

Today (March 23, 2020), Silicon Labs released the next generation of their Bluetooth SoCs: the EFR32BG22 chipset family.
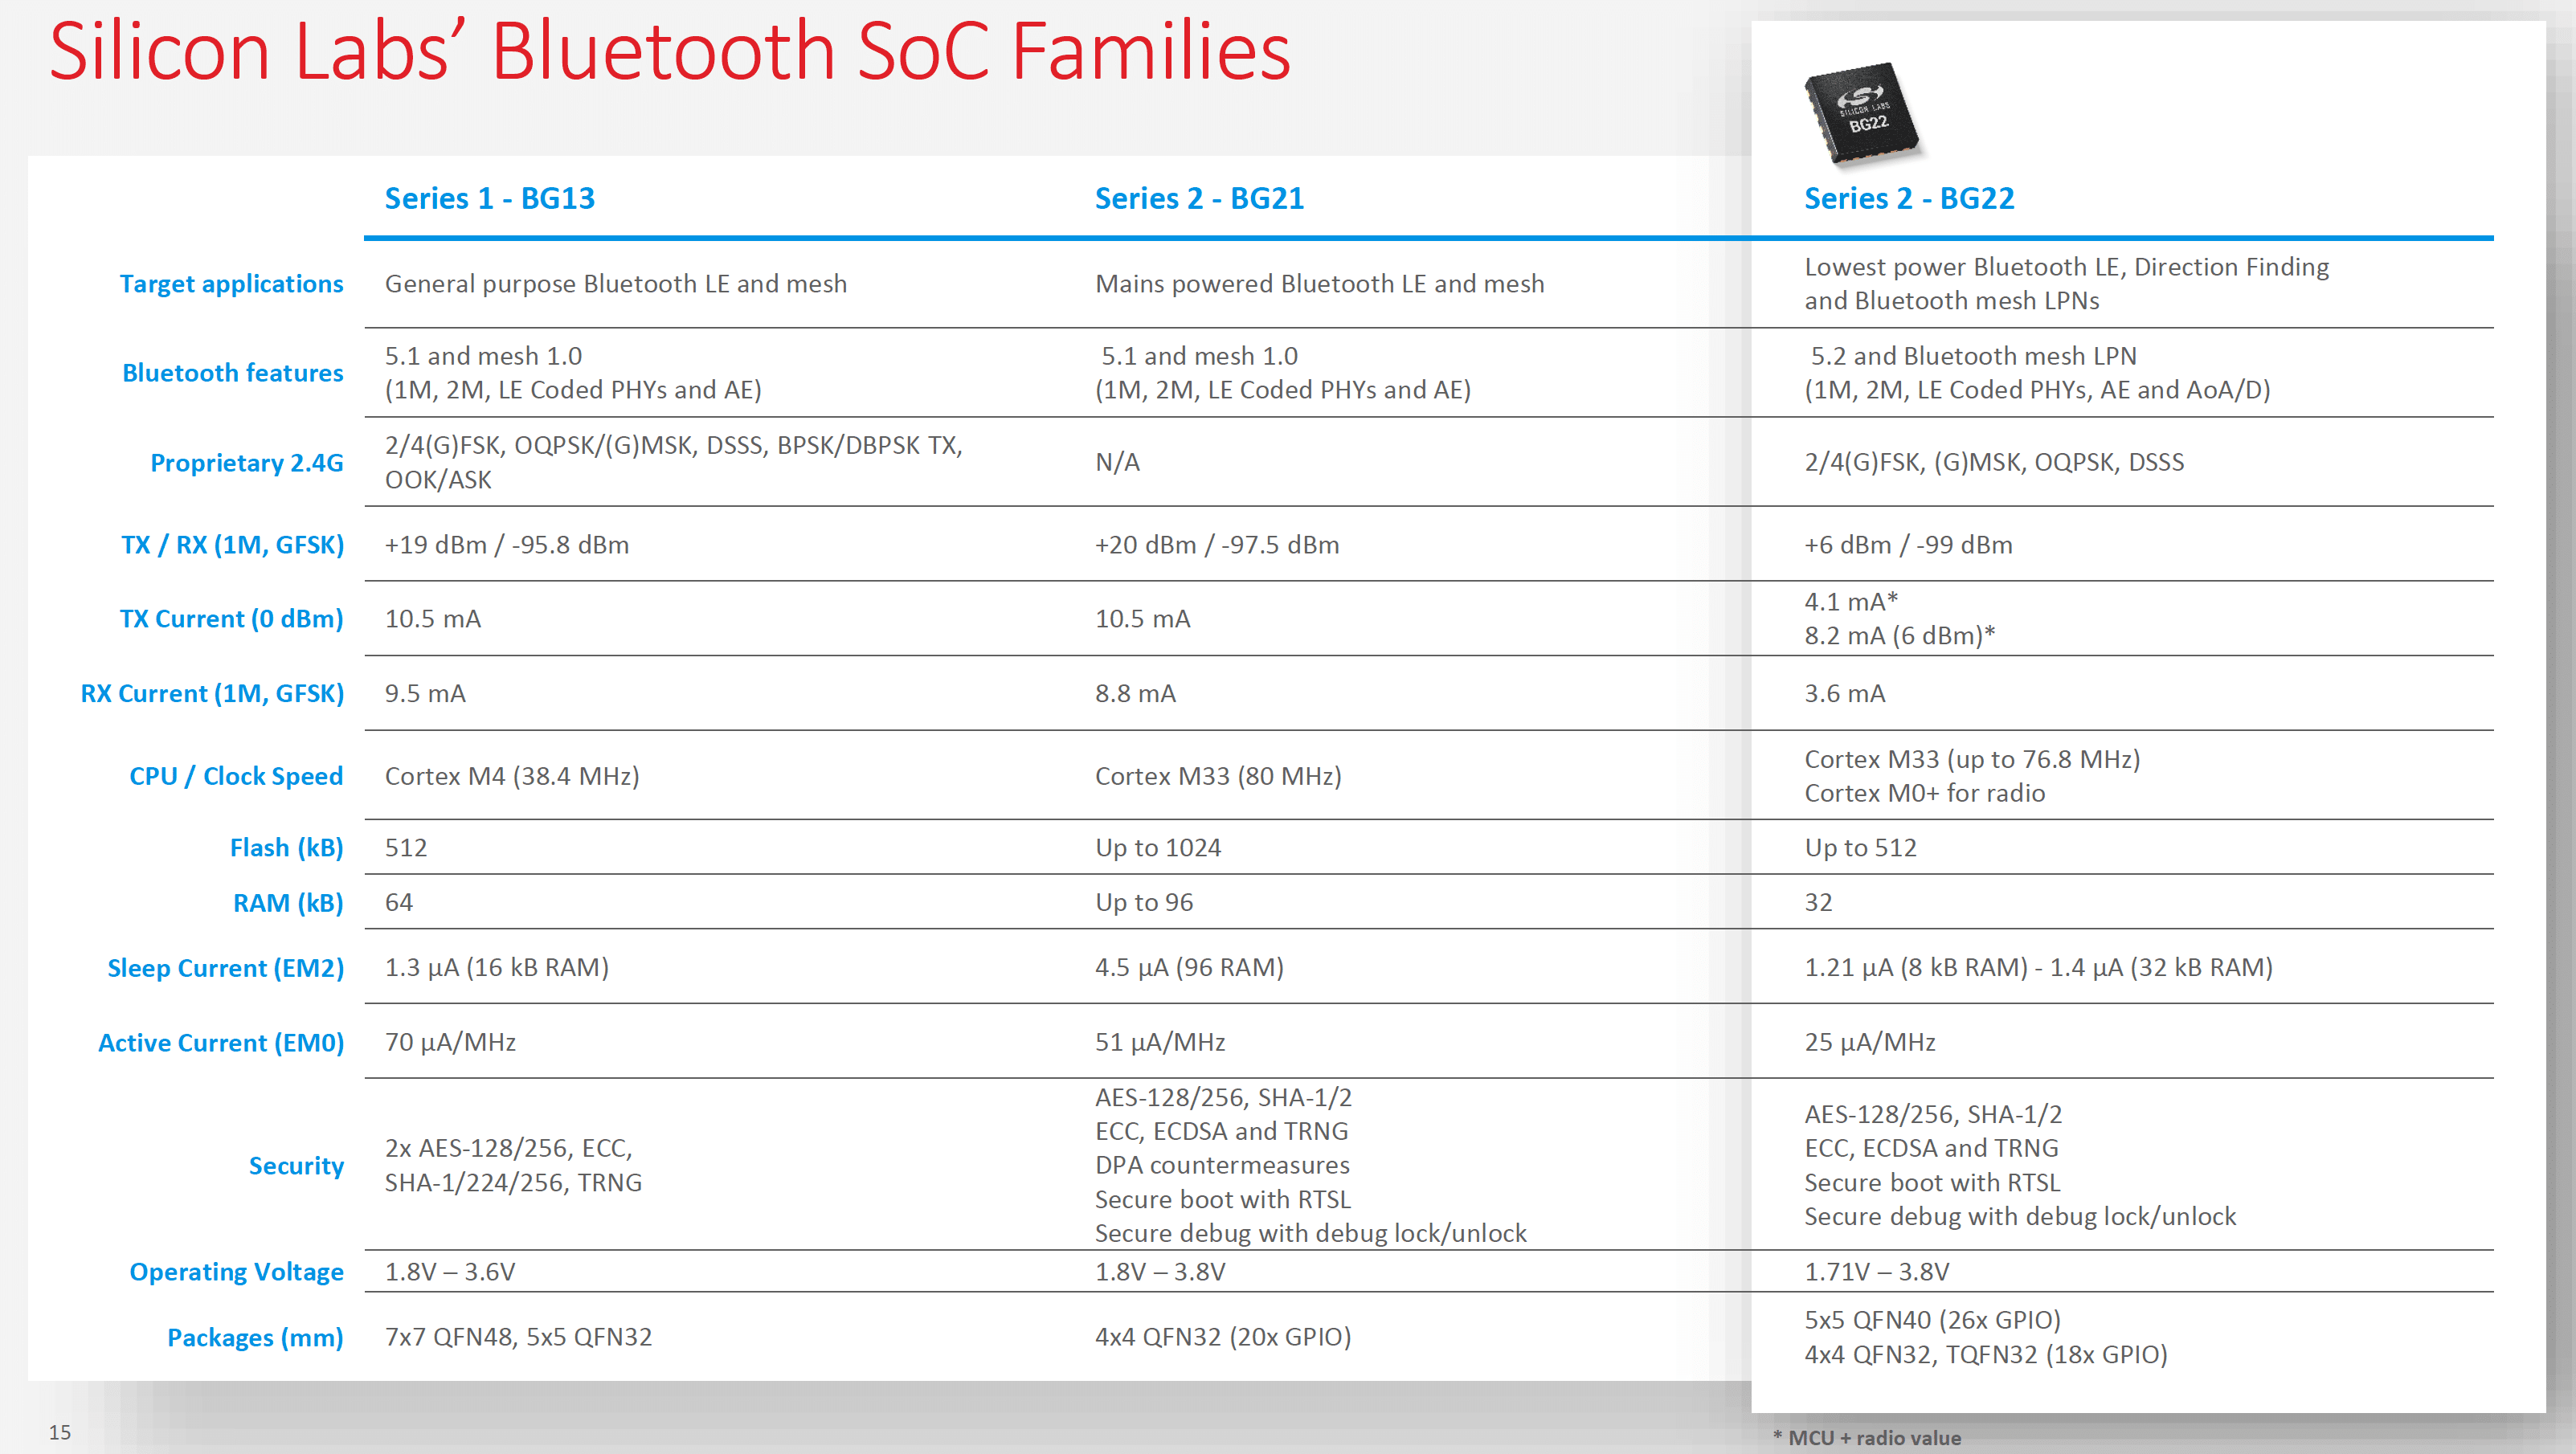
The chipset features an ARM Cortex-M33 which supports the latest version of Bluetooth: version 5.2 (including features from versions 5.1 and 5.0). More importantly, the chipset features the following enhancements:
- Significantly lower power consumption compared to the previous generations (up to 60% lower)
- Enhanced security features including a Hardware-Accelerated Crypto, a True Random Number Generator (TRNG), Secure Boot with Root of Trust and Secure Loader (RTSL), Secure Debug with Lock/Unlock, and ARM TrustZone.
Here's a table that provides a comparison of the new chipset and the previous generation:
So, as a Bluetooth LE developer, why should you care?
With the increased demand for securing embedded devices, especially those with wireless connectivity capabilities, this new generation of Silicon Labs Bluetooth chipsets provides an attractive platform for developing your next-generation Bluetooth LE product. This is especially applicable in applications that require low-power consumption and need to run on batteries for long periods of time.
Here are some examples of applications suitable for implementation based on the new BG22 chipset:
- Asset Tags and Beacons
- Consumer Electronics Remote Controls
- Portable Medical devices
- Bluetooth mesh Low Power Nodes (LPN)
- Sports, Fitness, and Wellness devices
- Connected Home devices
- Building Automation and Security applications
In terms of Bluetooth LE features, here are the main ones supported by the new chipset:
- LE Power Control (Bluetooth 5.2)
- GATT Caching (Bluetooth 5.1)
- 2M PHY and Coded PHY (Bluetooth 5)
- Extended Advertisements and Advertisement Sets (Bluetooth 5)
- Up to 8 simultaneous connections (mix of master or slave)
In collaboration with Silicon Labs, I was provided with early access to their SDK and development kit based on the new BG22 chipset.
In this post, I will guide you through setting up your development environment and getting started with your first BG22-based Bluetooth LE application.
Hardware and Software Requirements
Here's the list of hardware and software requirements for following this tutorial:
- EFR32xG22 Wireless Gecko Starter Kit (SLWSTK6021A)
- A mini USB cable (included with the development kit)
- A development PC (macOS, Linux, or Windows) – we'll be using macOS in this tutorial
- Silicon Labs Simplicity Studio IDE
- Included free GCC compiler – we'll be using this option in this tutorial
- IAR Embedded Work Bench for ARM (30-day eval license available)
Development Environment Setup
Let's go through the steps for setting up your development environment.
The first step is to install the Simplicity Studio IDE.
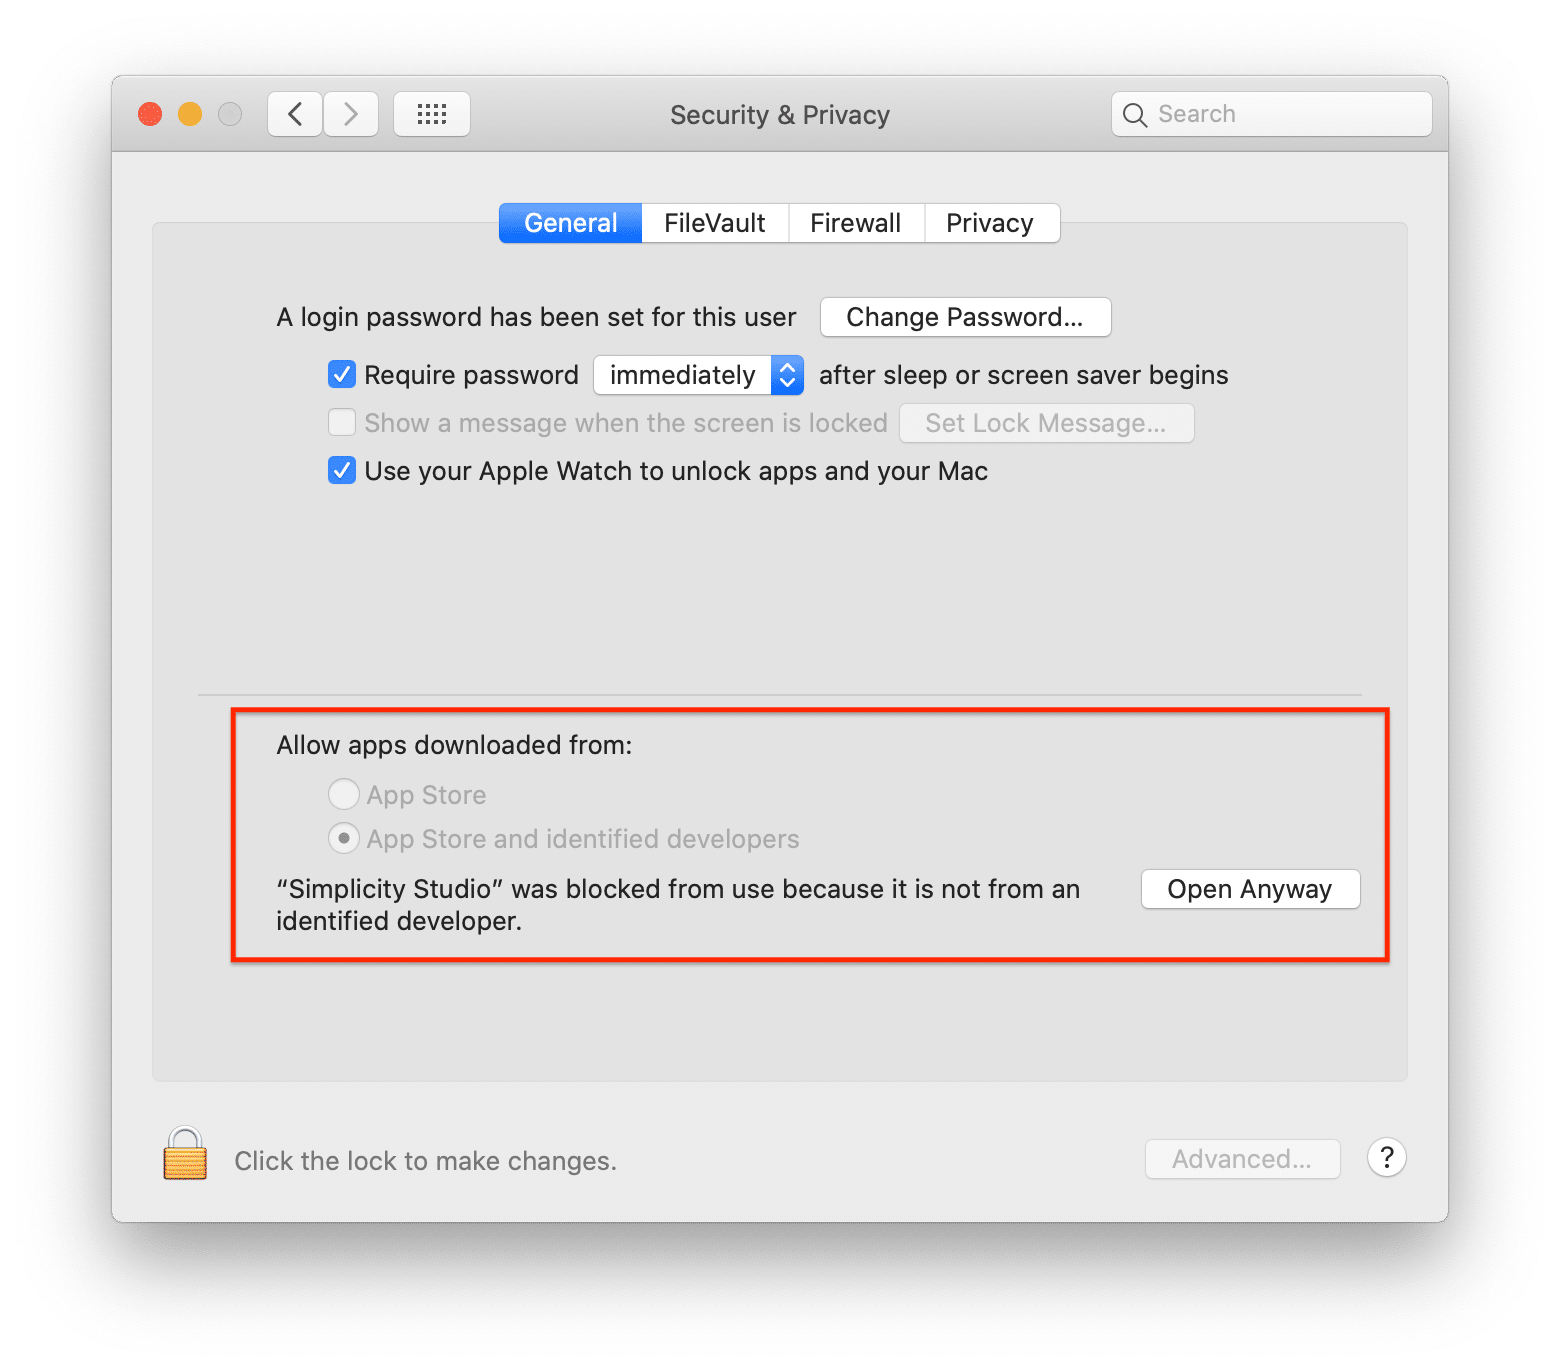
Once you've downloaded Simplicity Studio and installed it, you may run into an error that complains that the application not being secure to run. This issue can be fixed from within the Security settings under System Preferences and clicking on "Open Anyway".
After launching the application, you will be presented with a login screen. If you do not have a Silicon Labs account, you can sign up from this screen as well (or simply go to https://siliconlabs.my.site.com/apex/SL_CommunitiesSelfReg?form=short):

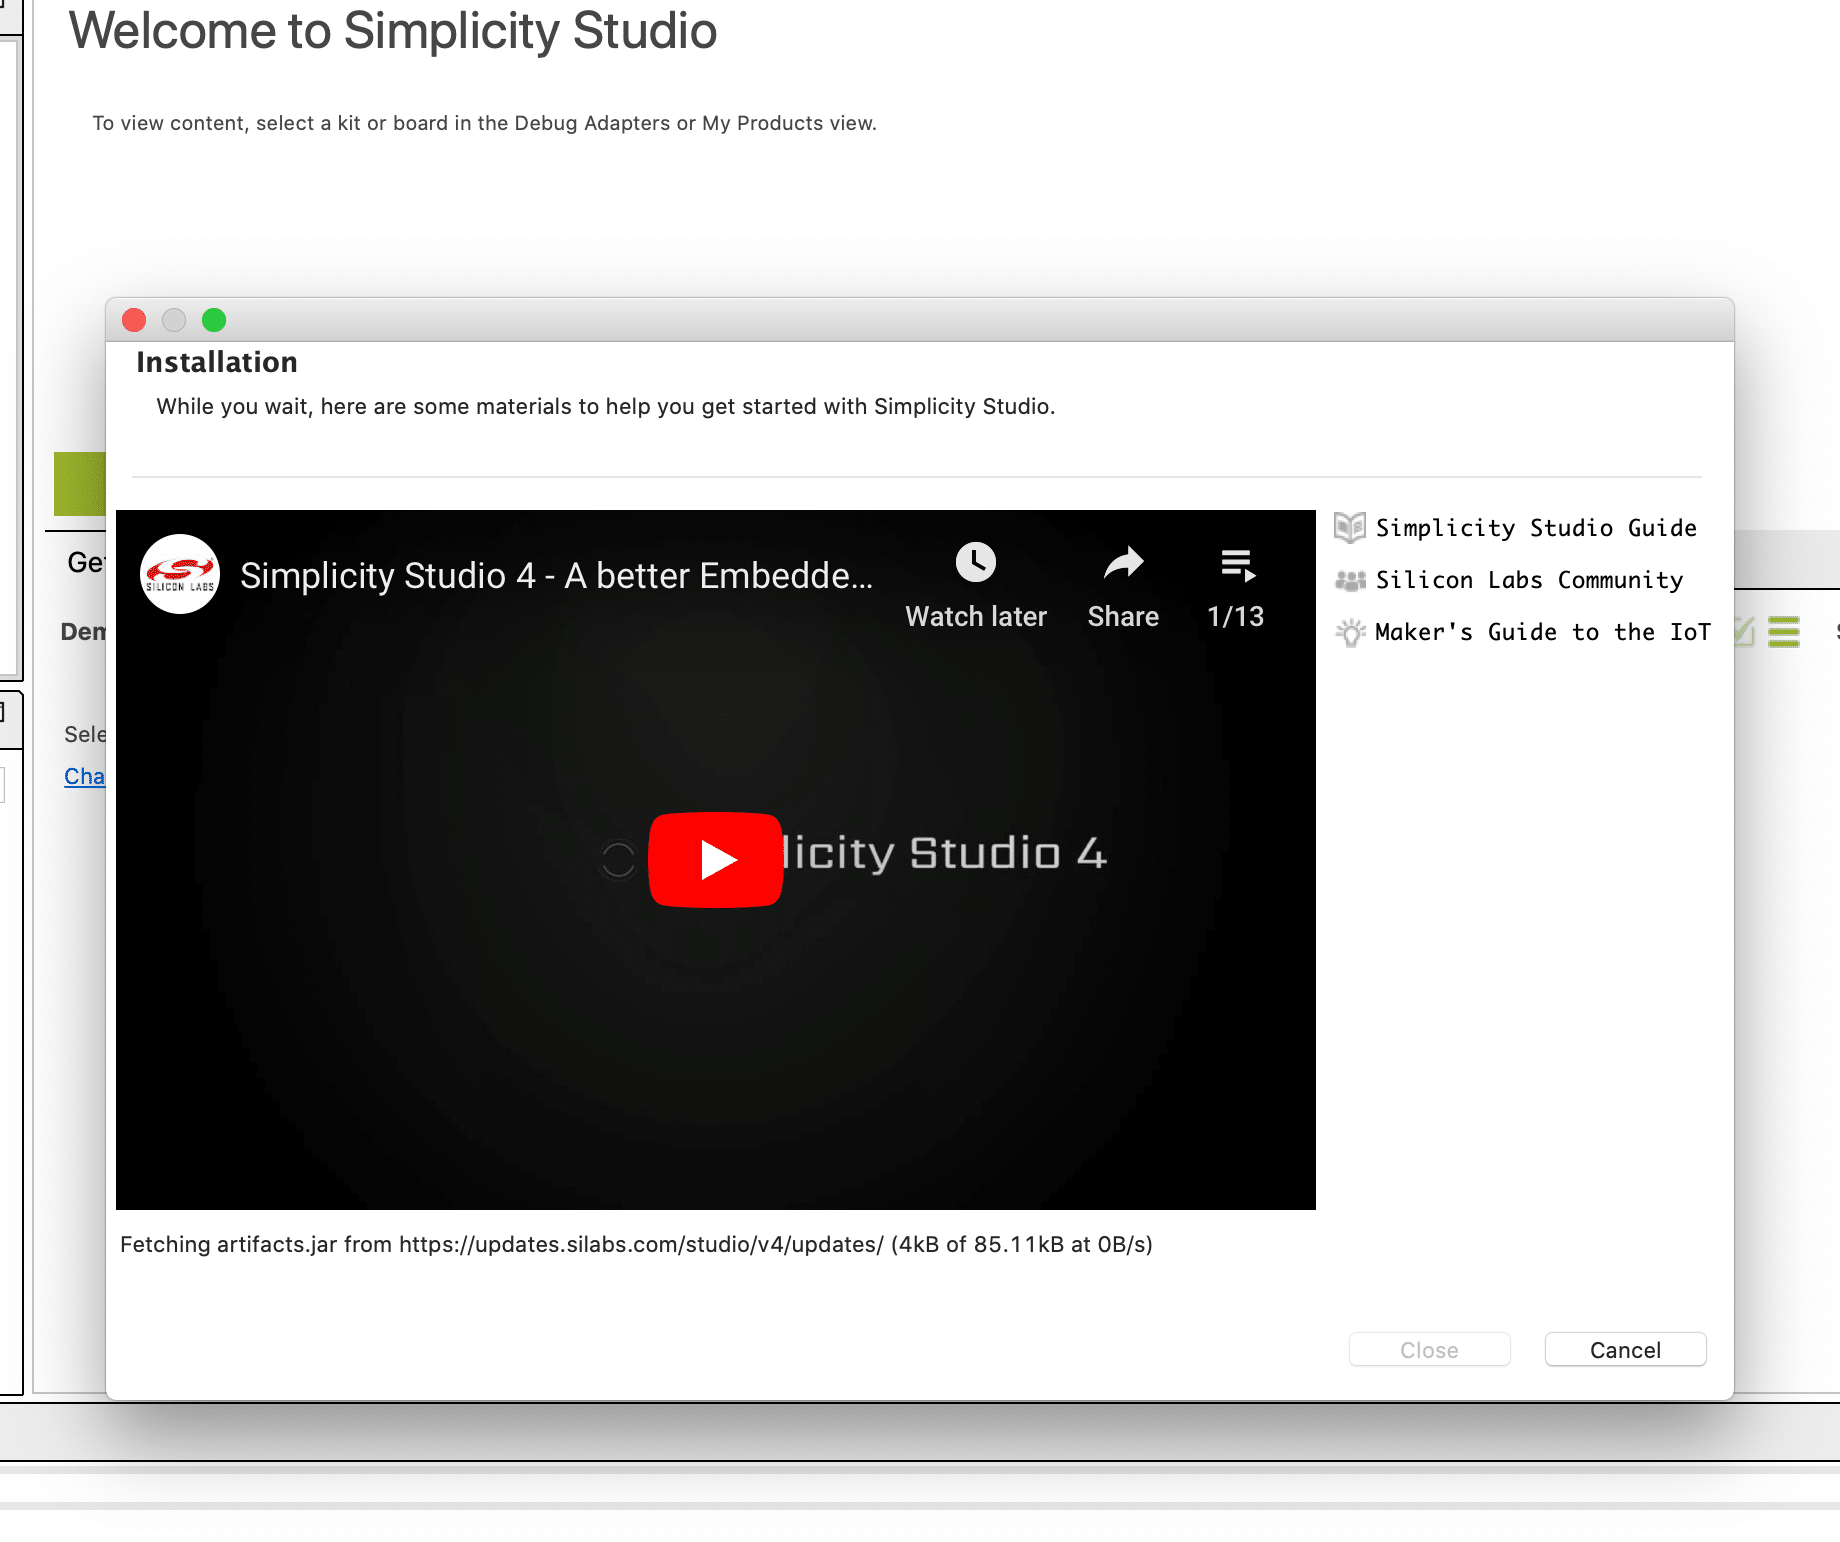
Once signed in, the application will check for software updates. It's recommended that you allow it to download and install these updates – this may take a few minutes.
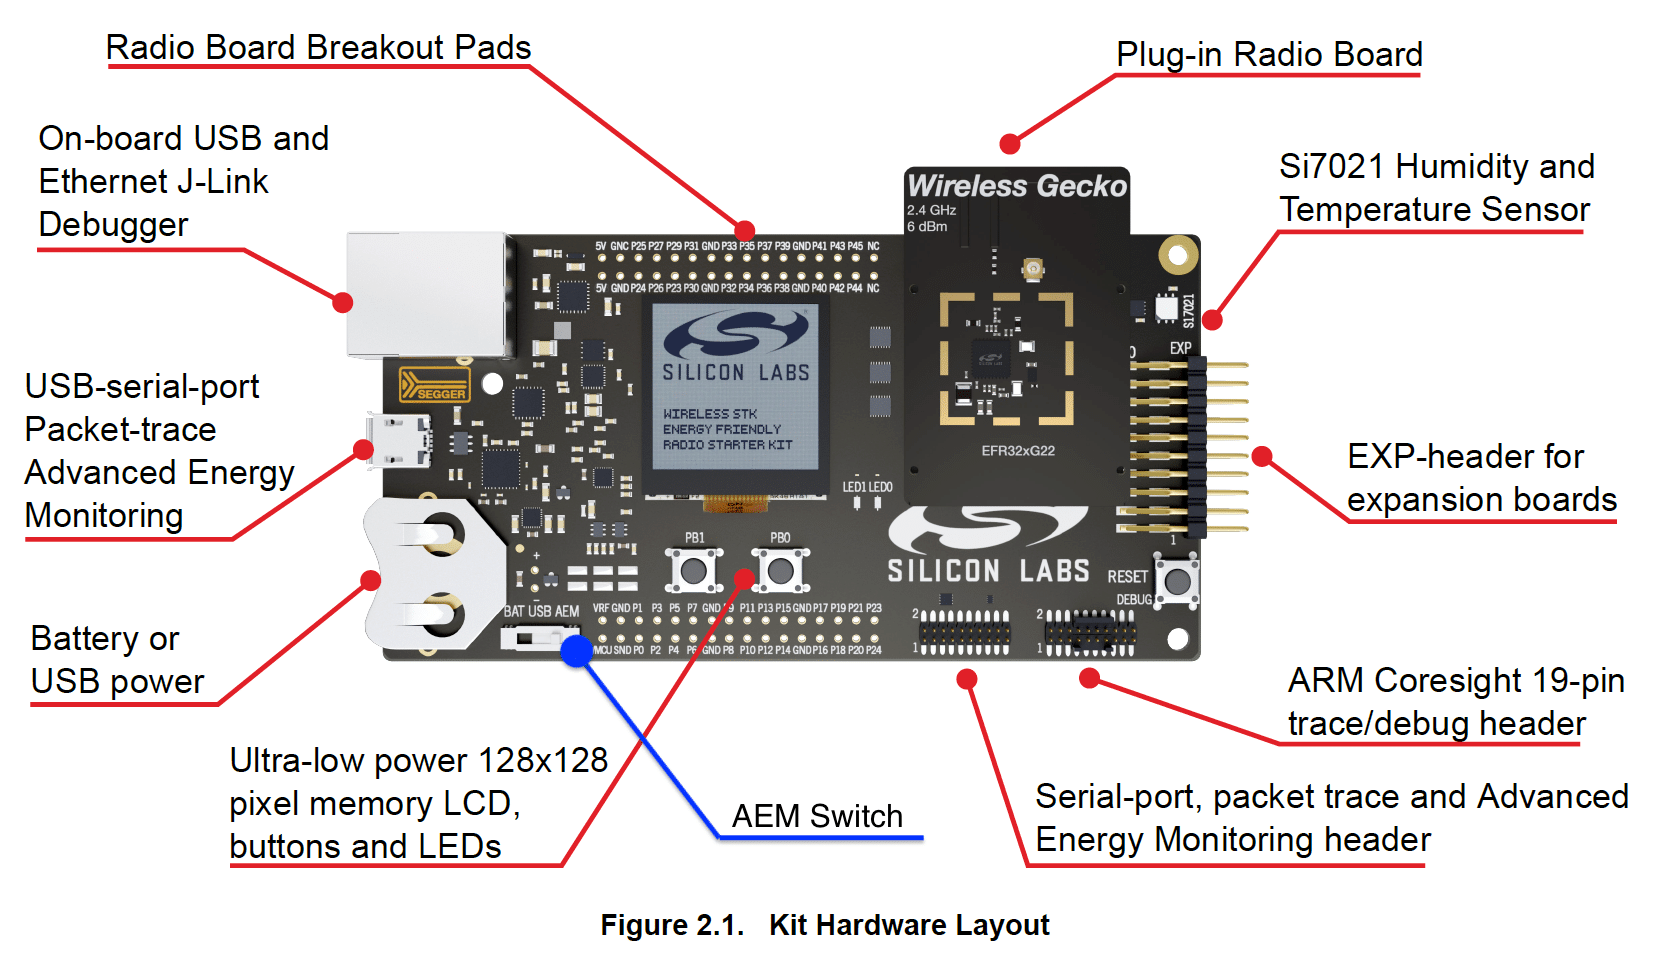
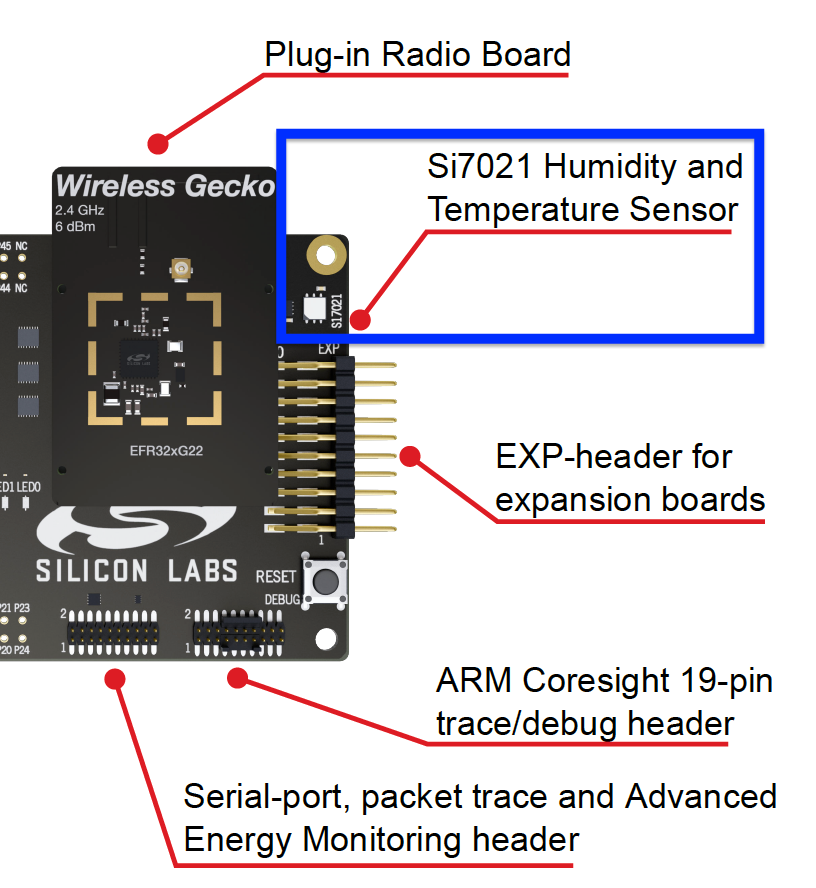
Once finished, the updates may require a restart of the application. After restarting, make sure you have the main development board with the radio board mounted and plugged into the development computer.
Make sure that the development board Power Switch is set to "AEM" (which stands for "Advanced Energy Monitor" and is necessary for using the energy profiler application) :
Now, click on the software update icon:

Once clicked, you will be presented with the following screen:
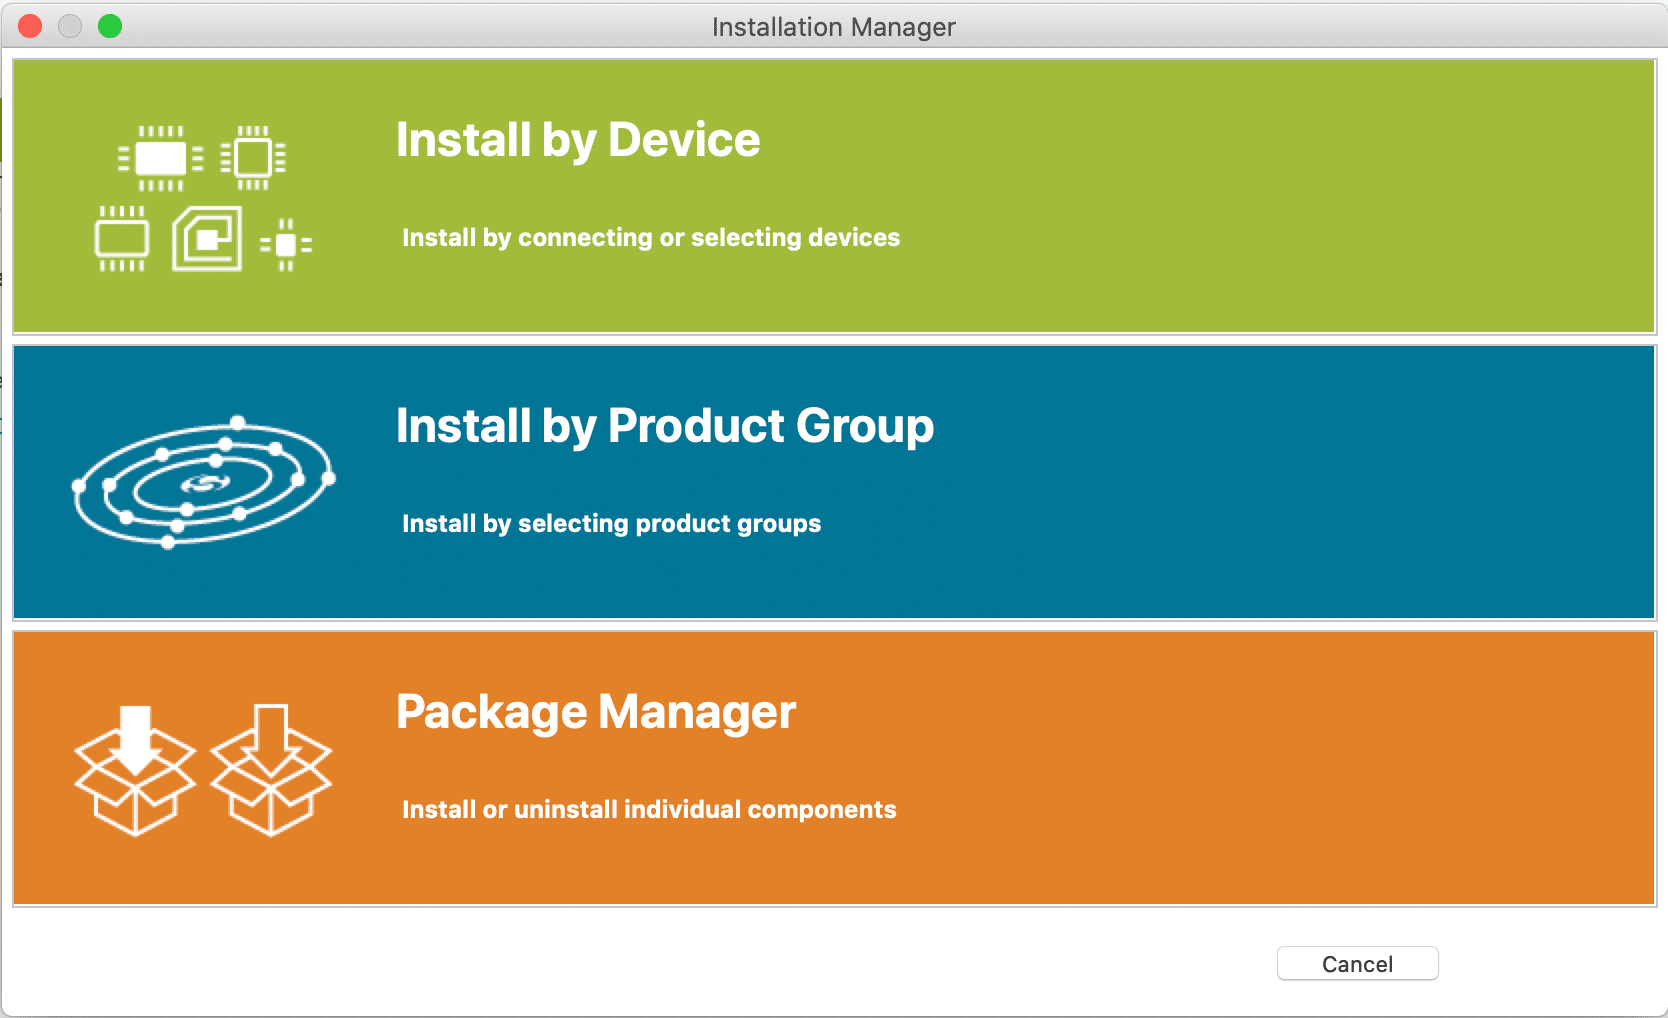
Since we are developing for a specific device (the BG22), the easiest method is to choose the "Install by Device" option:
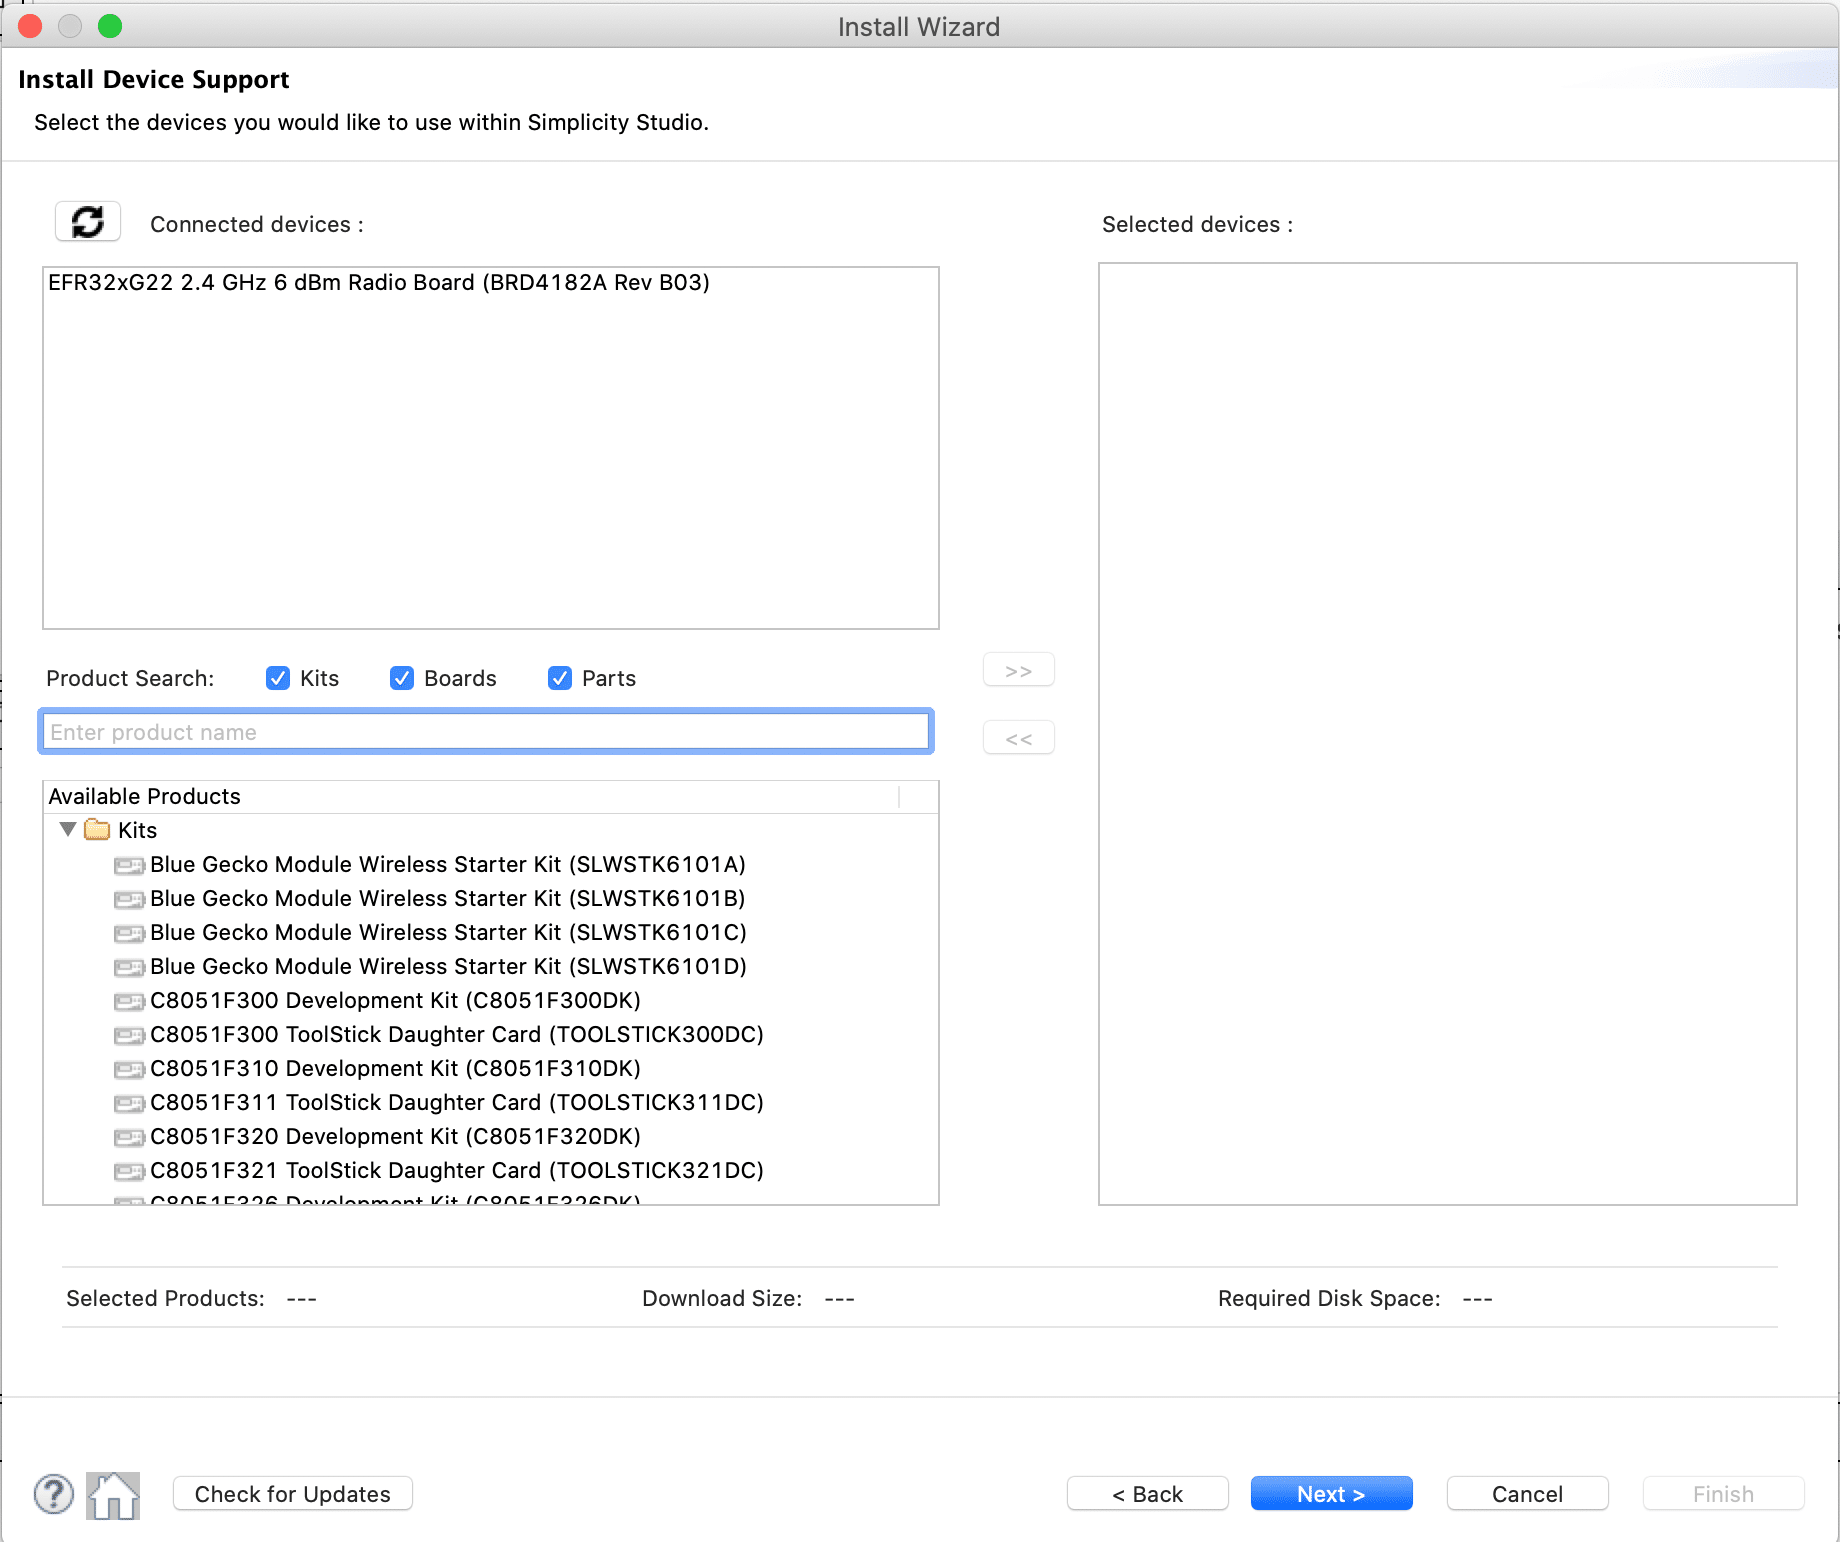
The application should detect the connected device (shown above). Click on the device, then on the ">>" button to add it to the "Selected devices:" section:
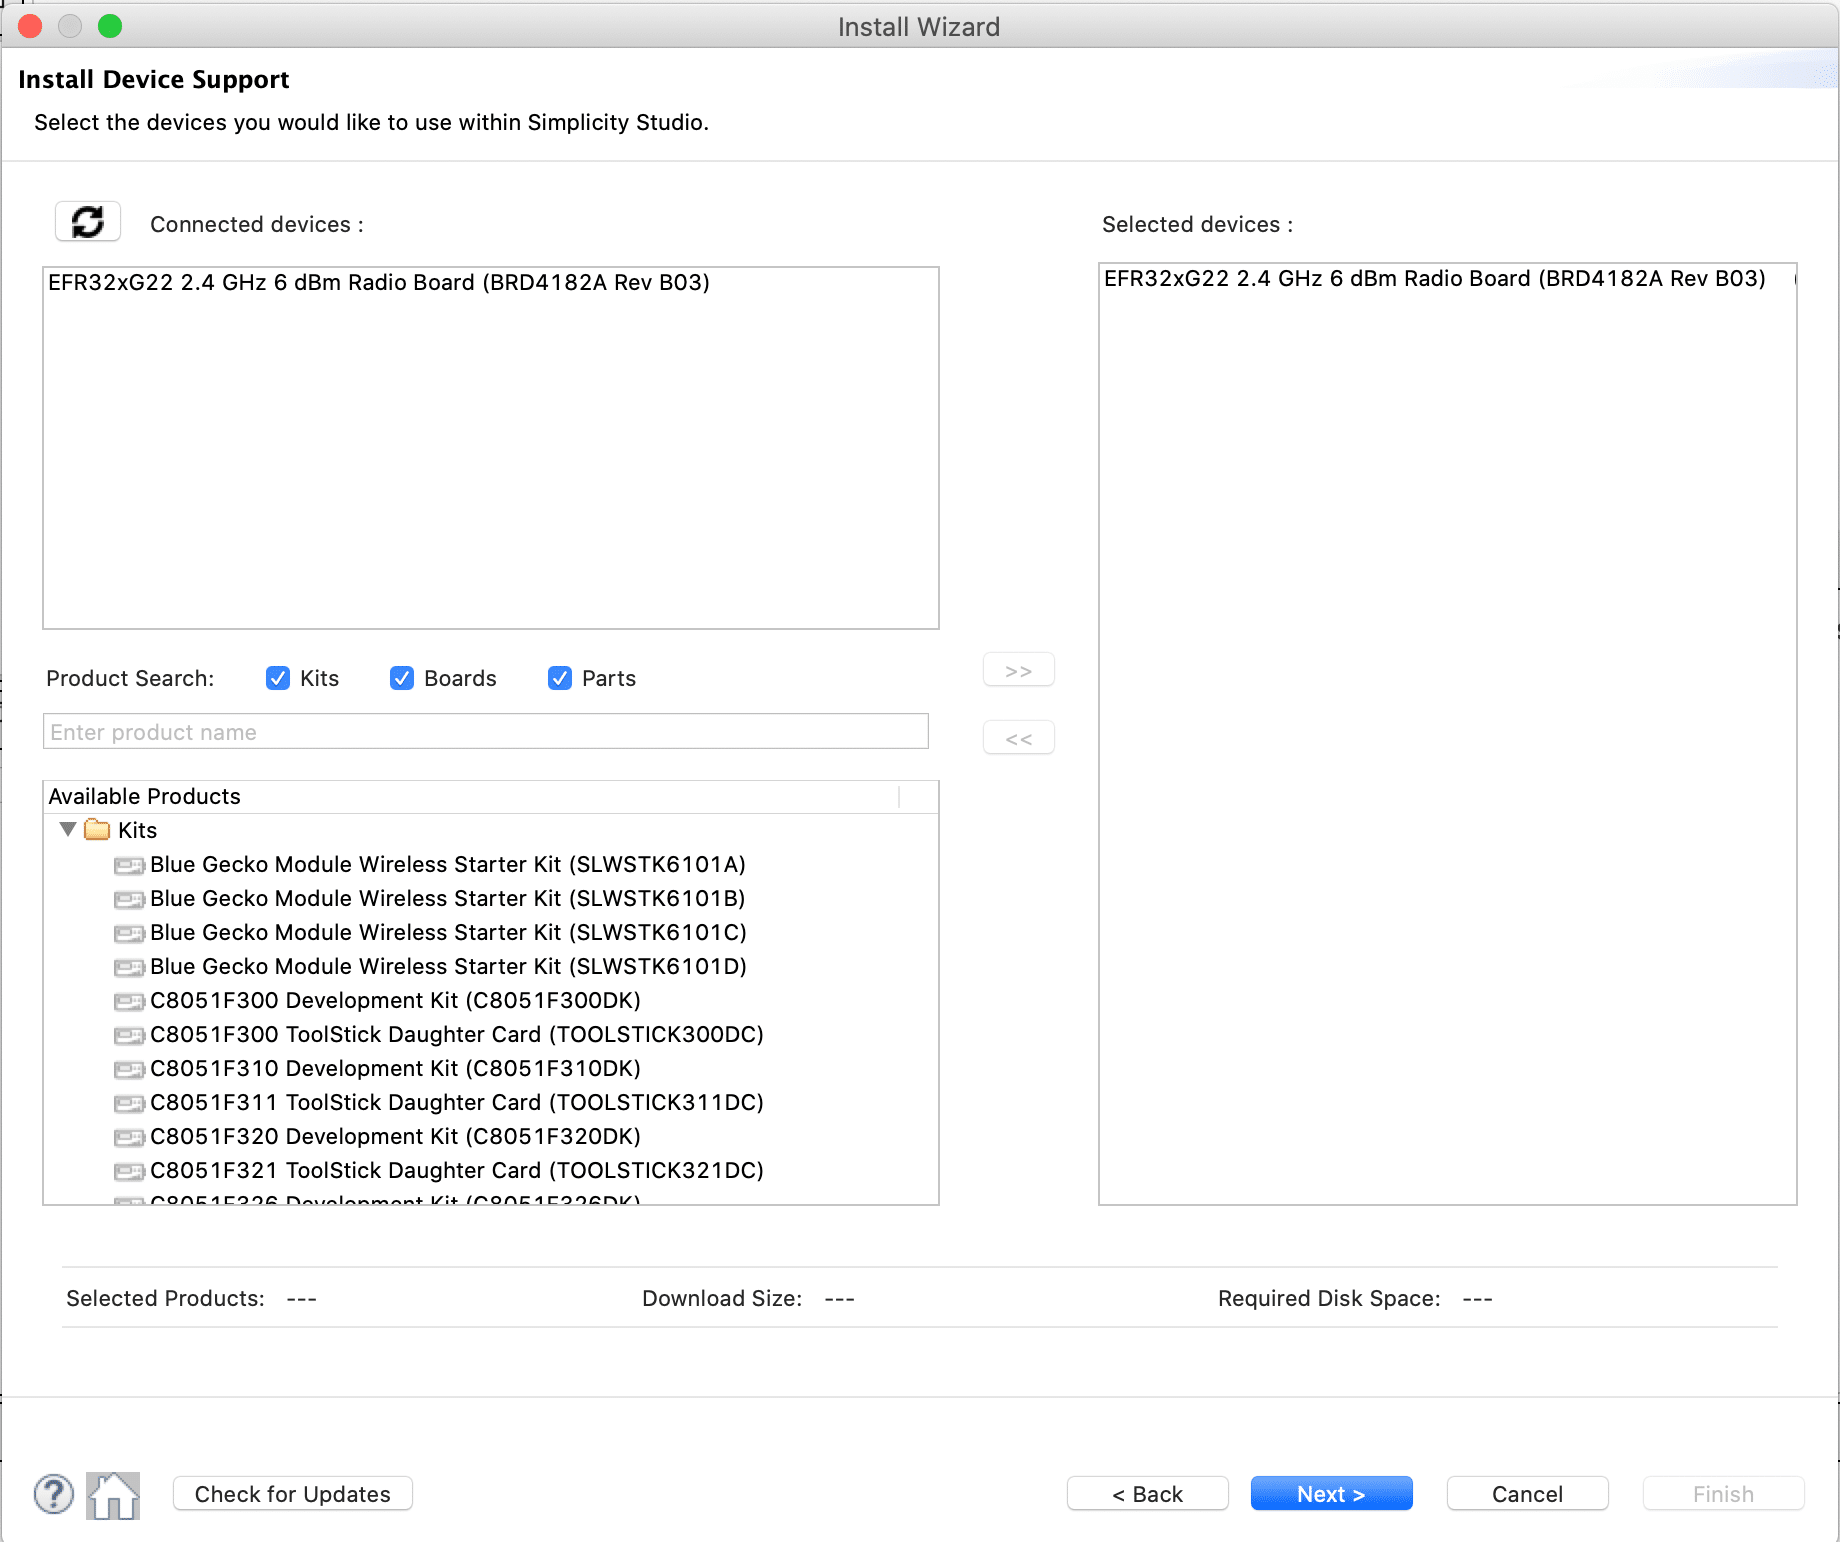
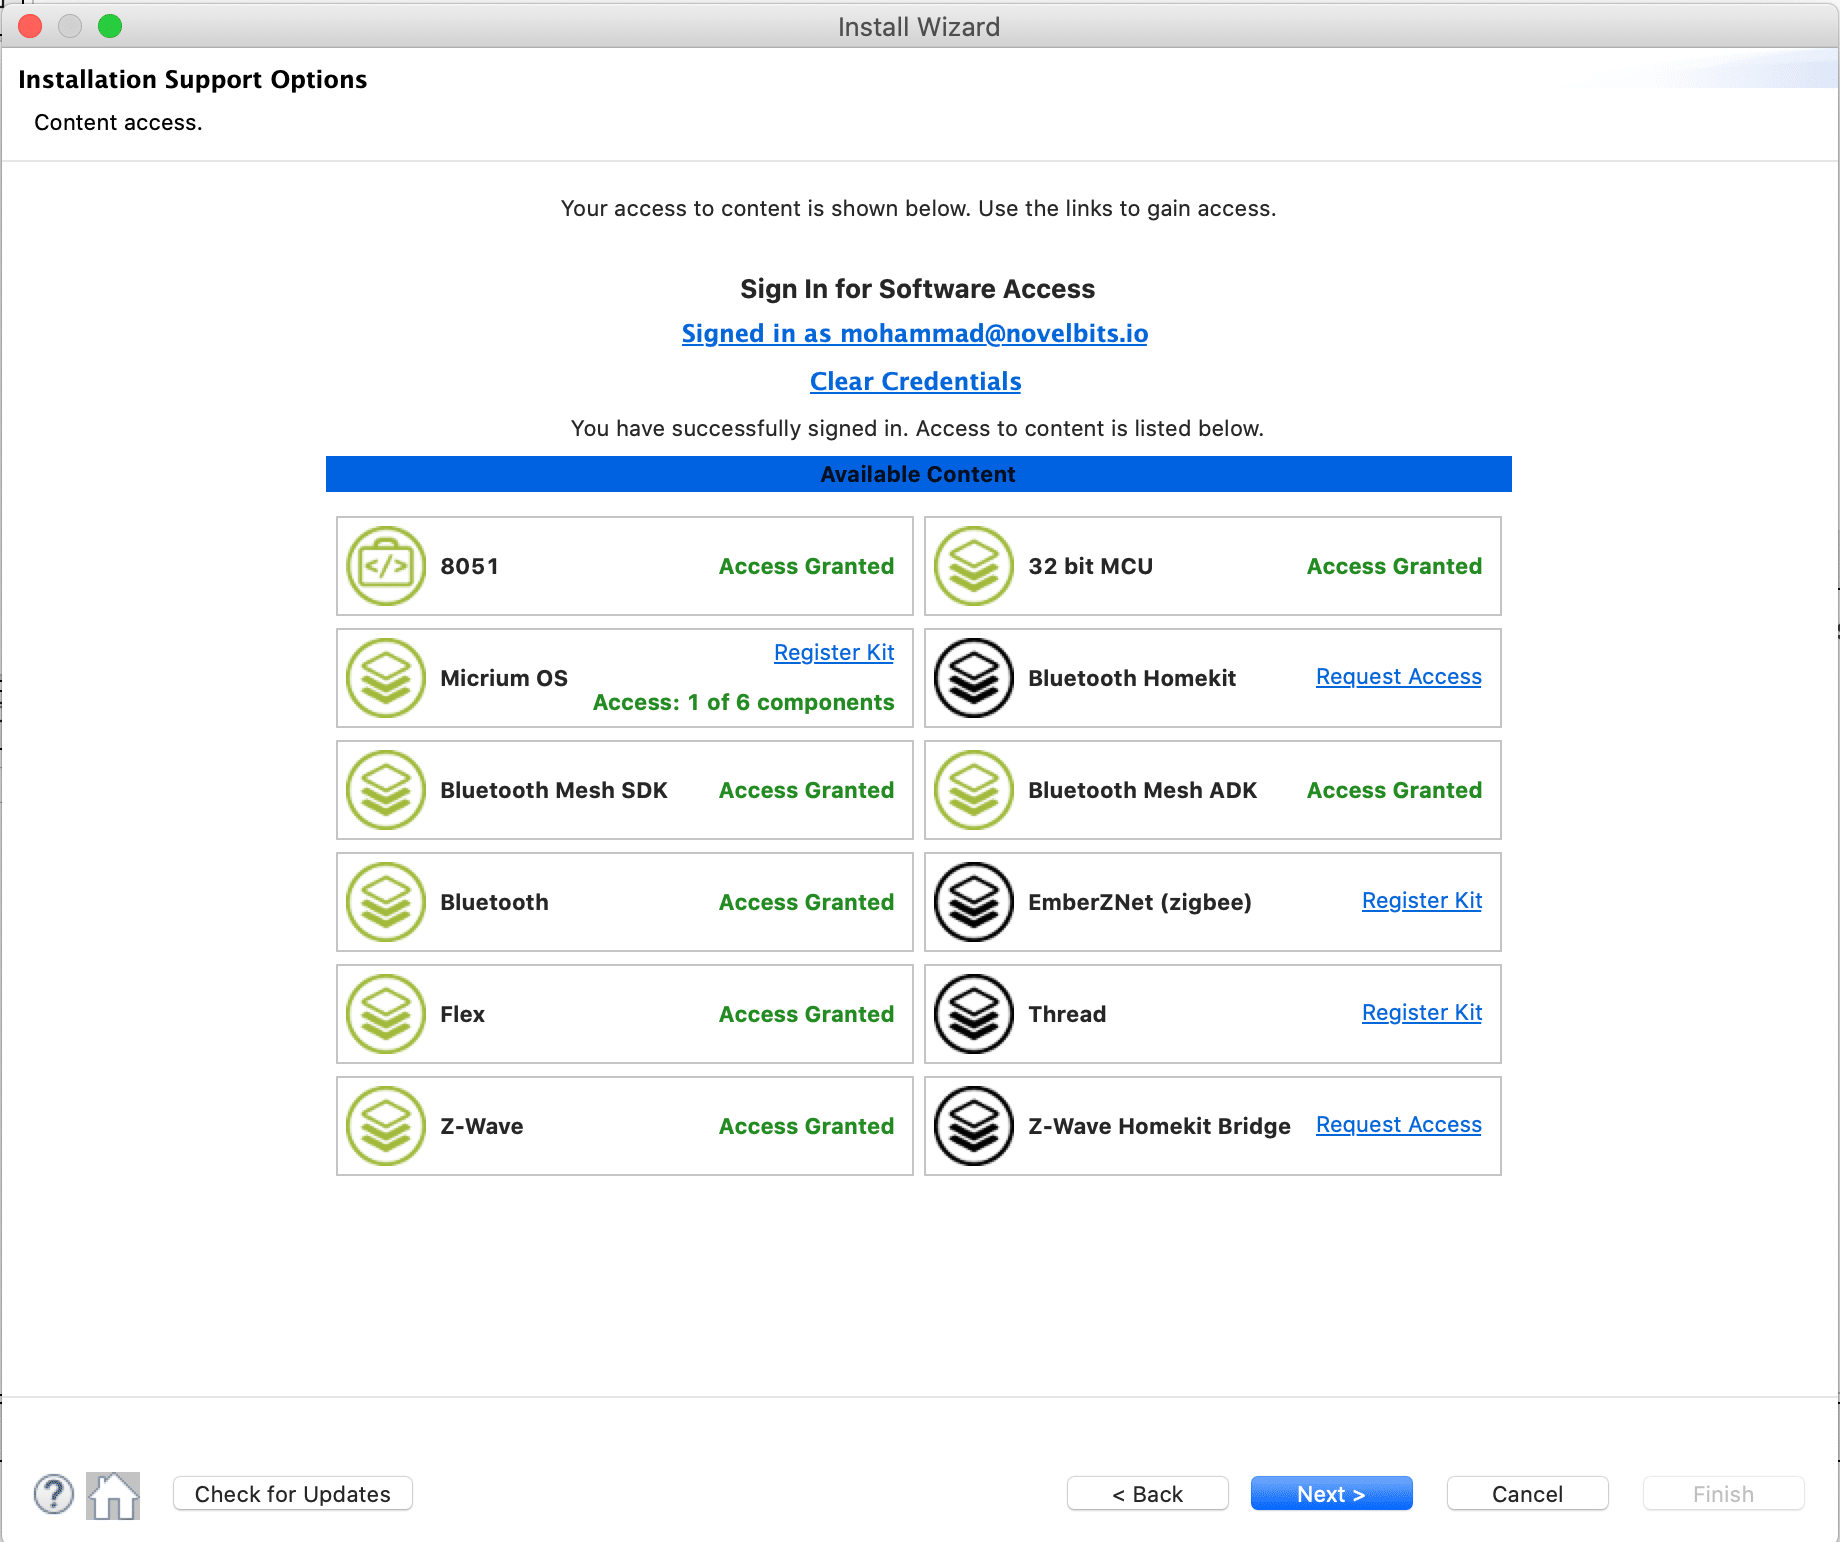
Click "Next" and make sure you have at least "Bluetooth" and "32 bit MCU" are selected:
Press "Next" again, and make sure the latest "Bluetooth SDK" is selected (I have the "32 bit MCU SDK" package selected as well, but that is not required):
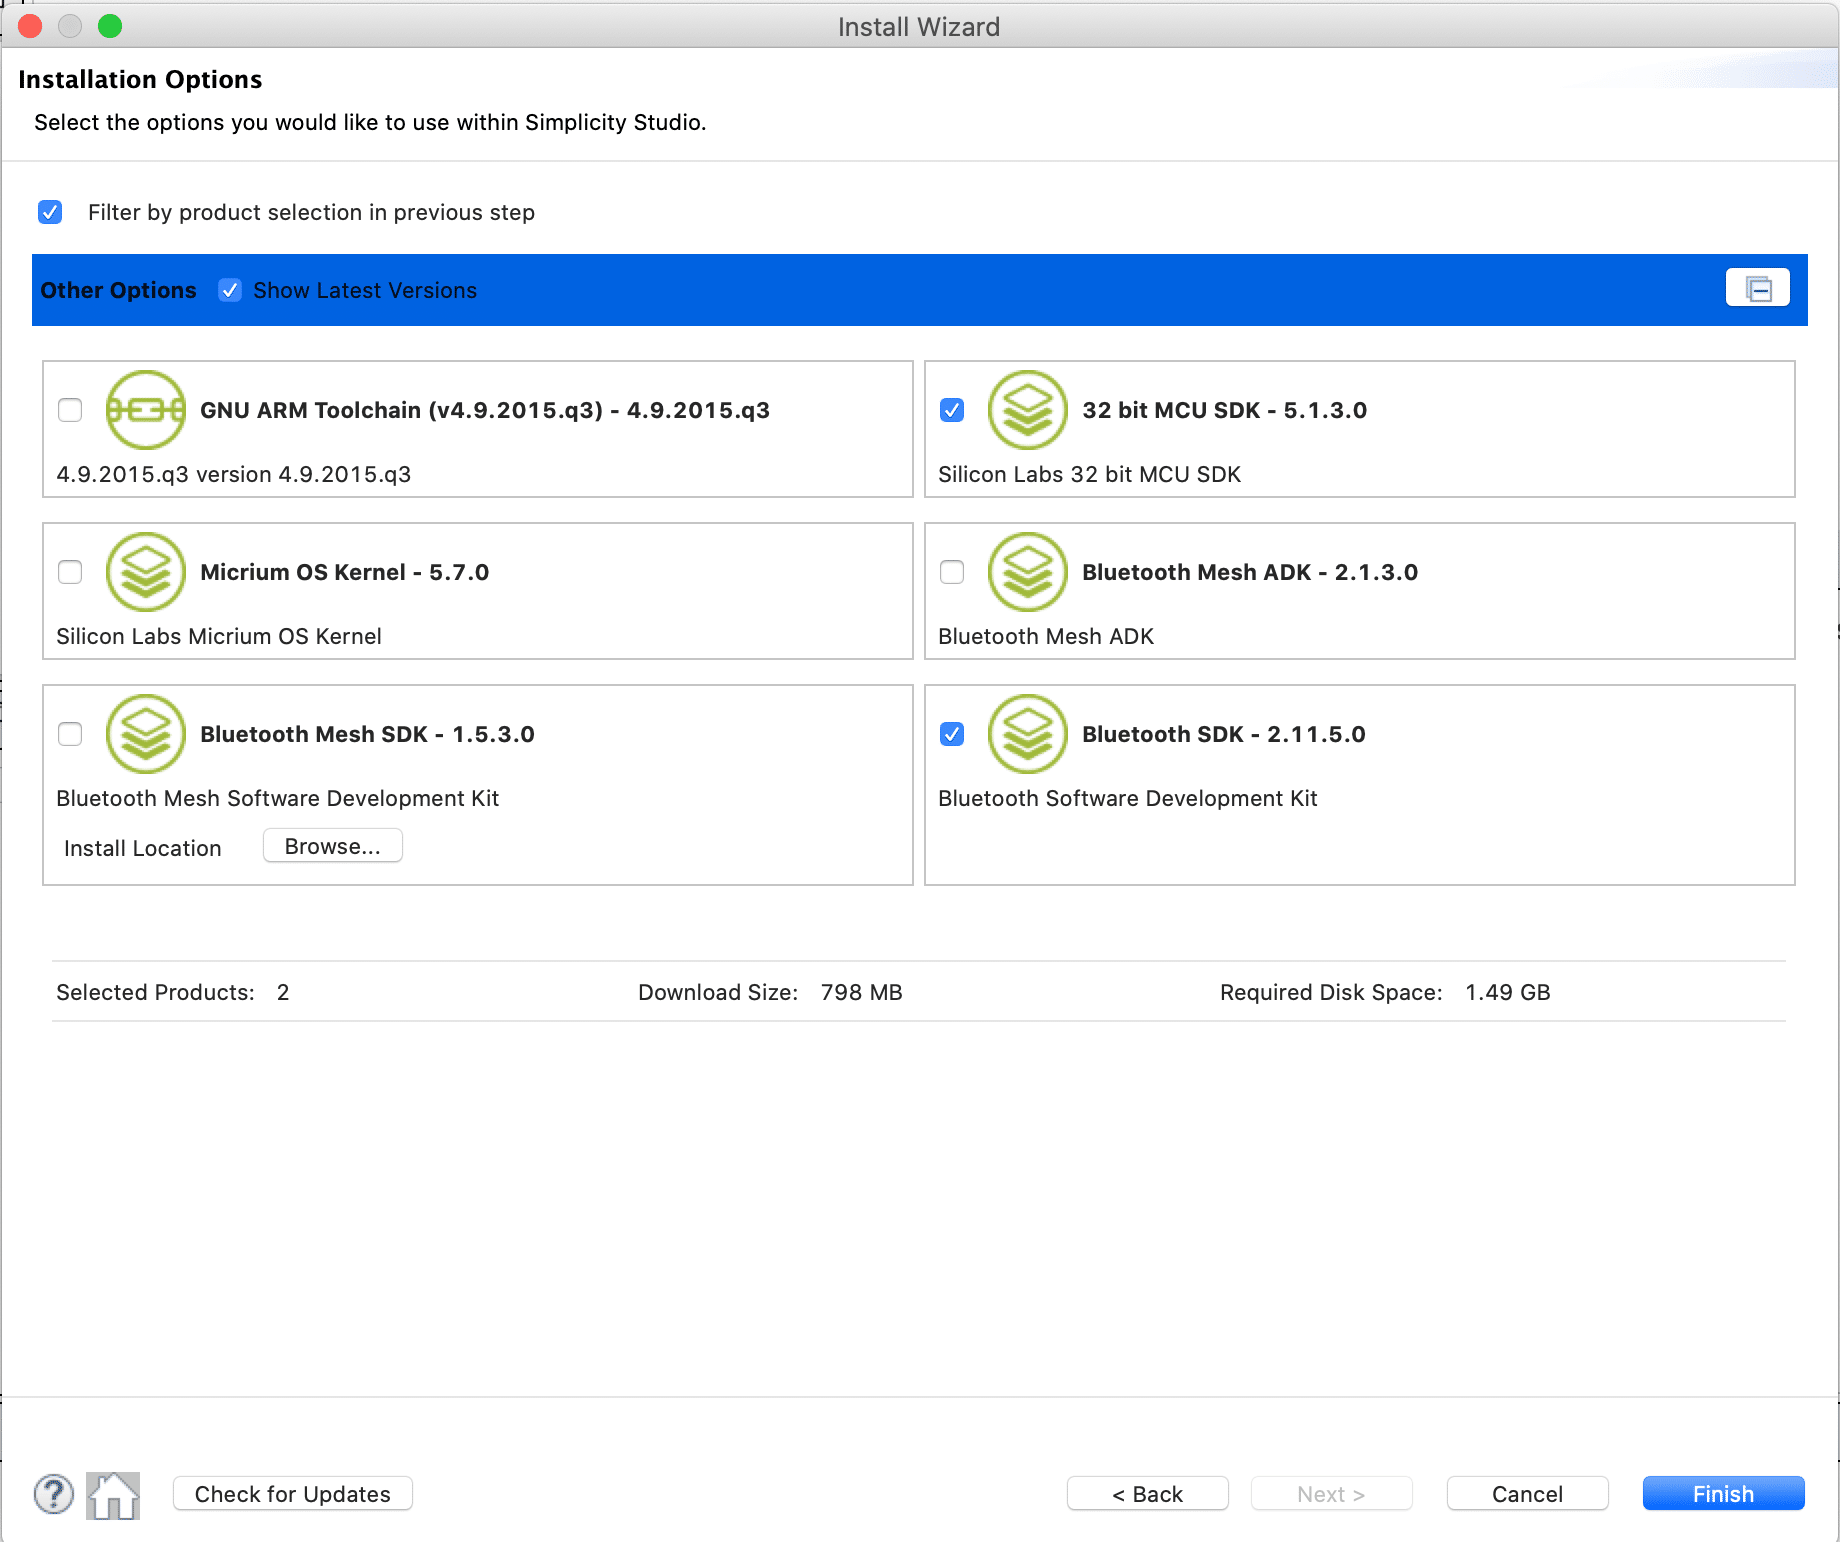
Press "Next" again and wait for the installation to finish. This will likely take a few minutes.
Once the installation is finished, click the "Close" button – a restart of the application may be required.
Running a Bluetooth LE Peripheral Example
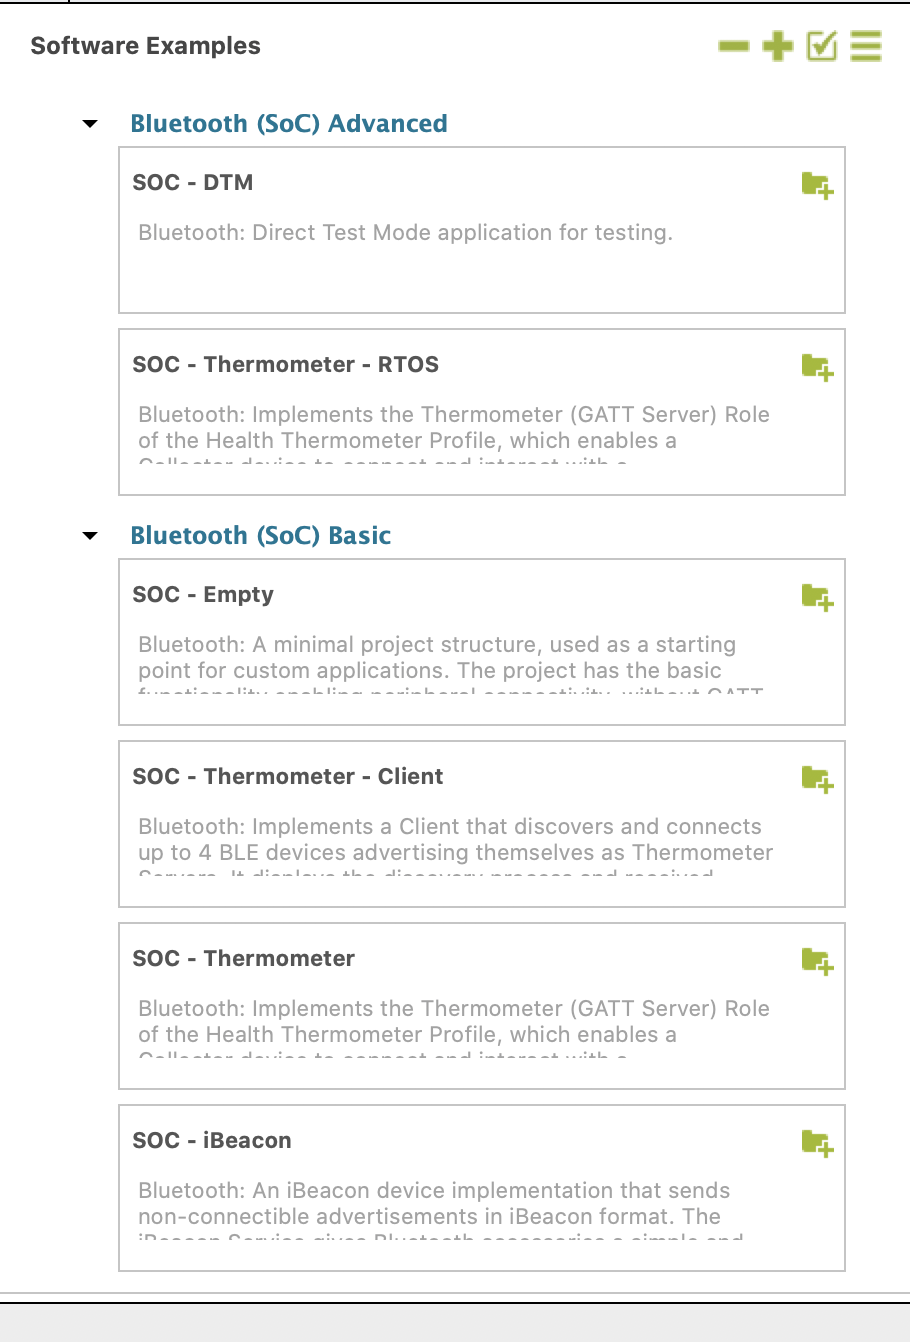
The Silicon Labs Bluetooth SDK includes a few examples that you can run on the board. Let's take a look at the different examples included:
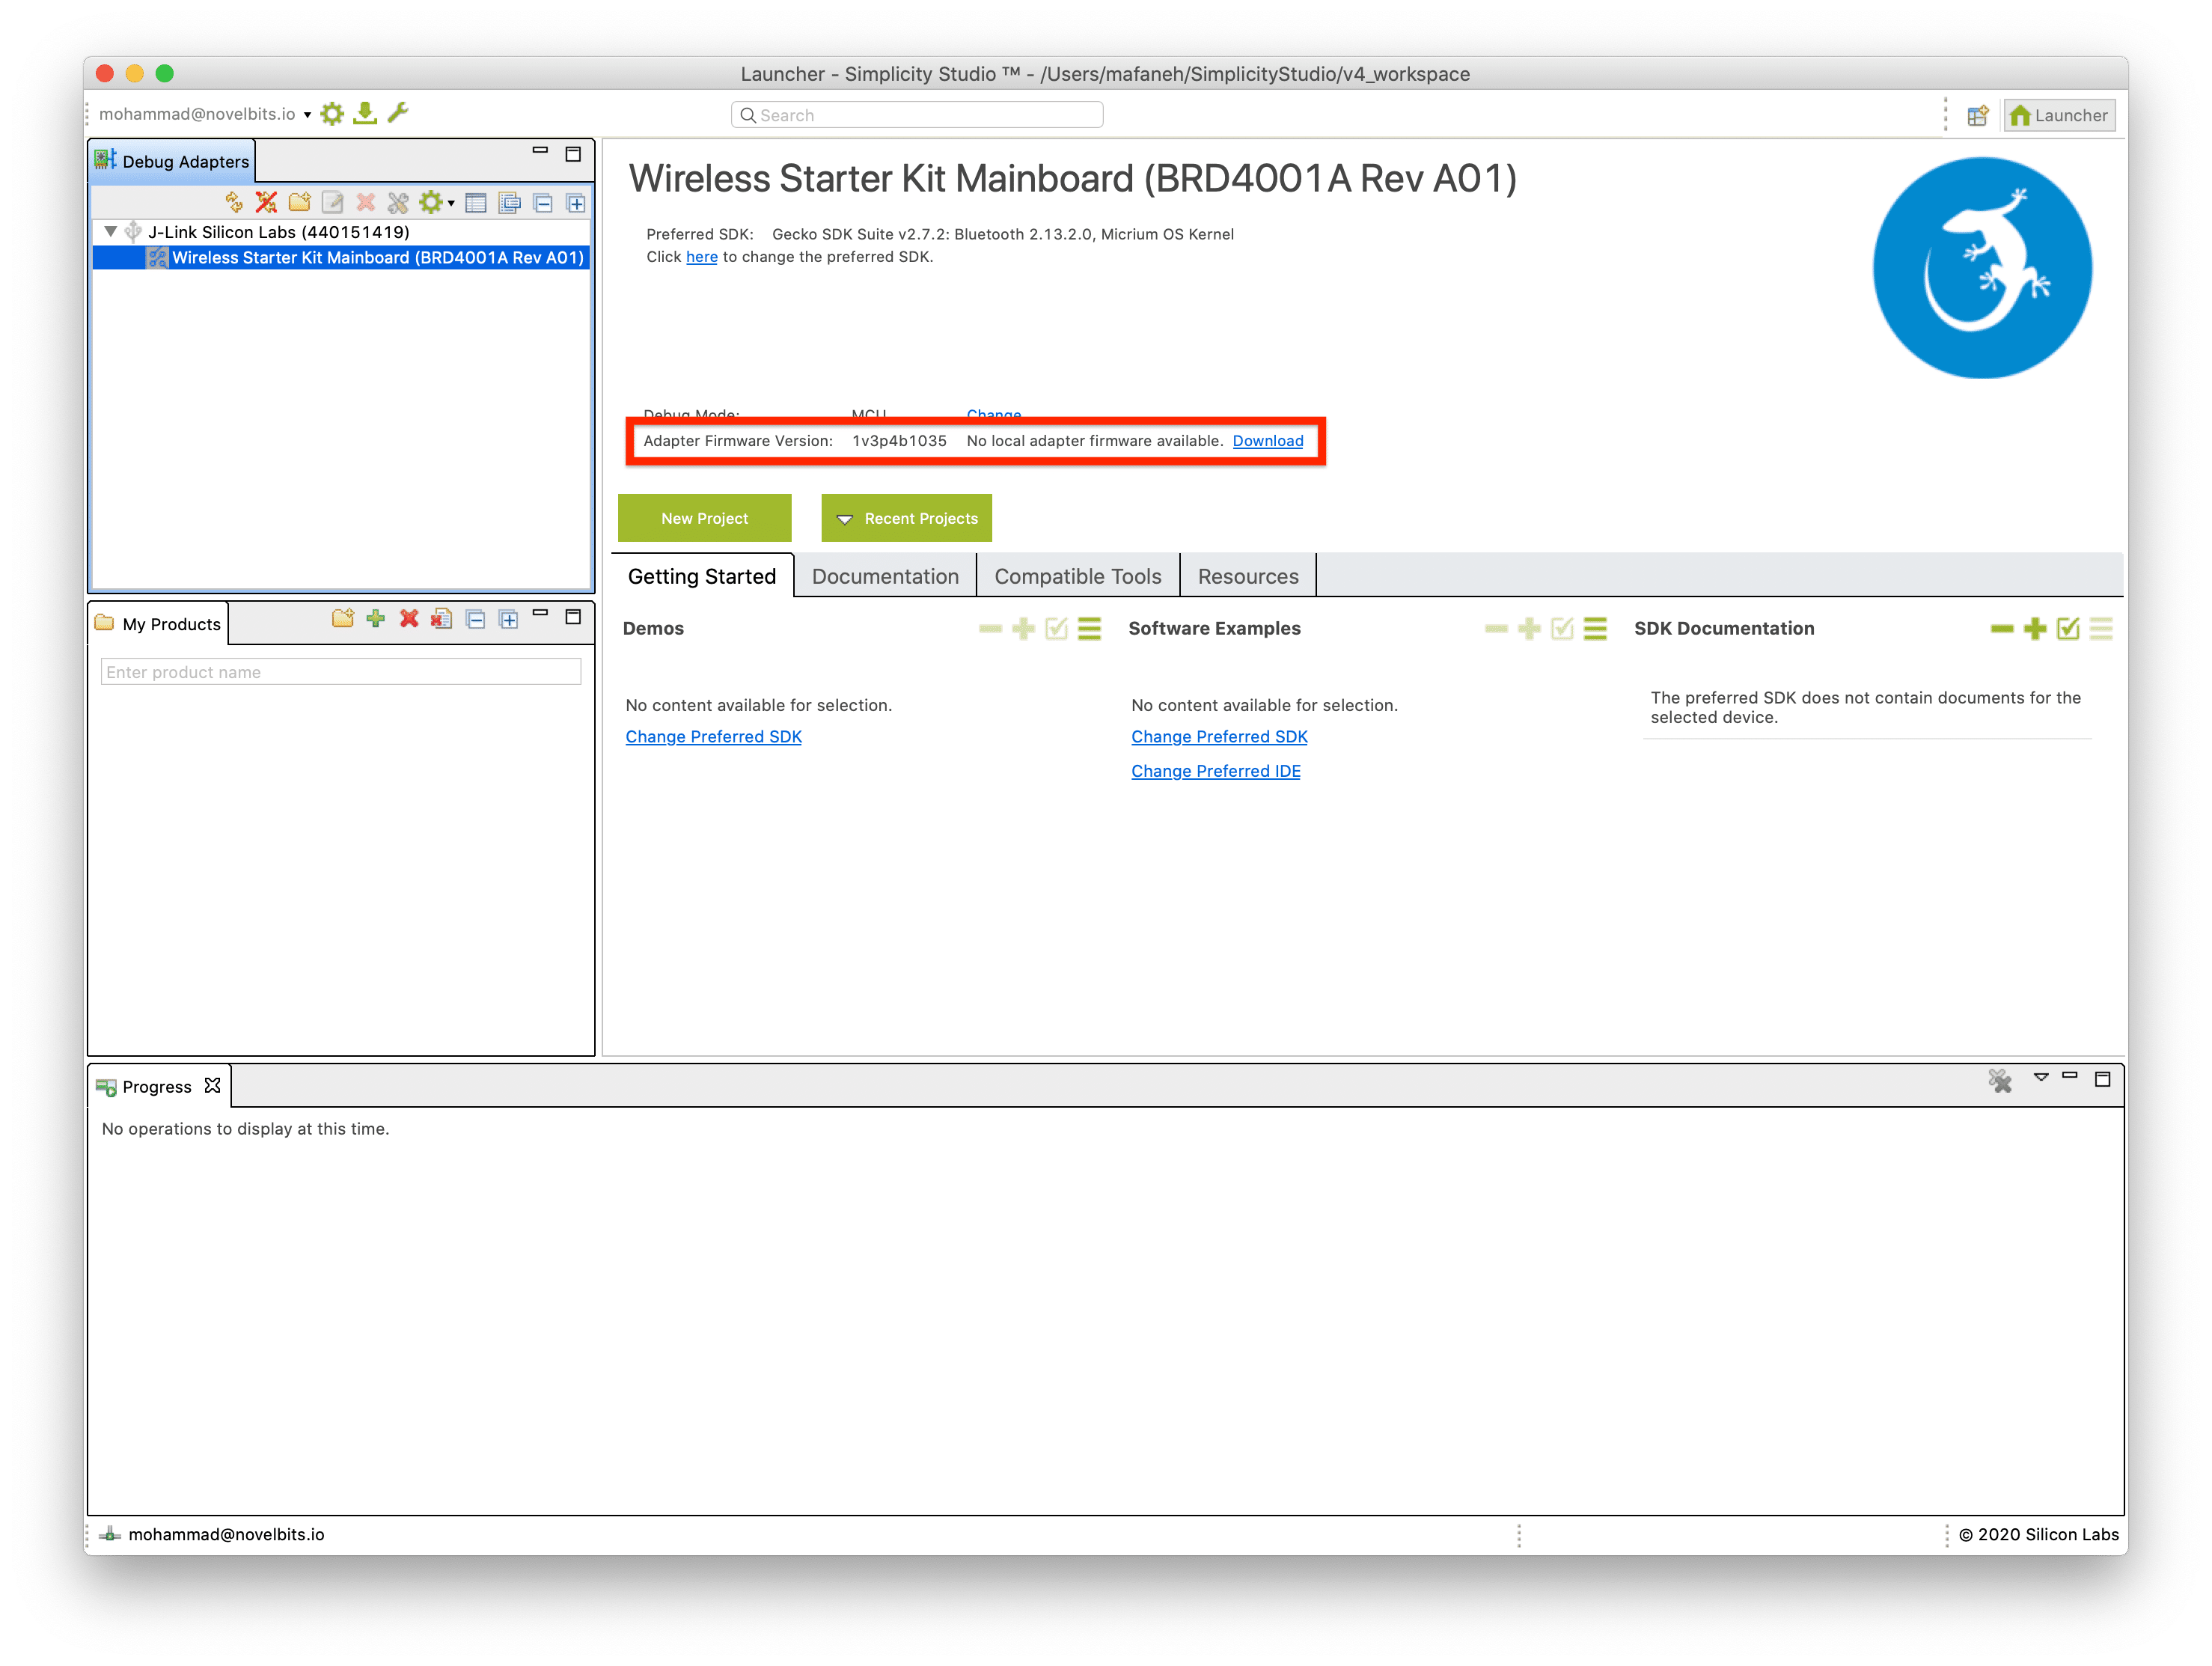
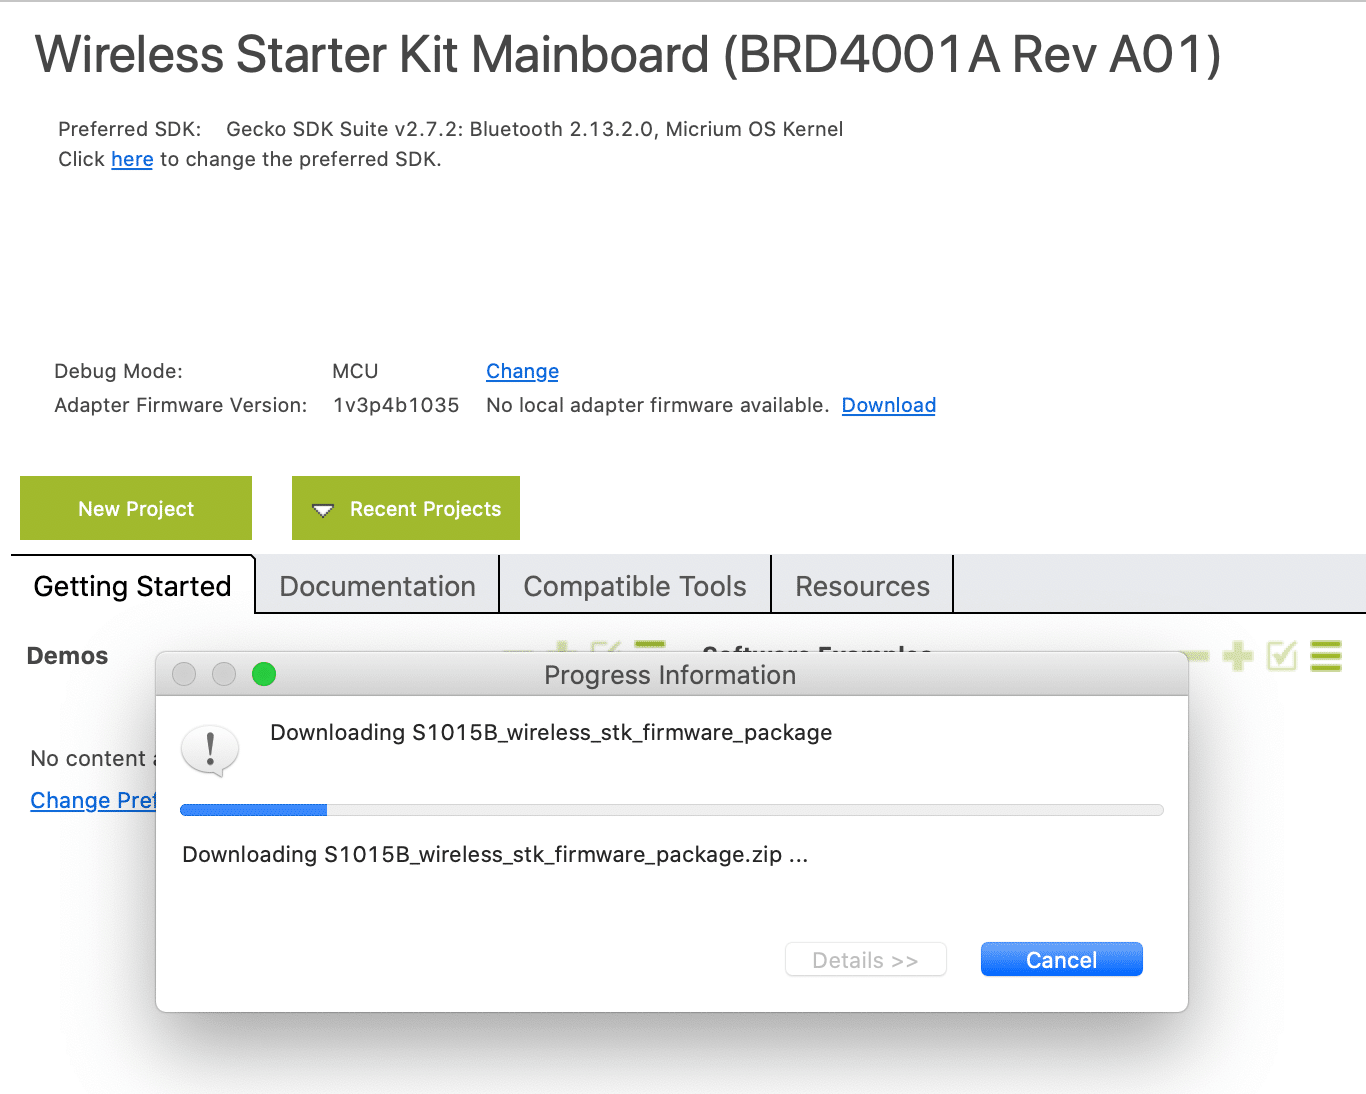
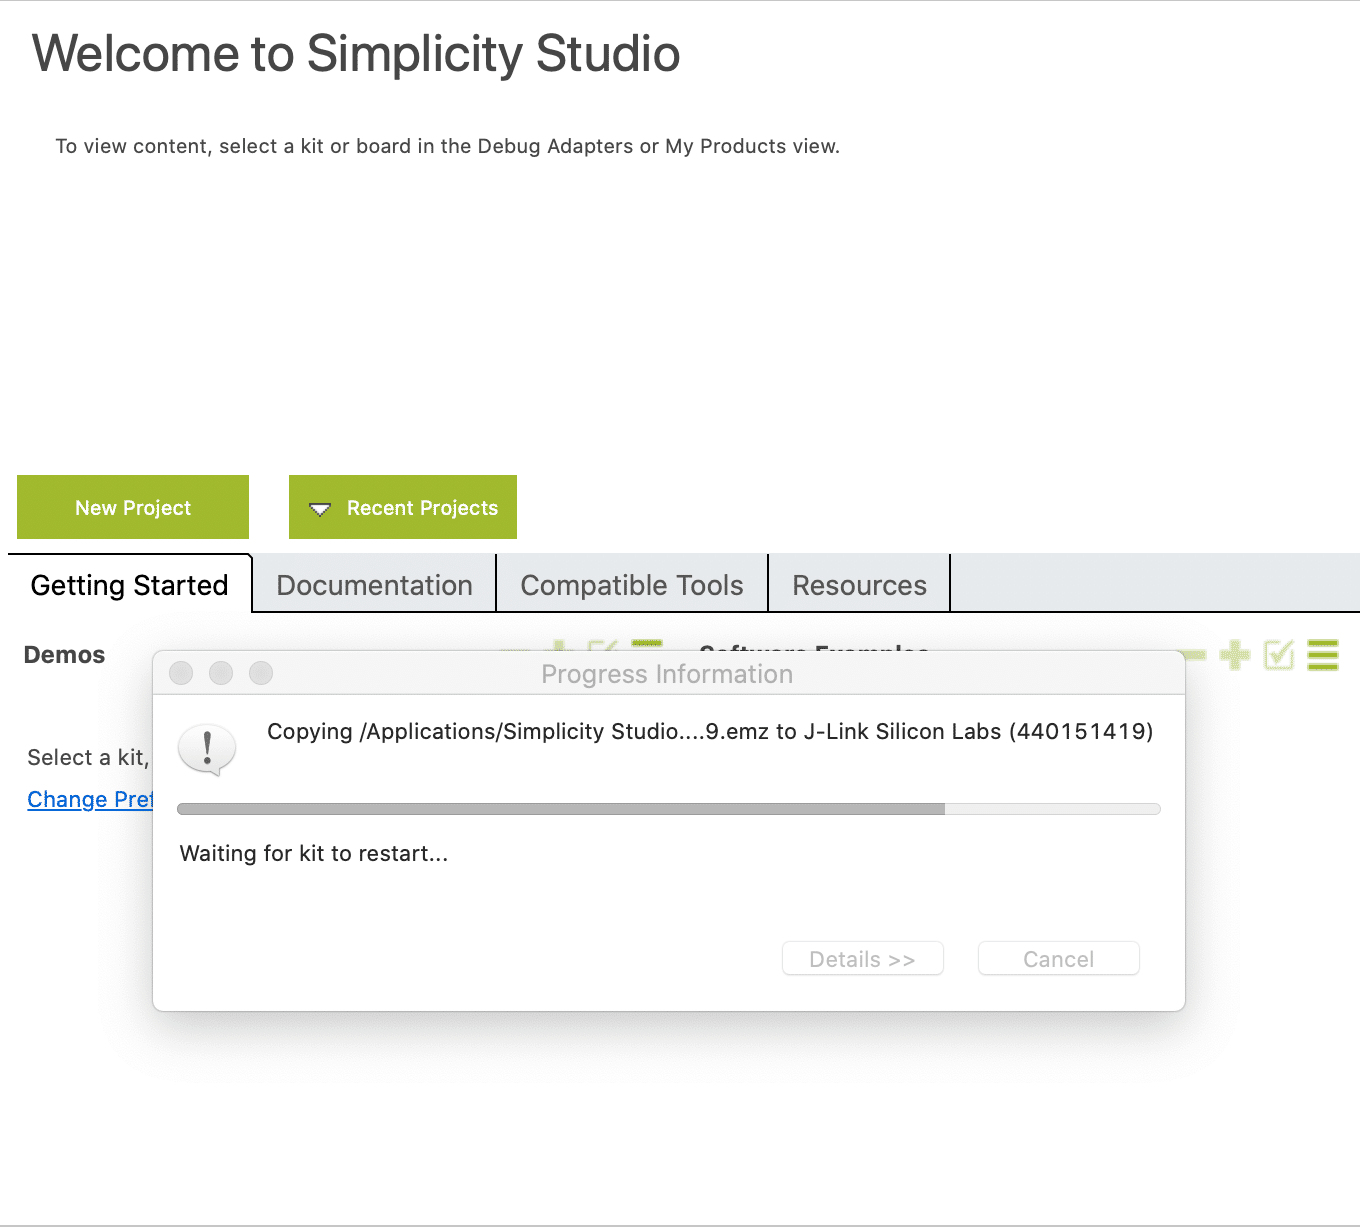
But before we run any of the examples. check to see if there's an update for the Adapter. If so, then click on "Download":
Make sure you do not unplug the development board while the Adapter firmware is being updated. Once the download and update are complete, it will display a prompt informing you that it's "Waiting for the kit to restart":
If you're using the development board for the first time, then you will need to flash the bootloader to the chipset. To do so, you have two choices:
- Flash the "Internal Storage Bootloader (single image on 512 kB device)" project (located under the "Gecko Bootloader Examples") to the board.
If you take this path, open the project then double click the *.isc file and click on "Generate". The .isc file allows you to customize the bootloader in a GUI tool and then generates the source code for that configuration. - Flash one of the "Bluetooth (SoC)" to the board (which already includes the bootloader).
Now, we're ready to run one of the Bluetooth LE examples.
Let's run the Thermometer example (labeled "SOC - Thermometer"). Simply click on the name, and you will be presented with the following view:

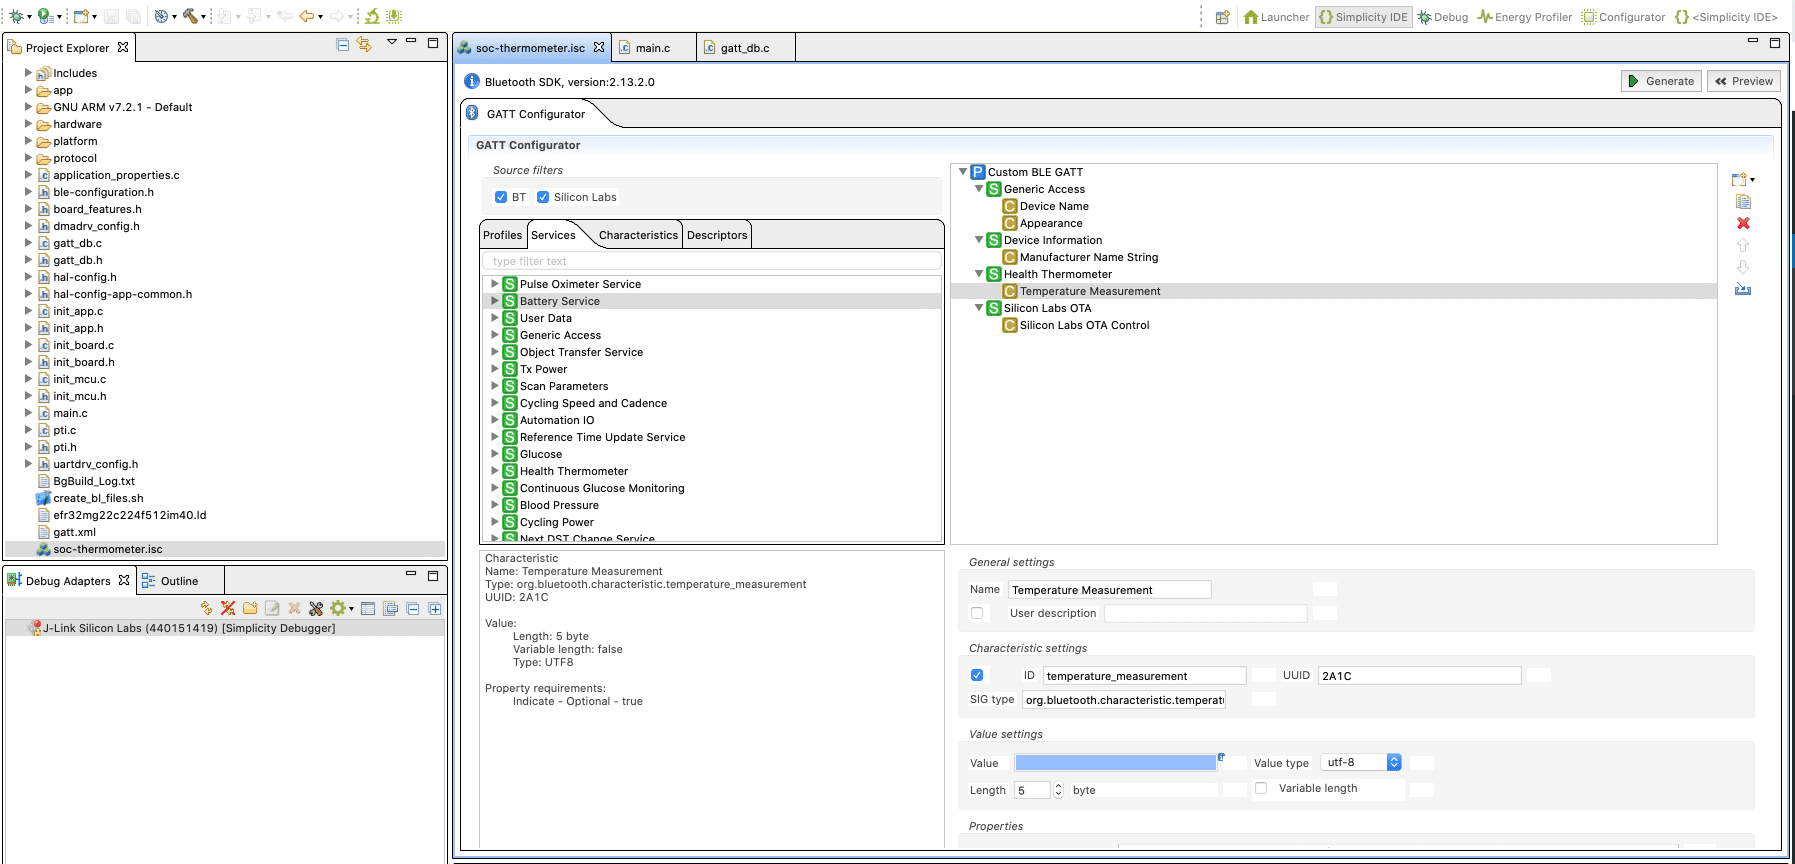
GATT Configurator Tool
Silicon Labs provides a very useful interface for setting up and designing your GATT Services and Characteristics. It also allows you to import and adopt Bluetooth SIG standard GATT Profiles (e.g. Heart Rate, Find Me, etc.), Services, and Characteristics.
This is really helpful for visualizing your GATT design and is much easier than trying to visualize and manage your Services and Characteristics in source code.
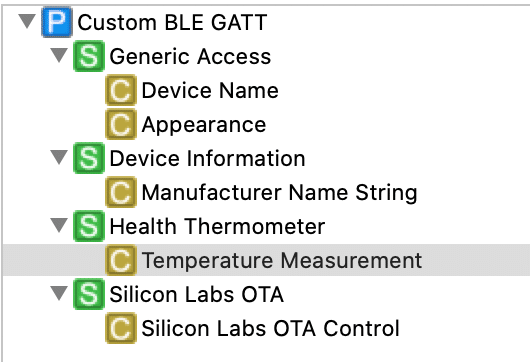
In the Thermometer [Server] example, you'll notice that the following GATT is defined:
Building, Flashing, and Testing
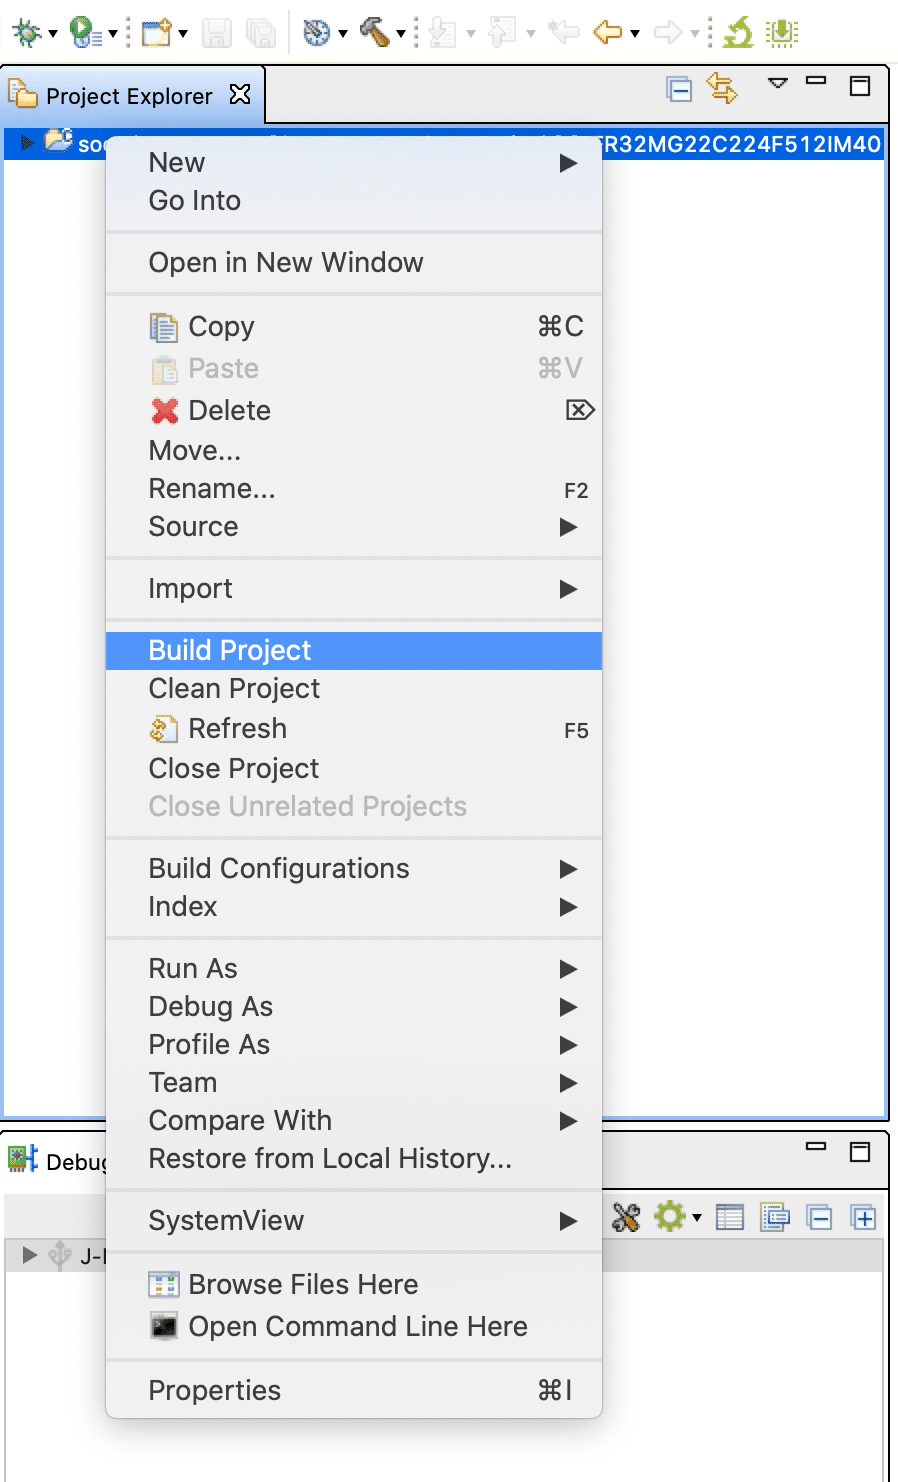
To build the application, right-click on "soc-thermometer" in the left-hand side and then click on "Build Project":
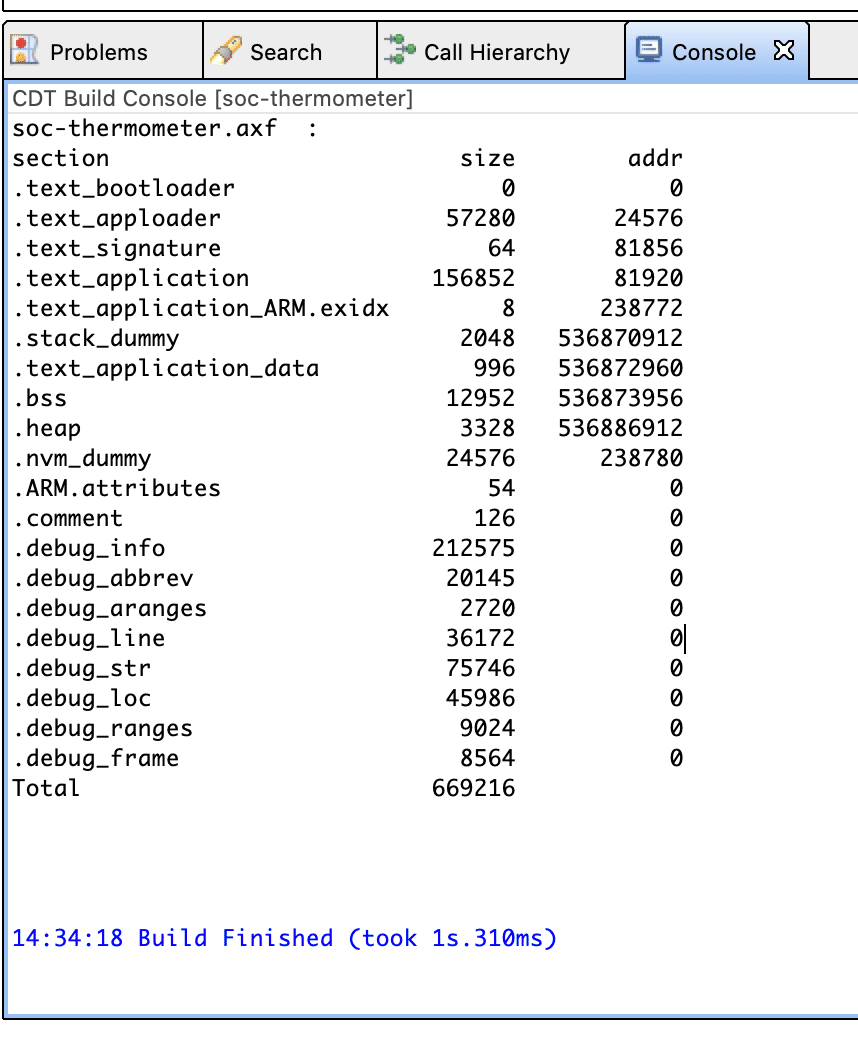
In the Console area, you'll see the output of the build process:
Once the build is successful, now we can flash and run it on the device. To do this, click on the "Debug" icon:

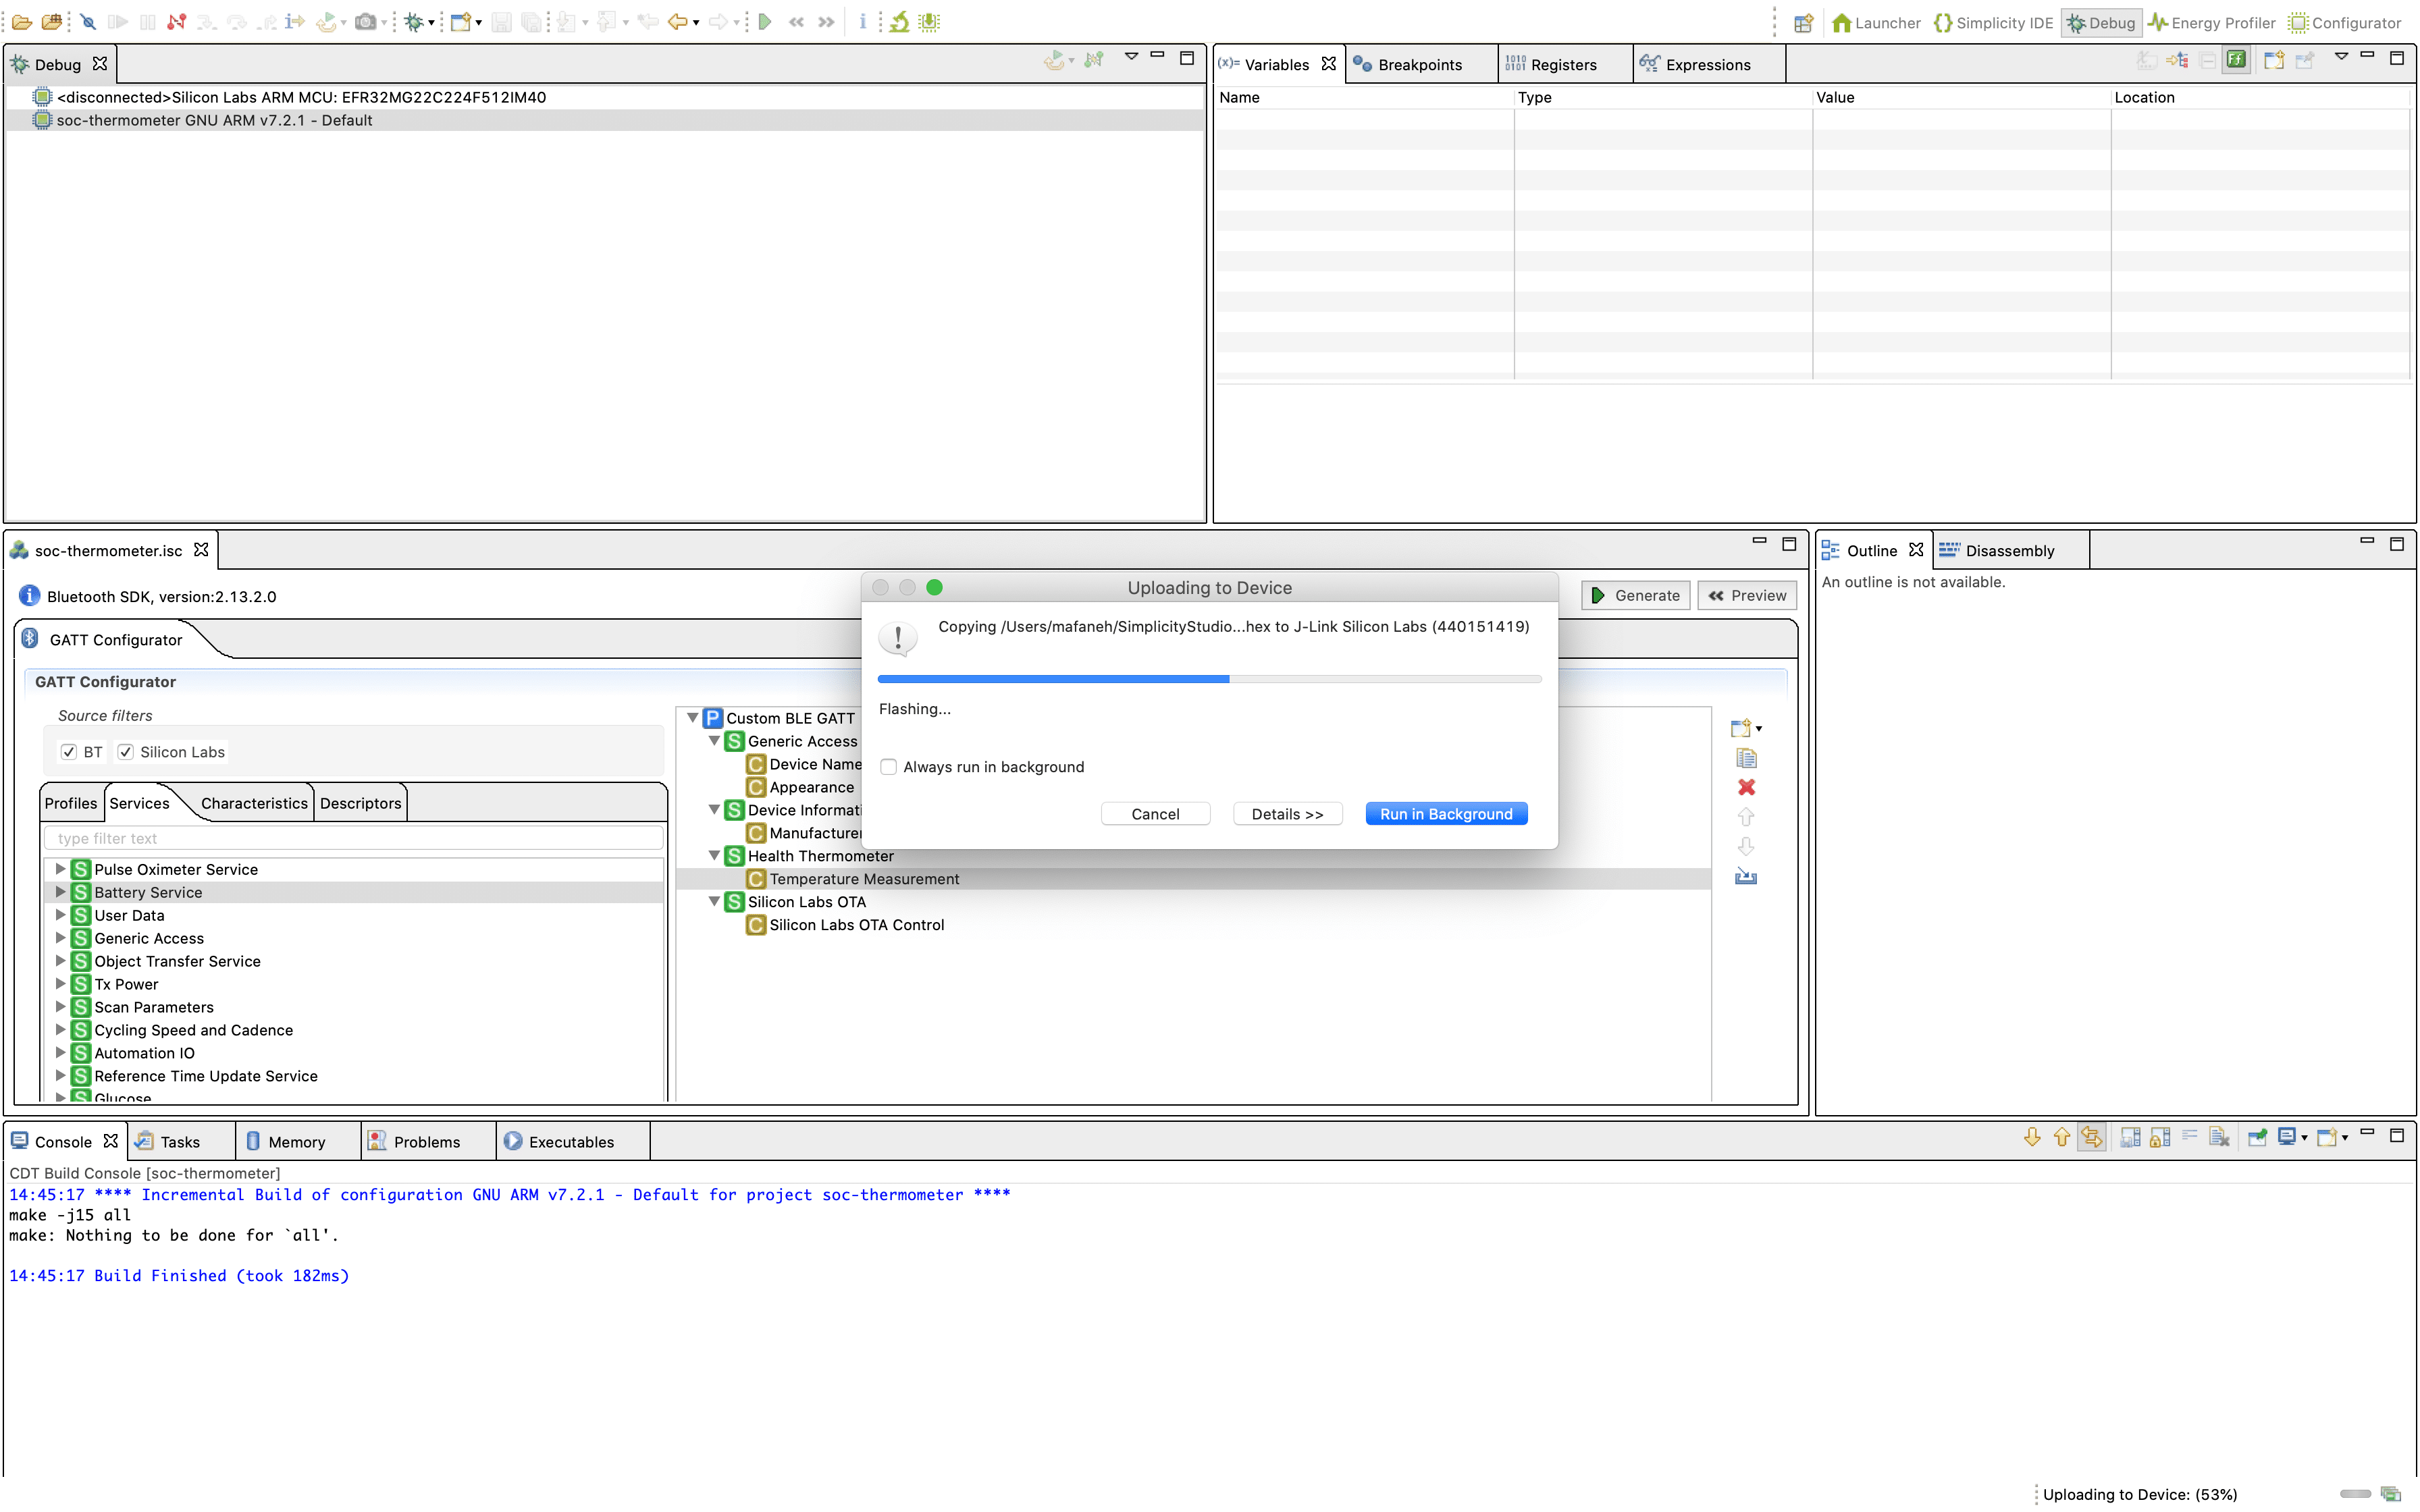
Once the application is run, we can confirm this by running a Bluetooth LE scanner mobile app. The Silicon Labs EFR Connect allows us to do just that.
The EFR Connect mobile is available for both iOS and Android.
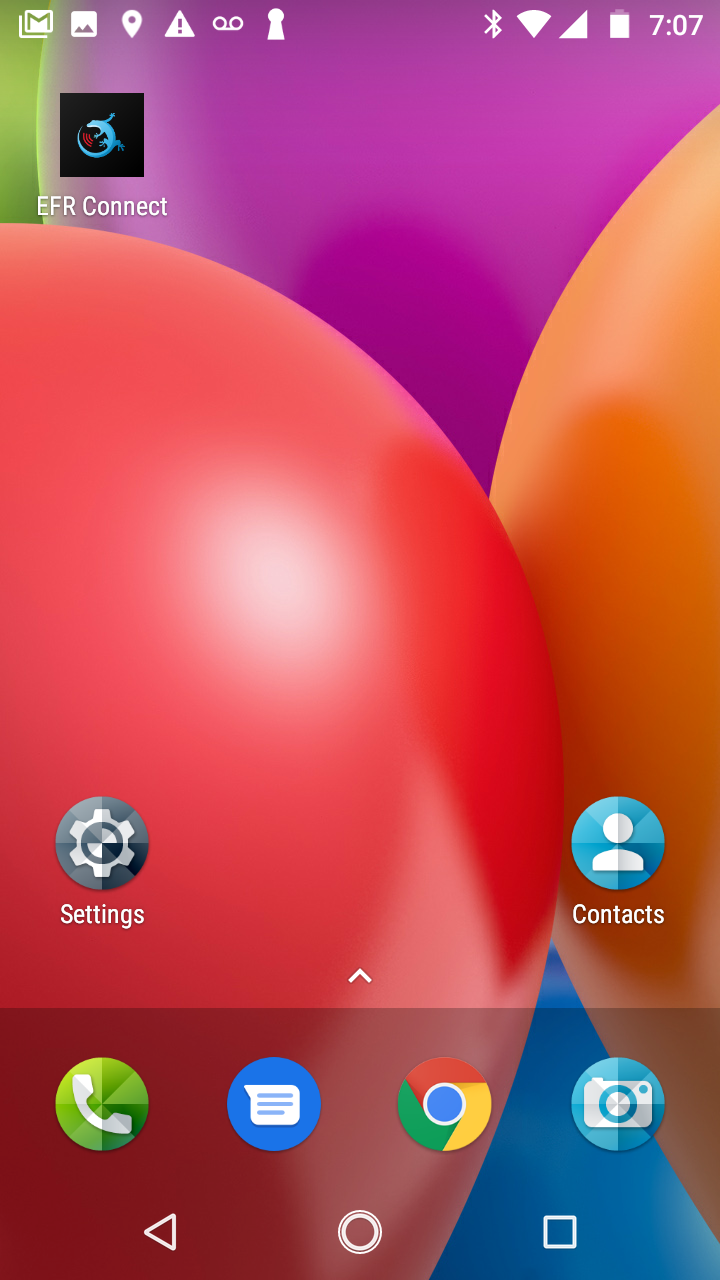
Once you run the app, you'll be presented with the following screen:
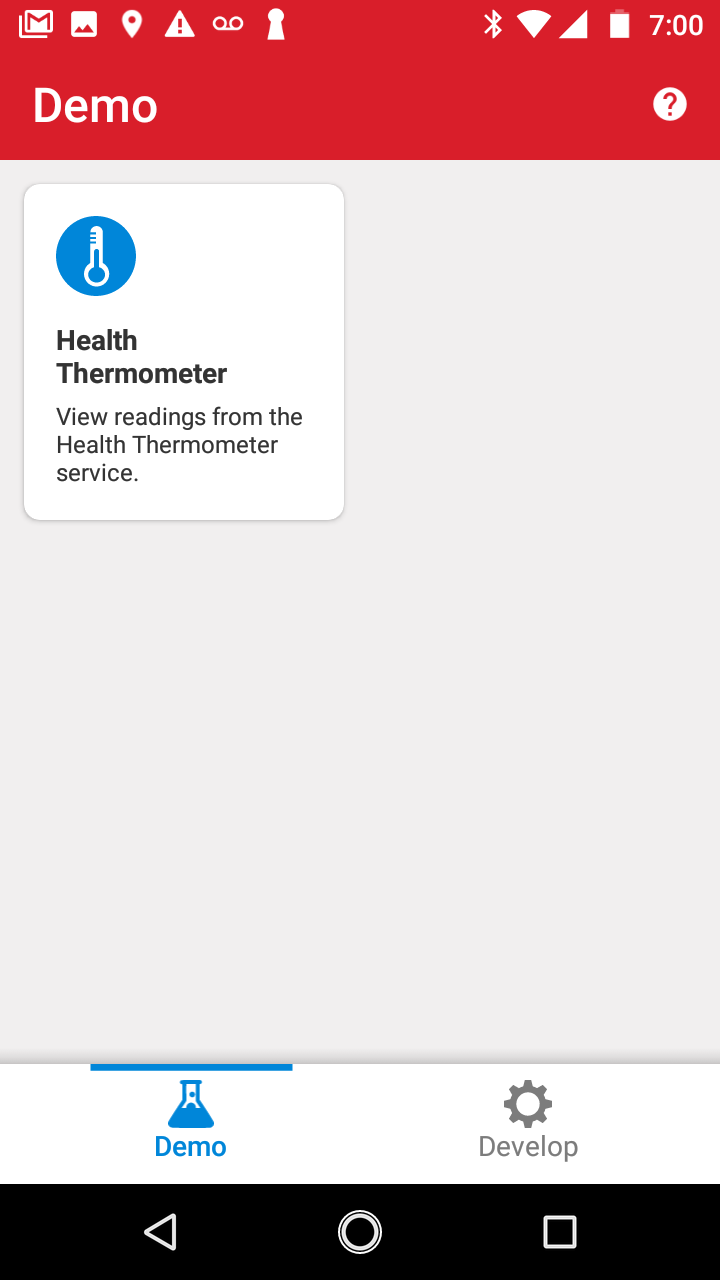
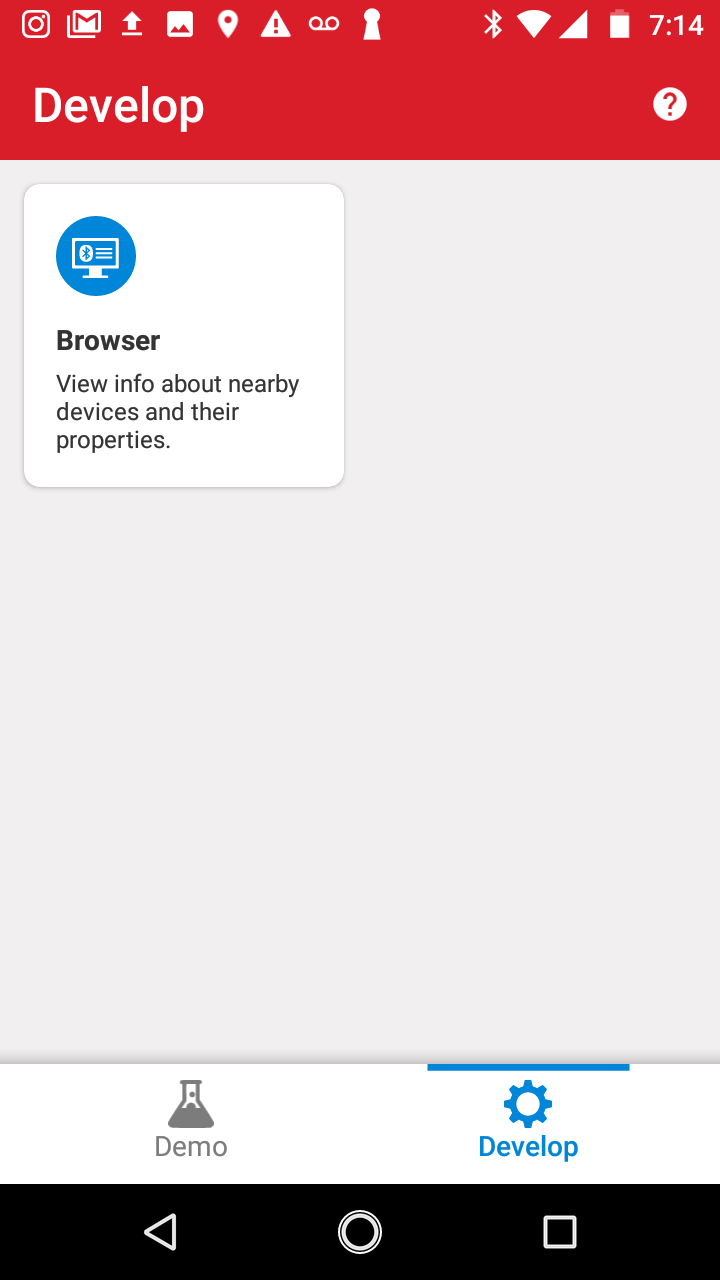
You'll notice that the main screen is the "Demo" screen with the "Health Thermometer" listed. If you navigate to the "Develop" screen, you'll see the option for a "Browser" which allows you to scan for any Bluetooth LE peripheral in the vicinity.
Since we are running the Thermometer example on our development board, we can utilize the "Health Thermometer" scanner within the app. Click on "Health Thermometer":
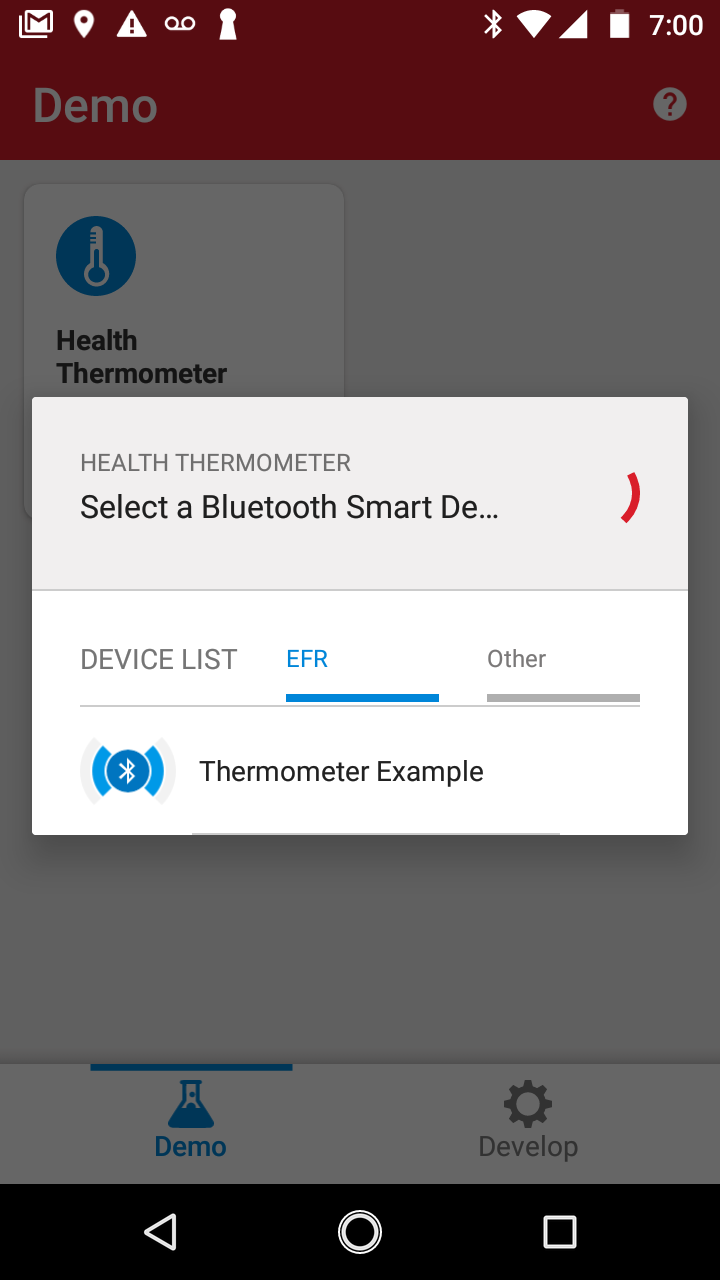
If you've set up and run the Thermometer example correctly on the board, you'll see your device listed in the app (as shown above). If the device does not show up in the "Blue Geckos" tab, try switching to the "Other" tab.
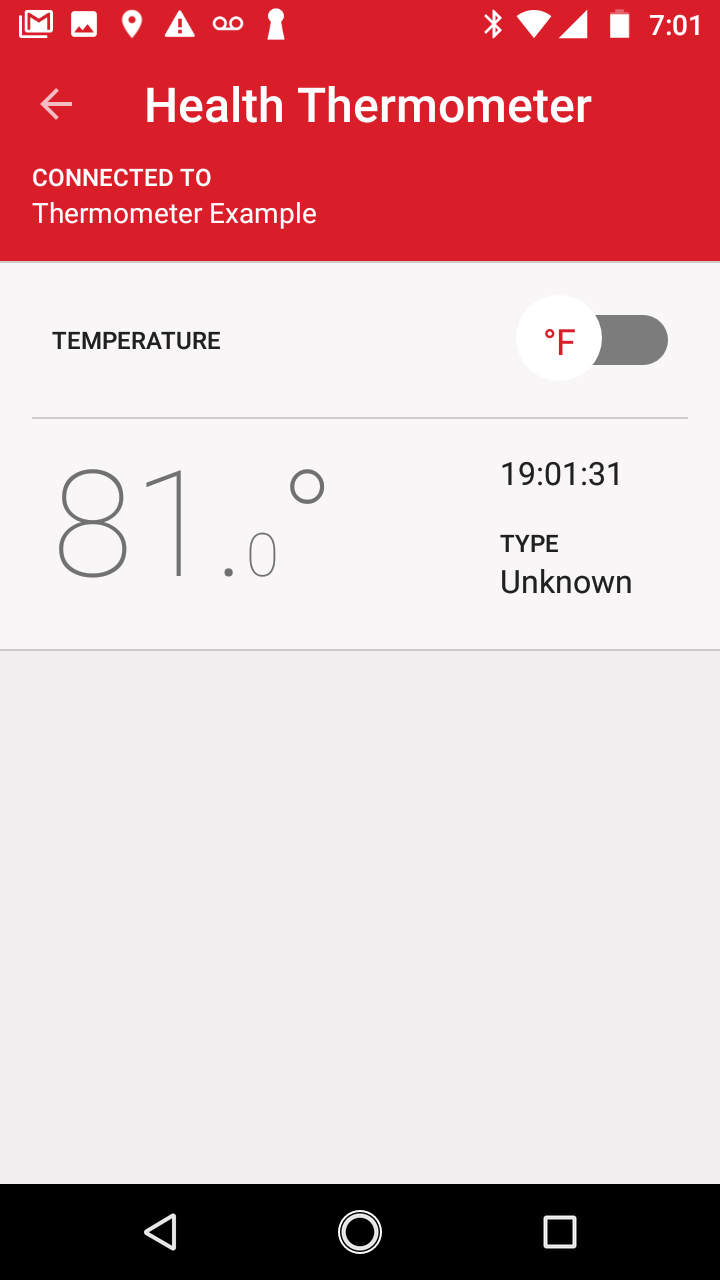
Tap on the device with the name "Thermometer Example" and the app will attempt to connect to the device. Once connected, you'll be presented with the following screen:
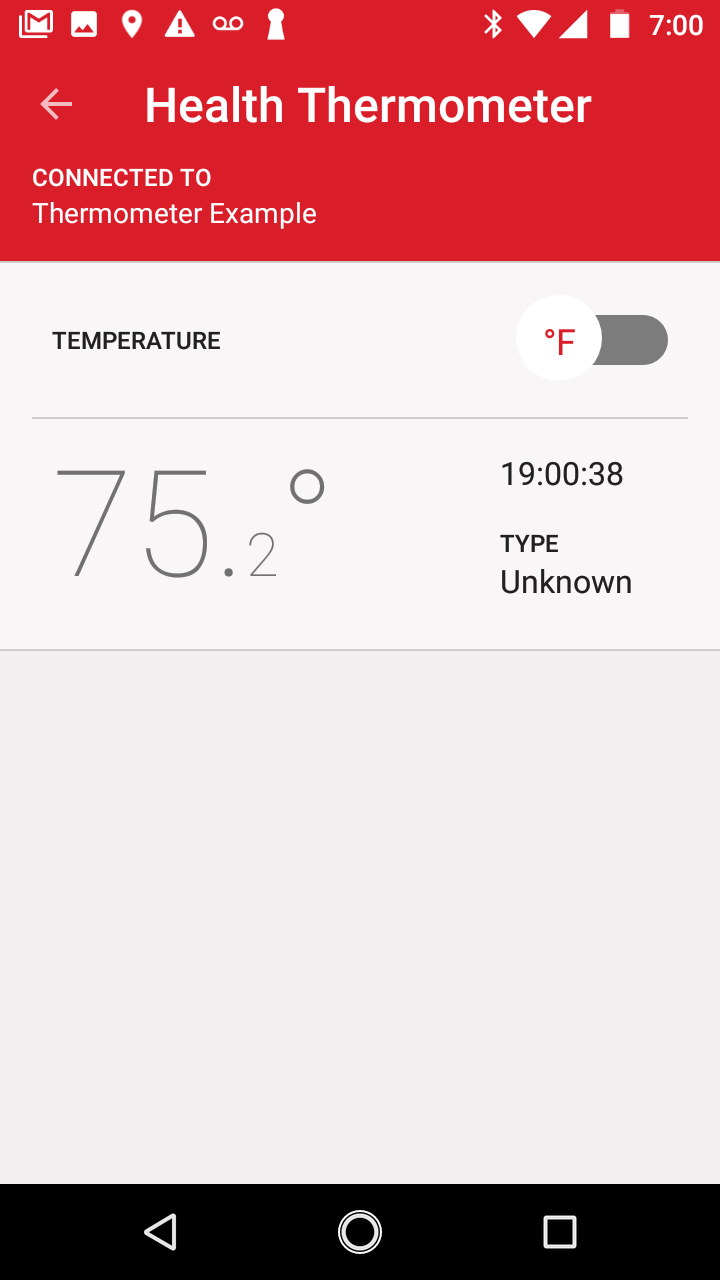
To test out the sensor's functionality, place your finger on the temperature sensor on the development board and notice that the temperature reported rises gradually:
Basic Structure of a Bluetooth LE Application
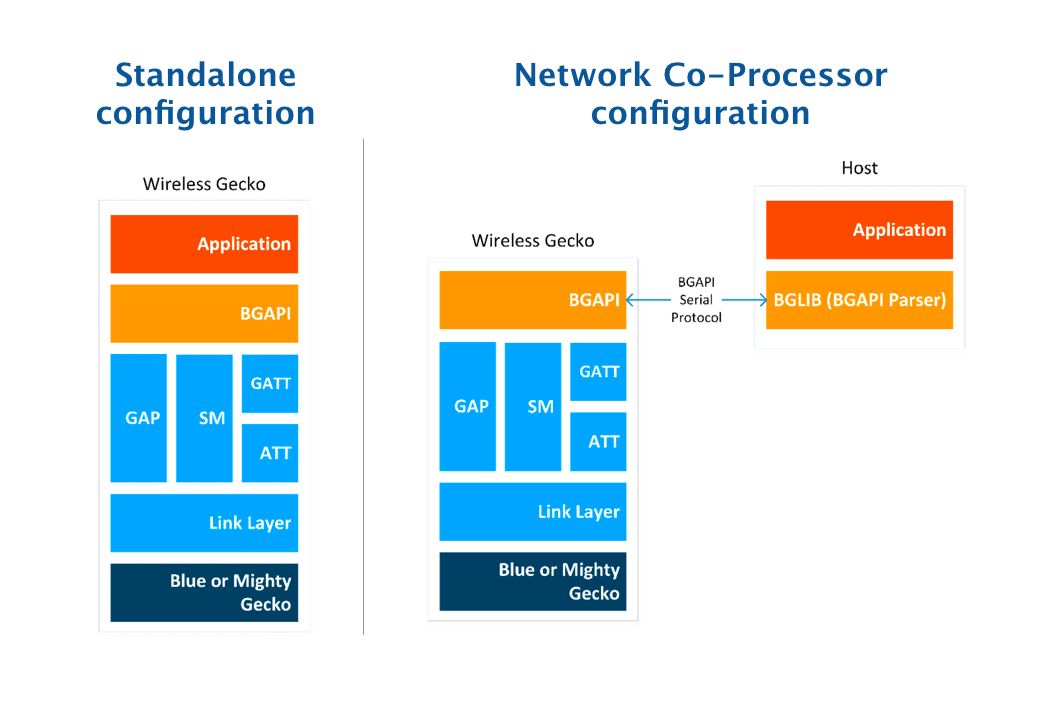
The Bluetooth SDK enables the development of Bluetooth LE apps in two different configurations:
- Standalone application configuration, where the Bluetooth stack and the application both run in the BGM22 chipset.
- Network Co-Processor (NCP) configuration, where the application runs on an external host and the Bluetooth stack runs in the BGM22 chipset.
The Thermometer example we ran on the development board is a standalone configuration. Here's a diagram that shows the architecture used in each configuration:
To better understand the structure of a standalone Bluetooth LE application, let's take a look at the different parts of main.c in the project.
First, the header files included in the file:
/* Board Headers */
#include "init_mcu.h"
#include "init_board.h"
#include "init_app.h"
#include "ble-configuration.h"
#include "board_features.h"

/* Bluetooth stack headers */
#include "bg_types.h"
#include "native_gecko.h"
#include "infrastructure.h"

/* GATT database */
#include "gatt_db.h"

/* EM library (EMlib) */
#include "em_system.h"

/* Libraries containing default Gecko configuration values */
#include "em_emu.h"
#include "em_cmu.h"

/* Device initialization header */
#include "hal-config.h"

#ifdef FEATURE_BOARD_DETECTED
#if defined(HAL_CONFIG)
#include "bsphalconfig.h"
#else
#include "bspconfig.h"
#endif
#else
#error This sample app only works with a Silicon Labs Board
#endif

#ifdef FEATURE_I2C_SENSOR
#include "i2cspm.h"
#include "si7013.h"
#include "tempsens.h"
#endif
Following the header file includes, we have a few configuration variables defined. The first of which is the maximum number of connections, which is defined as 4 in our example:
/* Gecko configuration parameters (see gecko_configuration.h) */
#ifndef MAX_CONNECTIONS
#define MAX_CONNECTIONS 4
#endif
uint8_t bluetooth_stack_heap[DEFAULT_BLUETOOTH_HEAP(MAX_CONNECTIONS)];
Another crucial part is the main gecko configuration data structure:
static const gecko_configuration_t config = {
  .config_flags = 0,
#if defined(FEATURE_LFXO) || defined(PLFRCO_PRESENT) || defined(LFRCO_PRESENT)
  .sleep.flags = SLEEP_FLAGS_DEEP_SLEEP_ENABLE,
#else
  .sleep.flags = 0,
#endif
  .bluetooth.max_connections = MAX_CONNECTIONS,
  .bluetooth.heap = bluetooth_stack_heap,
  .bluetooth.heap_size = sizeof(bluetooth_stack_heap),
#if defined(FEATURE_LFXO)
  .bluetooth.sleep_clock_accuracy = 100, // ppm
#elif defined(PLFRCO_PRESENT) || defined(LFRCO_PRESENT)
  .bluetooth.sleep_clock_accuracy = 500, // ppm
#endif
  .gattdb = &bg_gattdb_data,
  .ota.flags = 0,
  .ota.device_name_len = 3,
  .ota.device_name_ptr = "OTA",
  .pa.config_enable = 1, // Set this to be a valid PA config
#if defined(FEATURE_PA_INPUT_FROM_VBAT)
  .pa.input = GECKO_RADIO_PA_INPUT_VBAT, // Configure PA input to VBAT
#else
  .pa.input = GECKO_RADIO_PA_INPUT_DCDC,
#endif // defined(FEATURE_PA_INPUT_FROM_VBAT)
  .rf.flags = GECKO_RF_CONFIG_ANTENNA,                 /* Enable antenna configuration. */
  .rf.antenna = GECKO_RF_ANTENNA,                      /* Select antenna path! */
};

/* Flag for indicating DFU Reset must be performed */
uint8_t boot_to_dfu = 0;
The most important configurations defined above are:
- Bluetooth max connections = 4
.bluetooth.max_connections = MAX_CONNECTIONS, - Device name = "OTA"
.ota.device_name_len = 3,
.ota.device_name_ptr = "OTA", - Pointer to generated GATT database
gattdb = &bg_gattdb_data
This
Next in main.c we have the definition for the function temperatureMeasure(). The code is self-explanatory with very detailed comments:
/**
 * @brief Function for taking a single temperature measurement with the WSTK Relative Humidity and Temperature (RHT) sensor.
 */
void temperatureMeasure()
{
  uint8_t htmTempBuffer[5]; /* Stores the temperature data in the Health Thermometer (HTM) format. */
  uint8_t flags = 0x00;   /* HTM flags set as 0 for Celsius, no time stamp and no temperature type. */
  int32_t tempData;     /* Stores the Temperature data read from the RHT sensor. */
  uint32_t rhData = 0;    /* Dummy needed for storing Relative Humidity data. */
  uint32_t temperature;   /* Stores the temperature data read from the sensor in the correct format */
  uint8_t *p = htmTempBuffer; /* Pointer to HTM temperature buffer needed for converting values to bitstream. */
  static int32_t DummyValue = 0l; /* This dummy value can substitute the temperature sensor value if the sensor is N/A. */

  /* Convert flags to bitstream and append them in the HTM temperature data buffer (htmTempBuffer) */
  UINT8_TO_BITSTREAM(p, flags);

#ifdef FEATURE_I2C_SENSOR
  /* Sensor relative humidity and temperature measurement returns 0 on success, nonzero otherwise */
  if (Si7013_MeasureRHAndTemp(I2C0, SI7021_ADDR, &rhData, &tempData) != 0)
#endif
  {
    /* Use the dummy value and go between 20 and 40 if the sensor read failed.
     * The ramp-up value will be seen in the characteristic in the receiving end. */
    tempData = DummyValue + 20000l;
    DummyValue = (DummyValue + 1000l) % 21000l;
  }
  /* Convert sensor data to correct temperature format */
  temperature = FLT_TO_UINT32(tempData, -3);
  /* Convert temperature to bitstream and place it in the HTM temperature data buffer (htmTempBuffer) */
  UINT32_TO_BITSTREAM(p, temperature);

  /* Send indication of the temperature in htmTempBuffer to all "listening" clients.
   * This enables the Health Thermometer in the Blue Gecko app to display the temperature.
   *  0xFF as connection ID will send indications to all connections. */
  gecko_cmd_gatt_server_send_characteristic_notification(
    0xFF, gattdb_temperature_measurement, 5, htmTempBuffer);
}
Finally, we have the main() function. We won't list the whole contents of the function, but here are some of the most important parts.
First, we have different general initializations:
  // Initialize device
  initMcu();
  // Initialize board
  initBoard();
  // Initialize application
  initApp();
  initVcomEnable();
  // Initialize stack
  gecko_init(&config);
  #ifdef FEATURE_I2C_SENSOR
  // Initialize the Temperature Sensor
  Si7013_Detect(I2C0, SI7021_ADDR, NULL);
  #endif
Next, in the while() loop, we have a function call to wait for events to be reported from the Gecko stack:
    /* Event pointer for handling events */
    struct gecko_cmd_packet* evt;

    /* Check for stack event. */
    evt = gecko_wait_event();
The return value from the gecko_wait_event() API is then parsed to handle the reported event from the stack. A few cases are handled:
- The boot-up event, in which case the device then starts advertising.
- An event generated in the case of a notification or indication being enabled/disabled, or when an indication confirmation was received.
- A timer event in which case the function
temperatureMeasure()used to measure the temperature is called - An event generated when a connection has been closed, in which case the device either enters DFU mode (if the dfu boot flag was set) or going back to Bluetooth LE advertising mode.
- Events of characteristic write operations related to DFU mode.
As you can see, the main structure of a Bluetooth LE application is event-driven.
Silicon Labs Thunderboard™ BG22 Kit
The SiLabs Thunderboard™ EFRBG22 is a small and cost-effective prototype and development platform based on the EFR32 Wireless Gecko SoC. It features a number of on-board sensors:
- Humidity and temperature sensor
- UV index and ambient light sensor
- Hall effect sensor
- 6-axis inertial sensor
- PDM stereo microphones
In addition to the sensors, the board features a user LED and push-button. It is powered by either USB or a coin-cell battery.
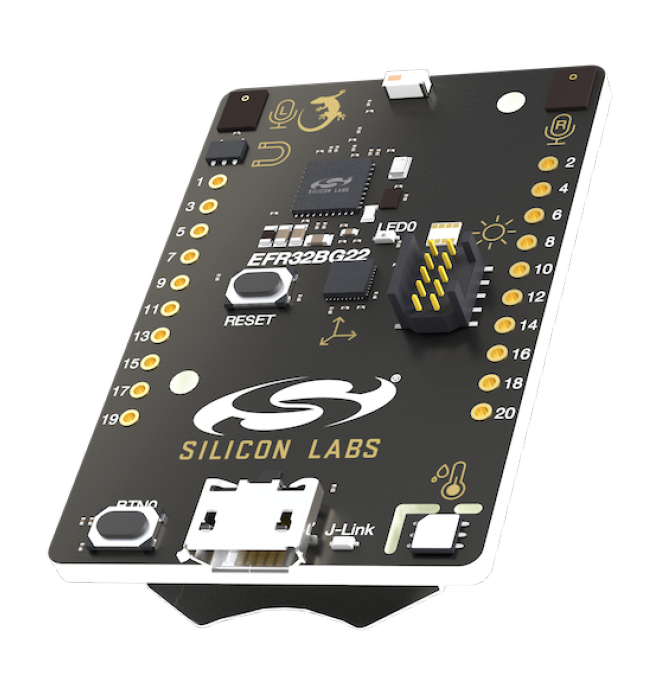
The board ships with a ready-to-use Bluetooth demo and includes a built-in SEGGER J-Link debugger.
To learn more about this development kit: https://www.silabs.com/development-tools/wireless/bluetooth/bg22-explorer-kit
Silicon Labs Software Tools
There are a few tools provided by Silicon Labs as part of the Blue Gecko suite of software tools.
Some of these tools are integrated into Simplicity Studio including: GATT Configurator, Multi-Node Energy Profiler, and Network Analyzer.
Others such as Simplicity Commander and BGTool Application are external and exist separately from Simplicity Studio (though Simplicity Commander can also be run from within Simplicity Studio).
GATT Configurator
This tool allows you to define and design the GATT database of a device via a visual interface. To re-launch the GATT Configurator tool at any point for a specific project, simply double-click the *.isc file in the project explorer pane:
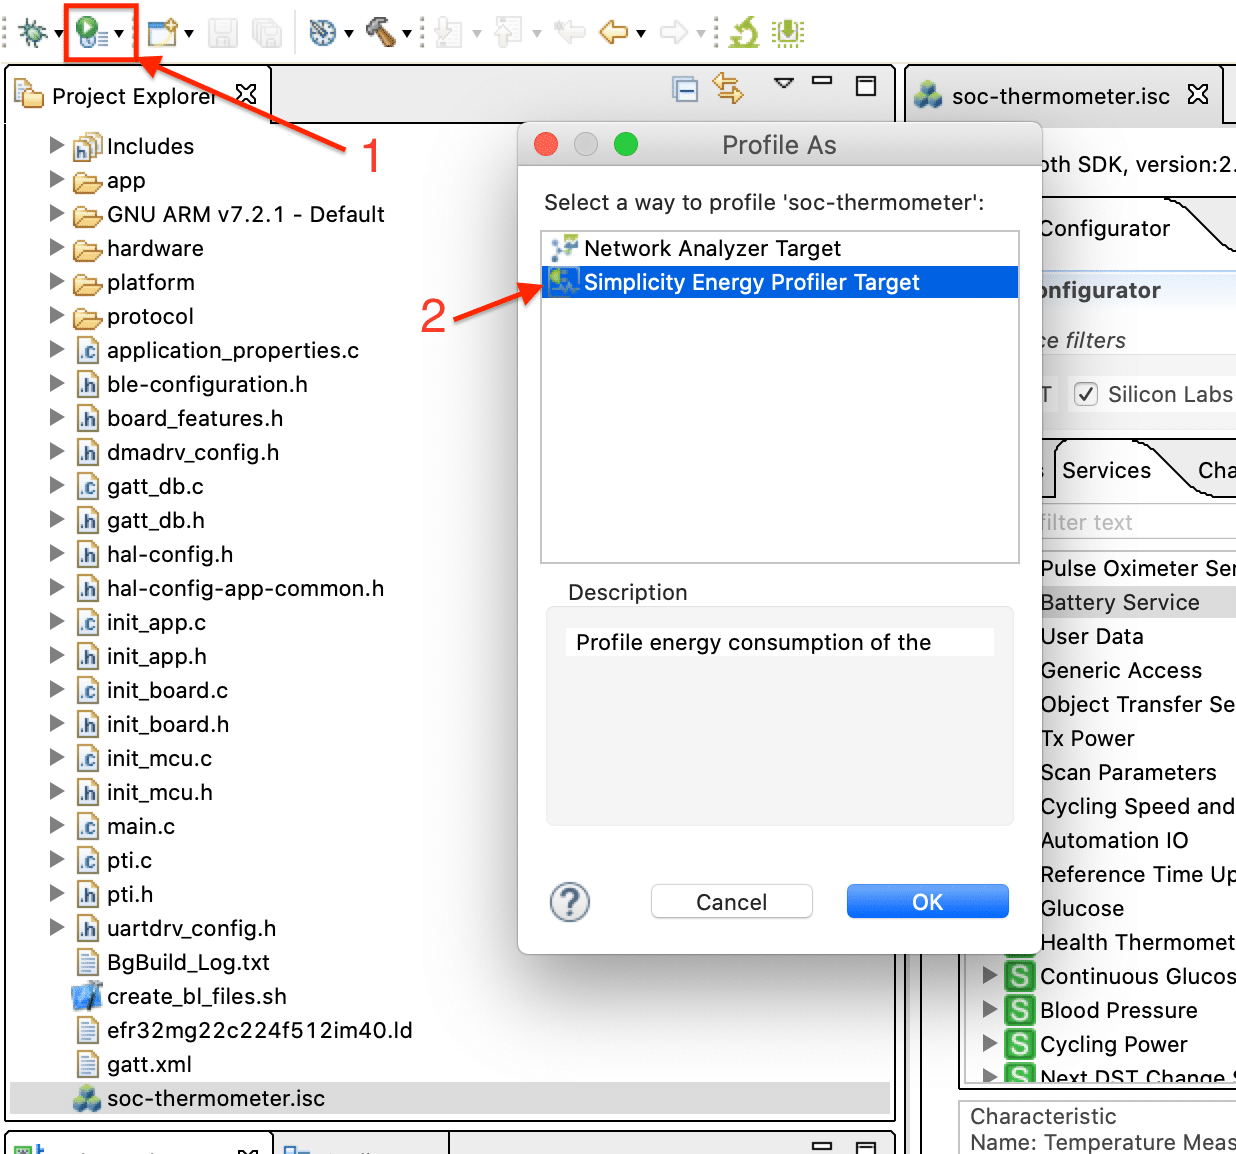
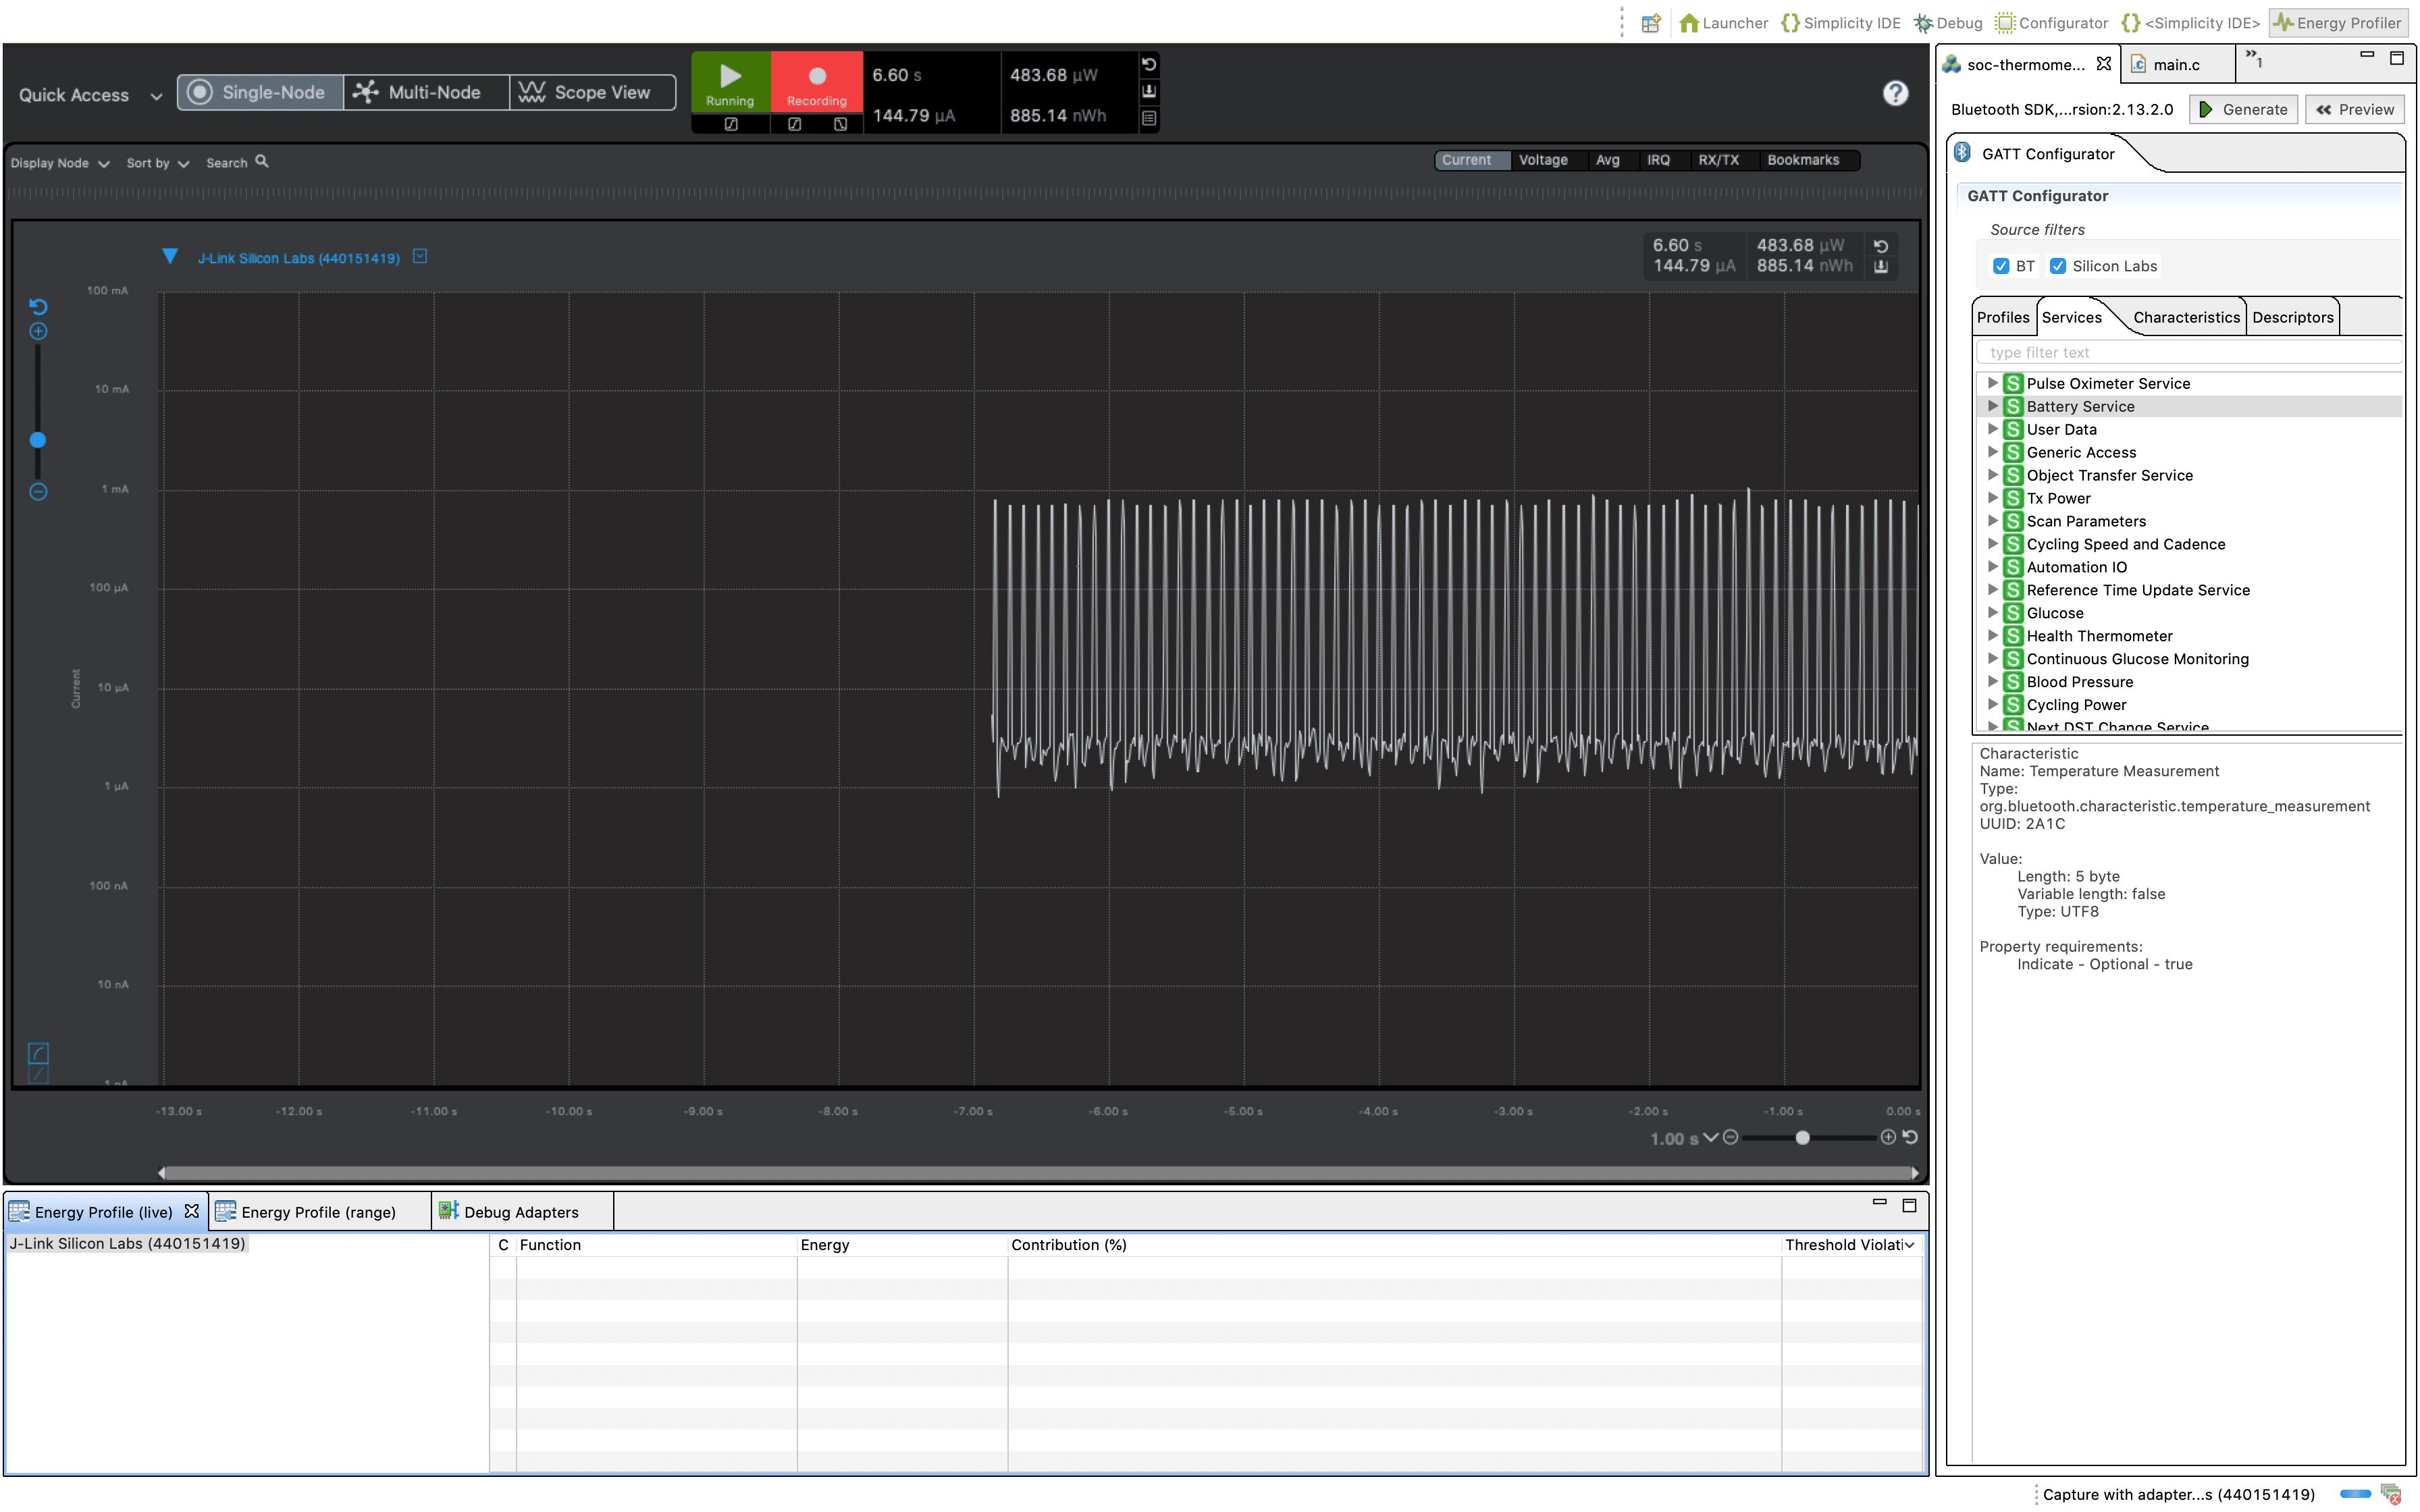
Multi-Node Energy Profiler
This tool allows you to accurately measure the energy consumption of your device in runtime including finding peak current consumption and sleep mode current measurement.
To run the profiler simply click on the Profile button in the Simplicity IDE perspective and select "Simplicity Energy Profiler Target":
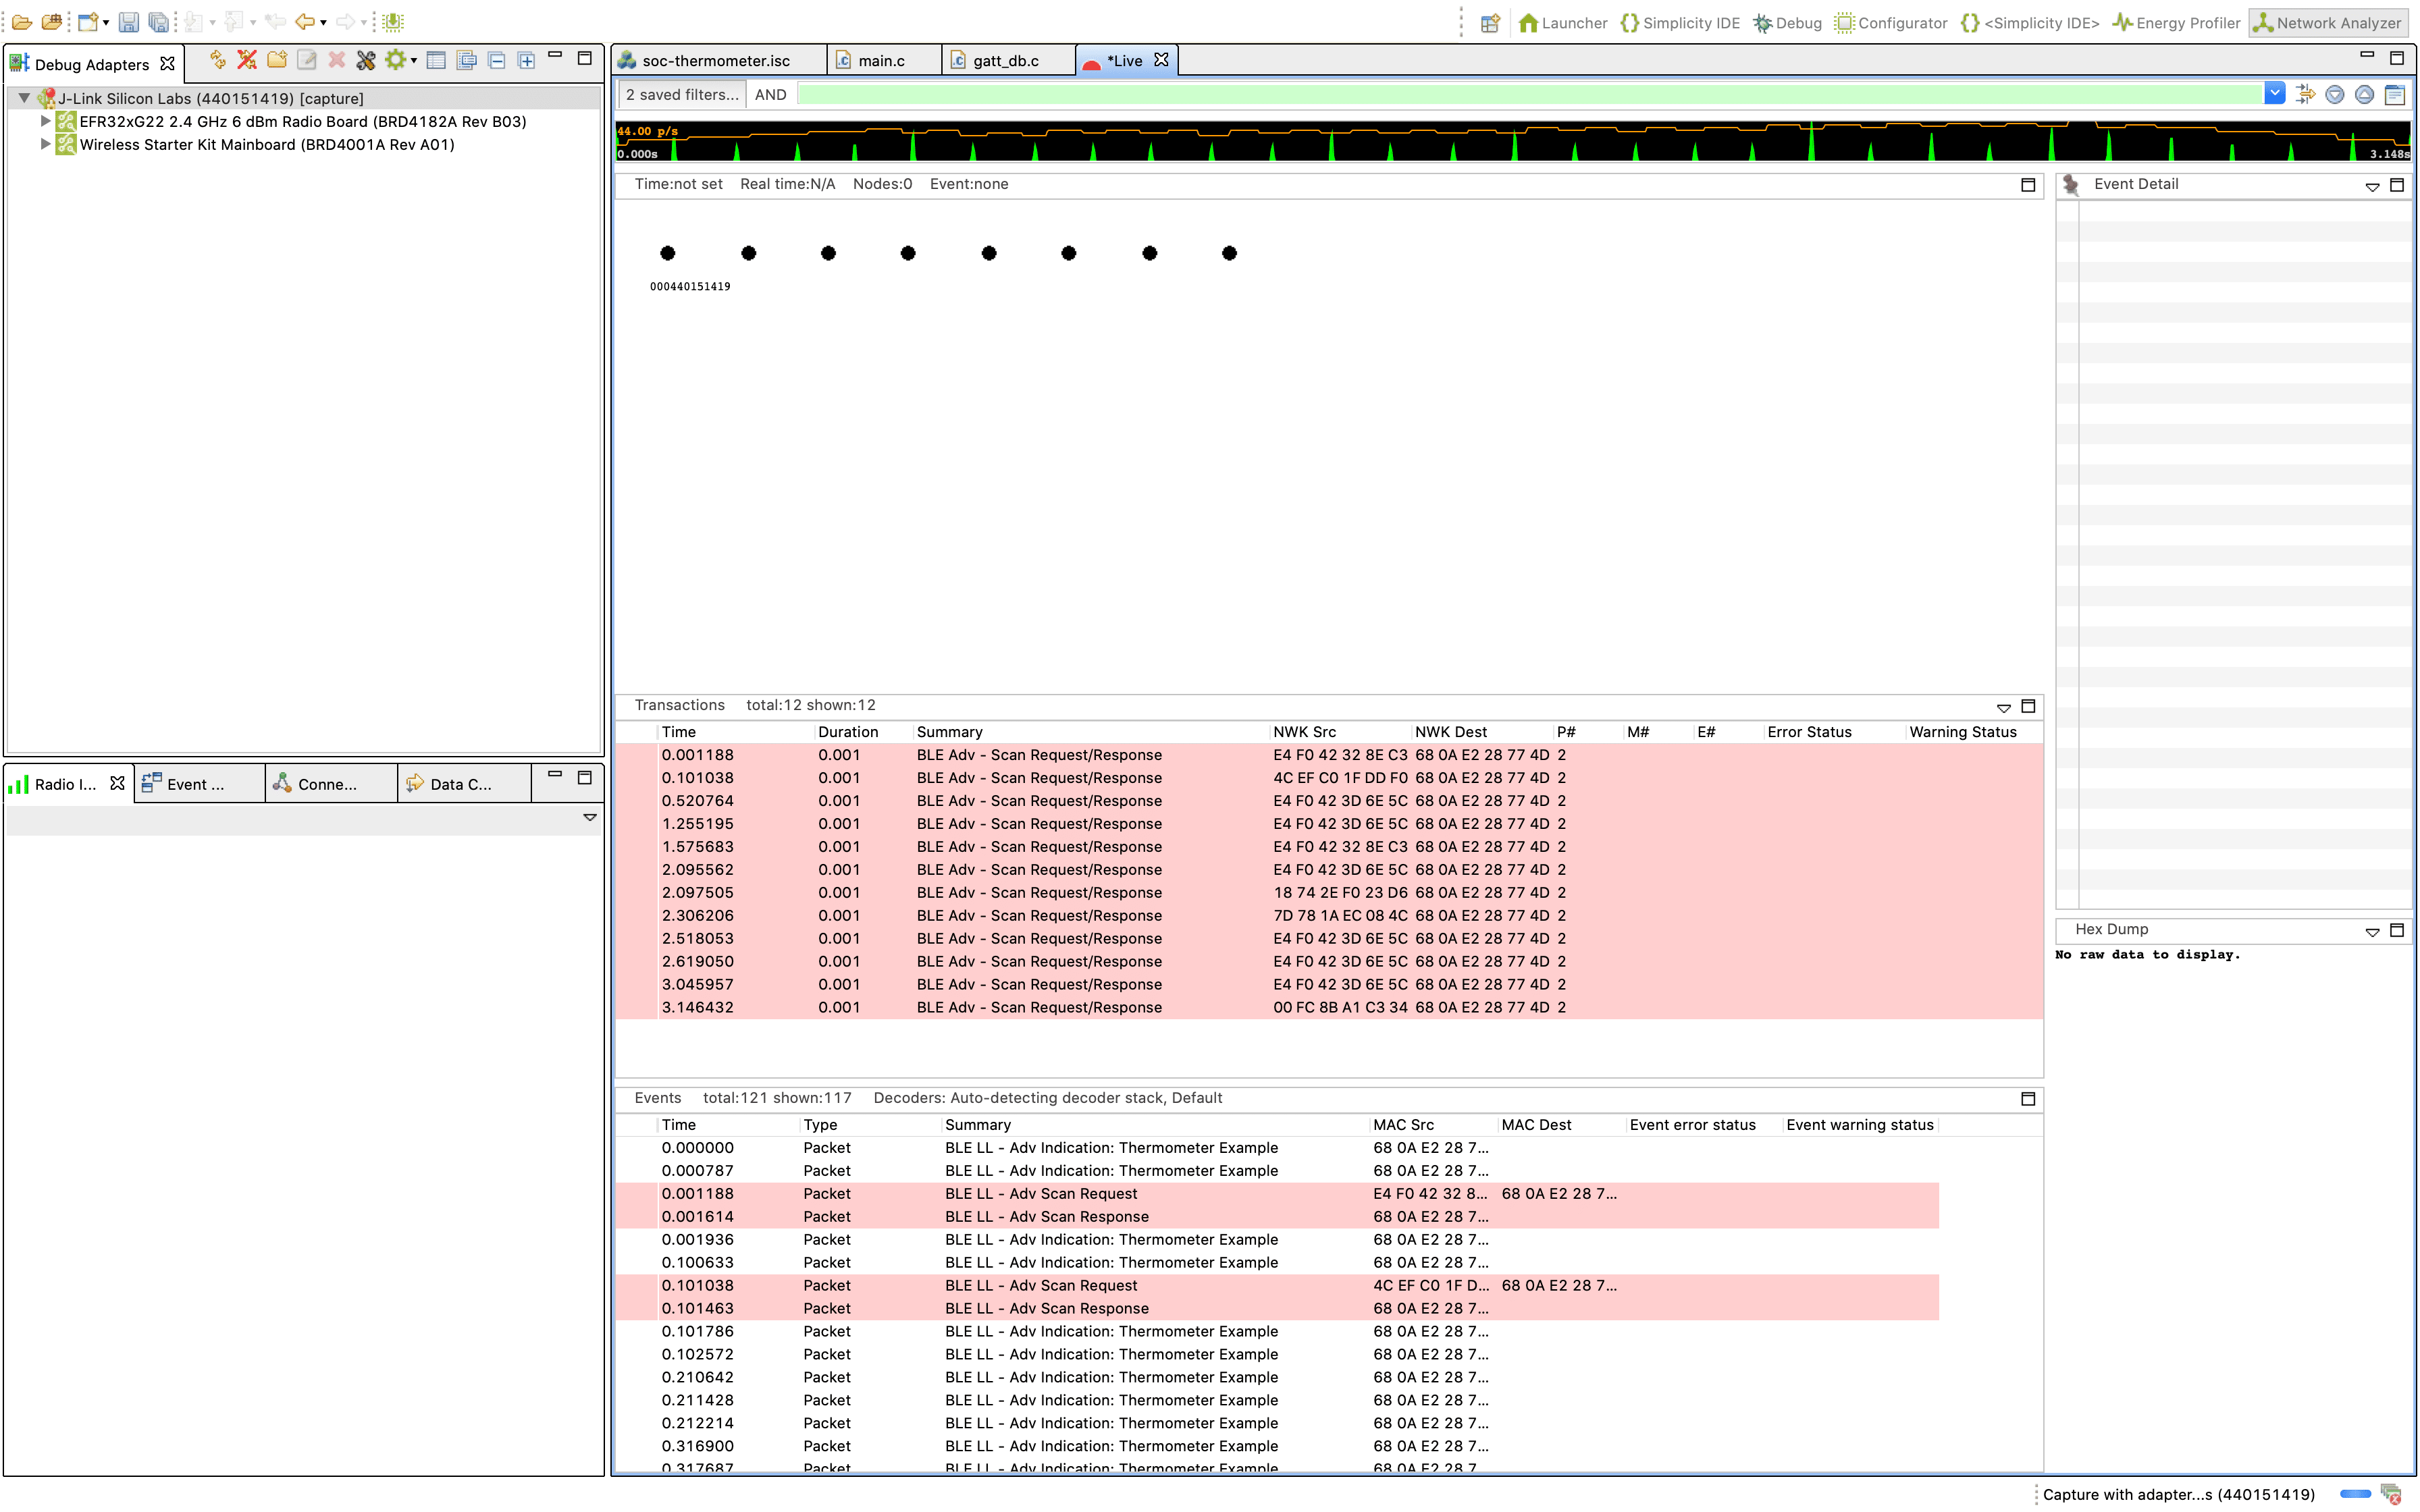
Network Analyzer
This tool is a packet capture and debugging tool that can be used to debug Bluetooth connectivity between Wireless Geckos and other Bluetooth devices.
The Packet Trace application captures the packets directly from the Packet Trace Interface (PTI) available on the Wireless Gecko SoCs and modules. It, therefore, provides more accurate capture of the packets compared to air-based capture.
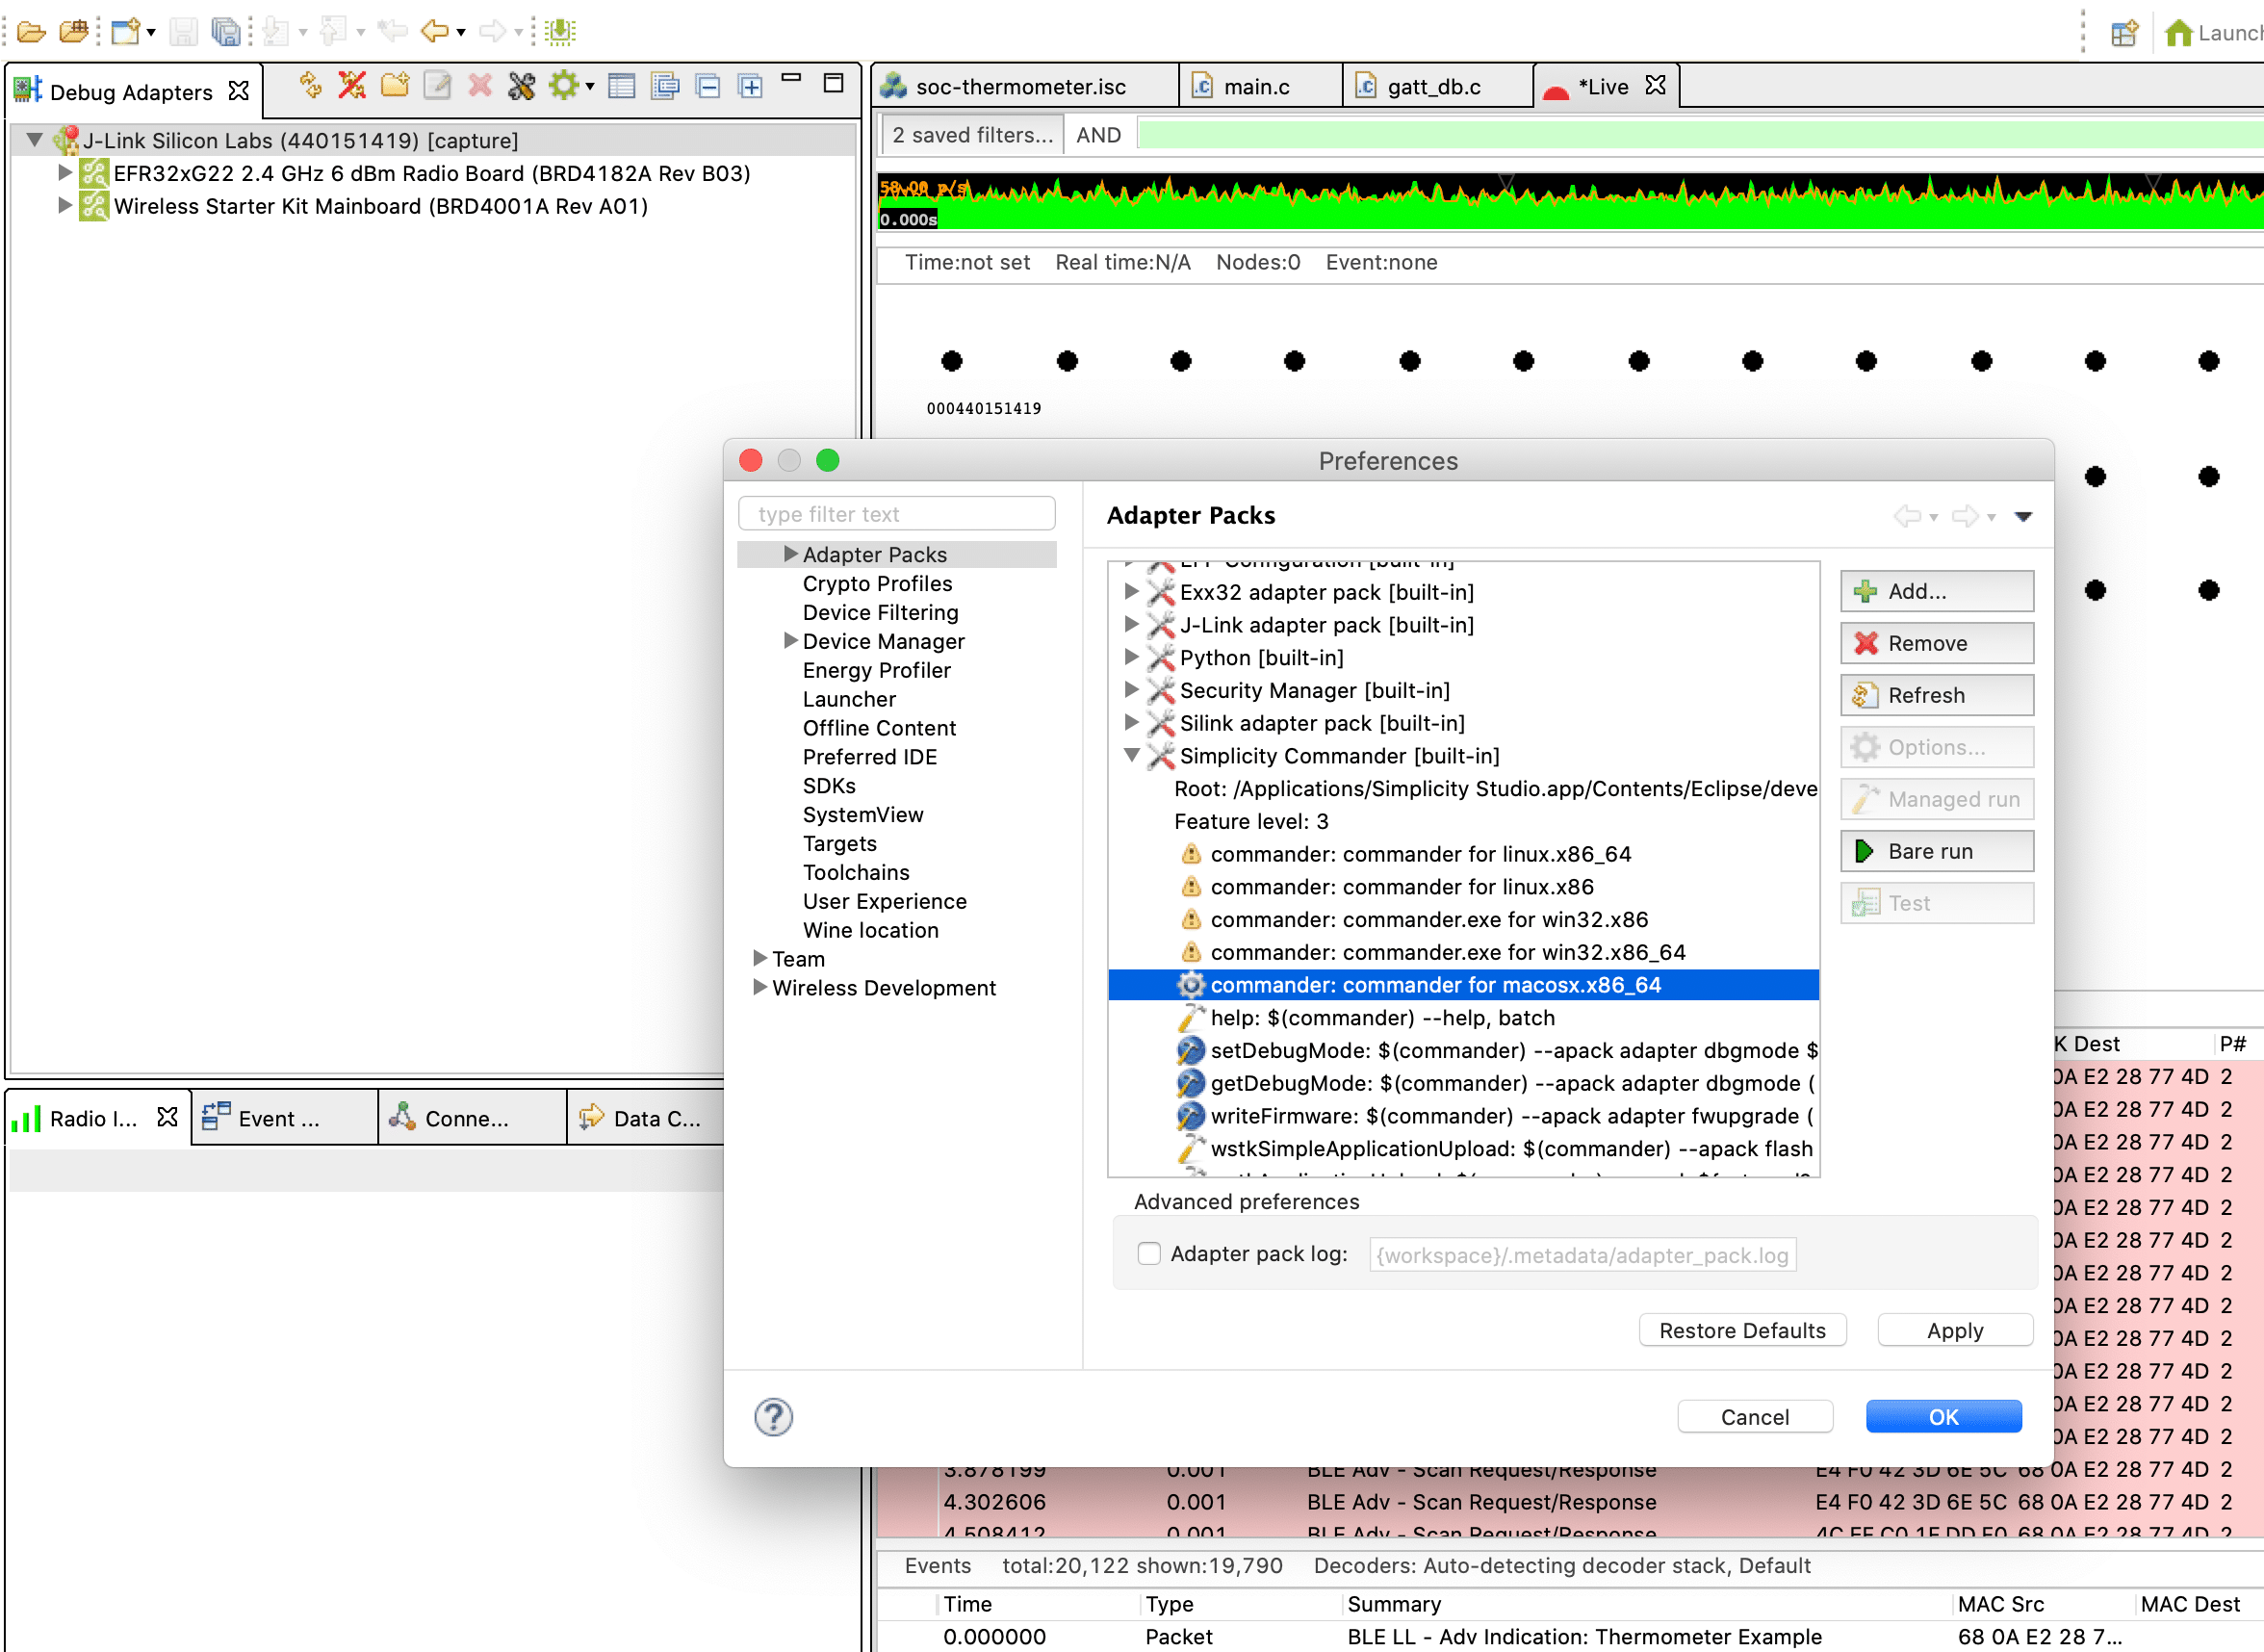
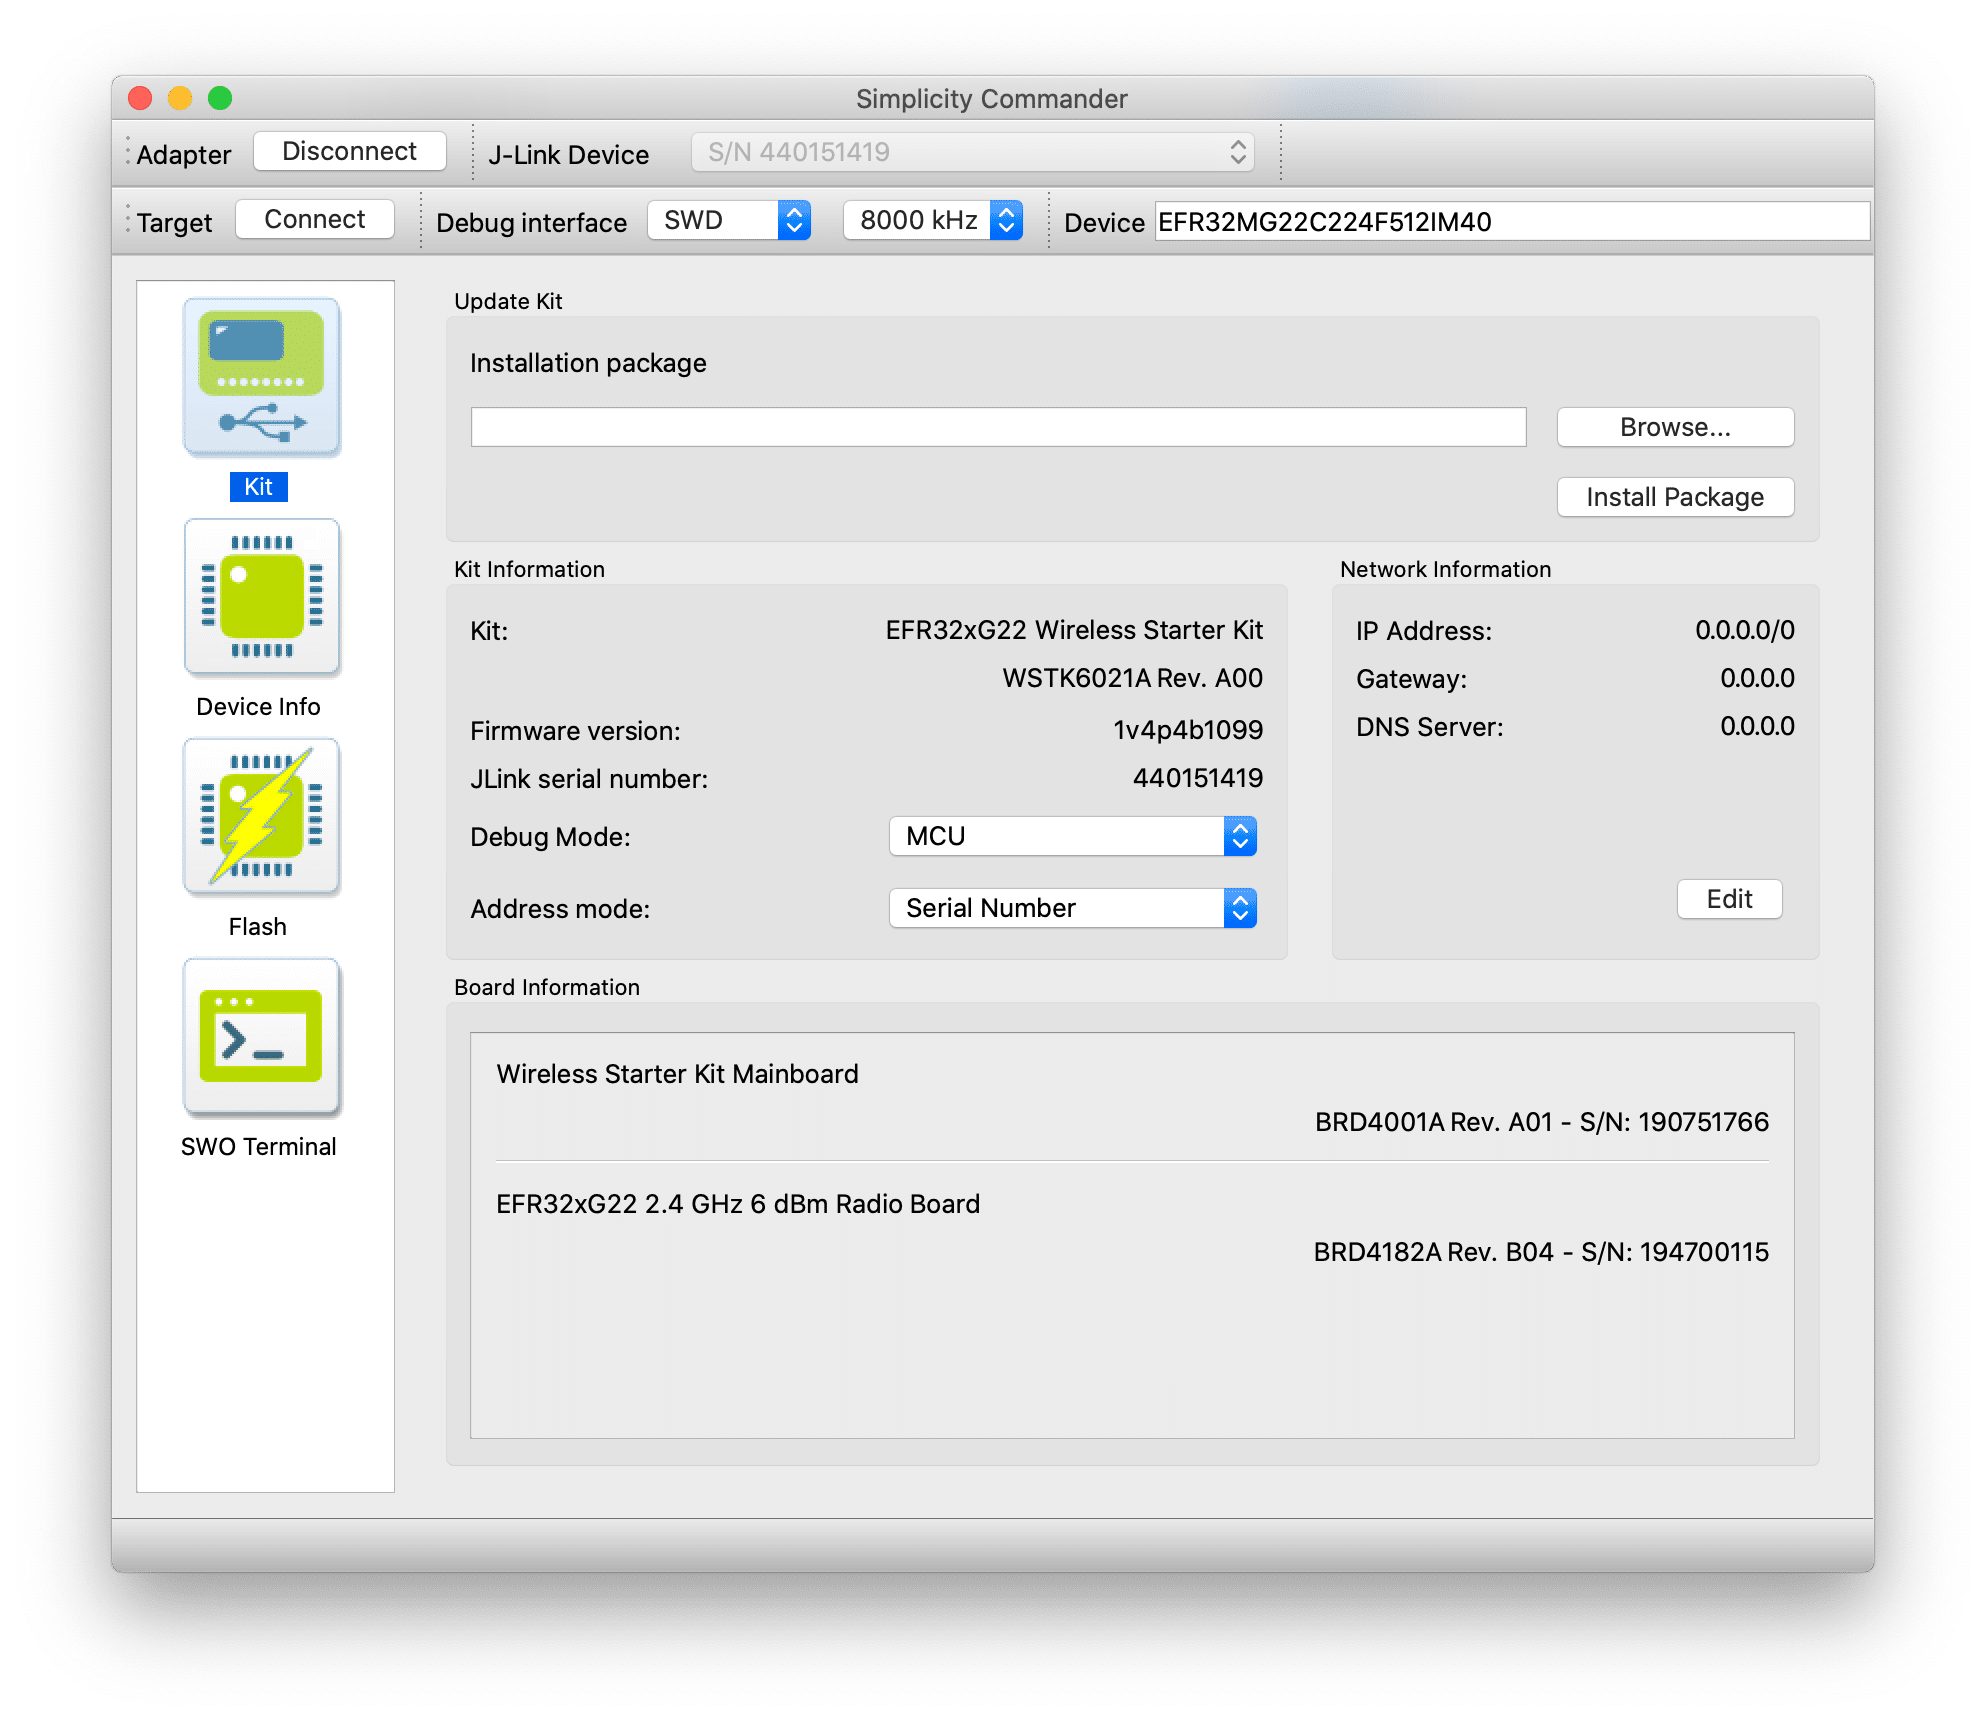
Simplicity Commander
This tool is a simple, yet very effective, tool that allows you to efficiently flash firmware images, erase flash, lock and unlock debug access, and perform other related operations on your device.
To run the application from within Simplicity Studio, go to the Preferences menu under Simplicity Studio ➝ Adapter Packs ➝ Simplicity Commander ➝ commander: commander for macosx.x86_64 (or whatever operating system you're running on):
Summary & Closing
In this tutorial, we introduced the new Silicon Labs BG22 SoC and covered how to get started with this exciting new platform.
The topics we covered are:
- Hardware and Software Requirements
- Development Environment Setup
- Running a Bluetooth LE Peripheral Example
- GATT Configurator Tool
- Building, Flashing, and Testing
- Basic Structure of a Bluetooth LE Application
- Silicon Labs Thunderboard BG22 Kit
- Silicon Labs Software Tools
- GATT Configurator
- Multi-Node Energy Profiler
- Network Analyzer
- Simplicity Commander
References
- SiLabs EFR32BG22: https://www.silabs.com/wireless/gecko-series-2/efr32bg22
- SLWSTK6021A Development Kit: https://www.silabs.com/development-tools/wireless/efr32xg22-wireless-starter-kit
- Simplicity Studio: https://www.silabs.com/software-and-tools/simplicity-studio
- Simplicity Commander: https://community.silabs.com/s/article/simplicity-commander?language=en_US
- "BGTool where to download" discussion: https://community.silabs.com/s/question/0D51M00007xeHokSAE/bgtool-where-to-download?language=en_US
- Silicon Labs Account Registration: https://siliconlabs.my.site.com/apex/SL_CommunitiesSelfReg?form=short


