

This tutorial is an excerpt from a course on Bluetooth LE development for iOS in the Bluetooth Developer Academy. The course was developed in partnership with Anas Imtiaz, Ph.D.
In this tutorial, we will look at developing iPhone/iPad apps that interface with a Bluetooth Low Energy peripheral to send/receive data.
We will start by looking at Core Bluetooth, a framework provided by Apple to make Bluetooth LE development easy through the use of APIs to perform different actions. We will also look at setting up a project in Xcode for Bluetooth LE development, looking at the setup stages for first-time use, and taking into account permission handling for different iOS versions.
Once we set up the workflow, we will dive into the world of Core Bluetooth APIs and code our way to develop an app that is able to:
- Scan the area to find the different Bluetooth LE peripherals
- Display information about peripherals scanned
- Connect to a specific peripheral
IMPORTANT: we are not going to look at building the UI in this tutorial and will focus strictly on getting started with Bluetooth LE development. Instead, we will use print statements to show different outputs visible in the debug area at the bottom of Xcode.
Prerequisites
- An Apple computer: Macbook, Mac Mini, iMac
- macOS
- XCode
- iPhone with Bluetooth LE (iPhone 4S onwards)
- Bluetooth LE Peripheral (we have used nRF52 Development Kit with Nordic HRM example)
- Enrollment in the Apple Developer Program (Free, unless you want to deploy to the App Store in which case it is USD99 per year)
- Basic understanding of Swift [preferred, but not essential]
Generally, the latest version of macOS and XCode are recommended, but anything from 2015 or later should be fine.
For this tutorial, we'll be using:
- MacBook Pro 2017
- macOS Catalina (10.15.2)
- XCode version 11.3.1
- iPhone 11 (iOS version 13.3.1)
- Swift 5
What is CoreBluetooth?
Core Bluetooth is a framework provided by Apple on iOS/iPadOS/macOS for communicating with all Bluetooth devices (BLE or Classic). If you have some experience in programming on mobile devices, particularly Apple devices, this will come across as very familiar i.e., a framework providing access to certain system features through the use of APIs.
Core Bluetooth provides support for several features, including:
- Setting up an iOS device as a Bluetooth LE central or peripheral
- Handling low-level connection parameters
- Establishing and maintaining a connection
- Transferring data between Bluetooth LE devices
- Bluetooth Classic
- Error handling
The two important Apple Developer resources related to Core Bluetooth that help understand some of the features and APIs are:
Core Bluetooth | Apple Developer Documentation
Core Bluetooth Programming Guide
Note that there are several other libraries out there that provide different methods for carrying out Bluetooth LE operations on iDevices. However, all of them are built on top of Core Bluetooth since that is the only API Apple has made available to developers. Some of the popular libraries include:
- BluetoothKit
Provides easy-to-use functions for carrying out simple tasks - RxBluetoothKit
Uses Core Bluetooth and RxSwift - BlueCap
Simple methods for asynchronous operations
Regardless of the library used, the core concepts will remain the same. With that in mind, let’s get started!
Setting up an iOS Bluetooth LE Project in Xcode
When ready, fire up XCode and select Create a new XCode project.
Choose iOS as the platform from the tab on top, and then select Single View Application and press Next.
Enter Product Name. This is the name of our app, so let’s call it TheBlueApp.
From the Team menu, you should be able to select your name as a personal team if you have already enrolled in the Apple Developer Program. If you don’t see the option now, we will come back to it later and you can leave the default for now.
The Organization Identifier is normally your domain in reverse. So you can use io.novelbits.
In User Interface, select Storyboard. Strictly speaking, it doesn’t matter which method you select since this is applicable for displaying the different UI components. SwiftUI is fairly new, and many developers (including myself) still continue to use Storyboard, so we will keep it that way for this tutorial.
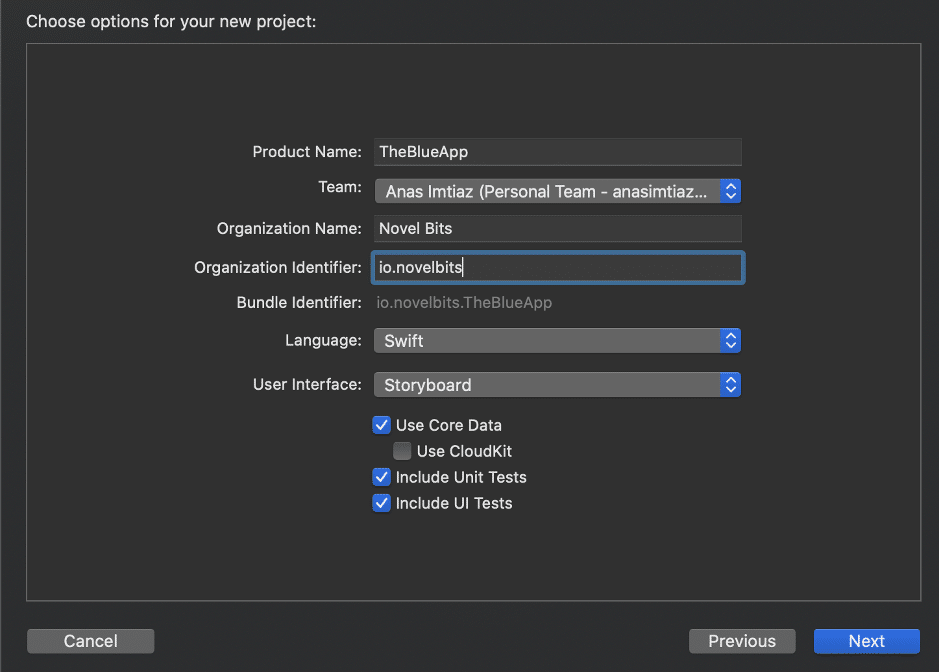
Click Next, select the location on your hard drive where you want to create the new project, and then click Create.
Our new project is ready now.
Let’s have a quick look at what XCode has created for us. On the left-hand side is the file explorer, which lists a bunch of files.
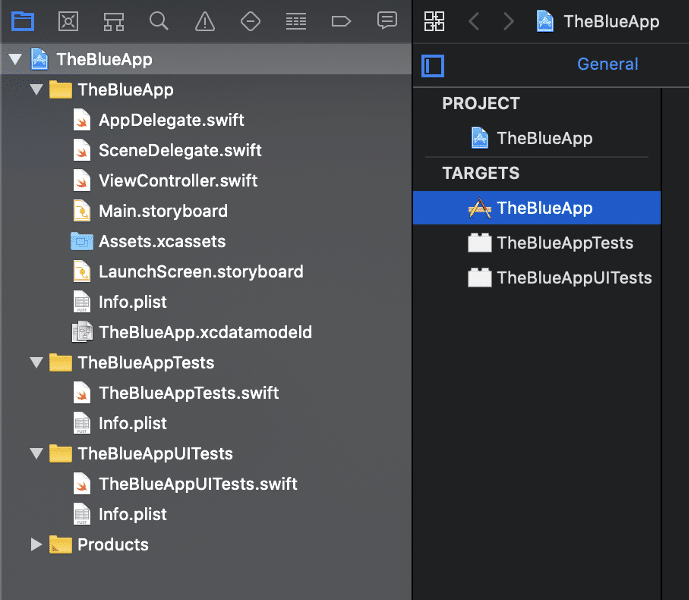
The two files of immediate concern to us are:
ViewController.swift
This file contains everything related to the display and functionality of our single view app.Info.plist
This is, sort of, the settings and permissions file which we need to use to enable the use of Bluetooth in our app.
Now, just to make sure our iPhone is correctly set up for deploying the app, let’s try and build this (empty) app.
- Plug your iPhone in via USB to your development computer.
- The phone may ask if you trust this computer, make sure you allow that.
- Select the phone from the top menu in XCode as shown below.

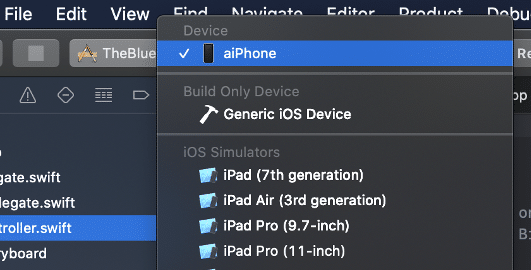
- It is important to note that while you can use the simulator for most app development, you have to use a physical device to test Bluetooth LE connectivity.
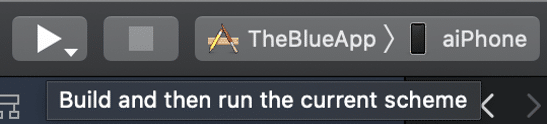
- Click the play button on top to build. If there are issues with respect to your Apple ID in relation to the developer program, they will be reported here, and you will be given options to fix them.
- Another option is to go to the Signings & Capabilities section and select the option to Automatically manage signing and press the button to Try again. Hopefully, this will iron out any issues related to signing and certificates.

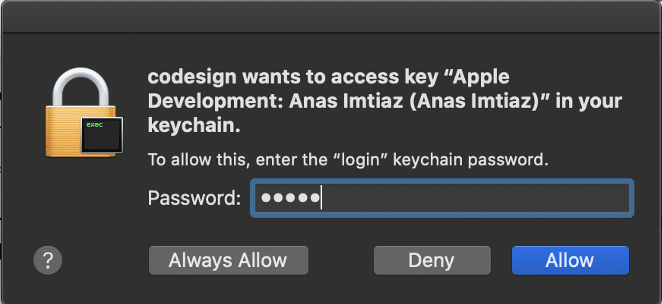
- If needed, build again and wait for the process to complete. Your Mac may prompt you to enter your password. Enter the password and select Always Allow.
- Once the build process is complete, the app will be installed and try to launch.
- On newer versions of iOS, you will get the following error:
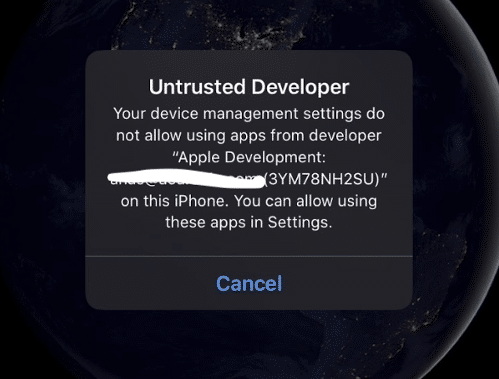
- On the iPhone, go to Settings → General → Device Management. Select your development profile and then tap on Trust “Apple Development: <YOUR_APPLE_ID>”
- Launch the app again, and it should work, but since we haven’t added anything to the app, it will show a blank screen.
We haven’t done any Bluetooth LE development so far, but we have managed to set up our workflow to develop apps on Xcode and deploy them to our physical iPhone.
Importing CoreBluetooth
Now let’s get to work on setting up the use of CoreBluetooth.
The very first step is to import the CoreBluetooth framework into your project. To do this, add the following line at the top of your ViewController.swift:
import CoreBluetoothNext, we will be using CBCentralManager and CBPeripheral classes since our phone will be the central manager and we will use methods to interface with the peripheral Bluetooth LE device. While we get access to the different methods of these classes, we still need to conform to the delegate methods defined by the CentralManagerDelegate and CBPeripheralDelegate protocols.
These are slightly advanced concepts, but in simpler terms, Swift has these design patterns where the timing of the function calls is defined, but their behaviours are not. Hence the behaviour of these functions must be defined. For example, CBCentralManager can tell you that it has connected to a peripheral, but what happens on connection needs to be defined by you. Similarly, if there is a disconnection, what should the central manager object do…ignore or try to re-establish a connection?
You can read more about this concept of delegation here.
To use these protocols, add CBCentralManagerDelegate and CBPeripheralDelegate to the line where your class is defined.
class ViewController: UIViewController, CBCentralManagerDelegate, CBPeripheralDelegate {
    ...
}
As soon as you do this, Xcode will start complaining that:
Type ‘ViewController’ does not conform to protocol ‘CBCentralManagerDelegate’
This is because some of the methods of these protocols need to be defined, while others are optional.
If you click on the red circle showing the error, as follows, there should be a little Fix button.
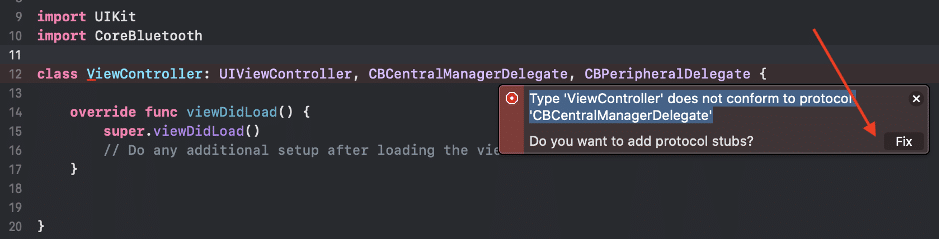
This is Xcode trying to help you write the stubs for the required methods (functions).
Once you click Fix, the outline for function centralManagerDidUpdateState appears:
func centralManagerDidUpdateState(_ central: CBCentralManager) {
    <#code#>
}
Remove the “code” stub for now - we will fill this in later.
This method is an absolute requirement because it gets called whenever you define a CBCentralManager. It is used to check the hardware status of Bluetooth on your device, i.e., whether it's powered on and available to use or disabled. Any further operations to connect with a peripheral must only be carried out if Bluetooth is powered on and enabled.
We also want to declare a variable for our central device so we can refer to it later. Within the class, add the following:
var centralManager: CBCentralManager!The exclamation mark at the end means this is an unwrapped optional variable, and if we refer to it later, we can check for null safety.
We also want to declare a variable for our peripheral object once we establish a connection, so add the following line.
var myPeripheral: CBPeripheral!In the viewDidLoad() function, add the following line to initialize the centralManager variable:
centralManager = CBCentralManager(delegate: self, queue: nil)Now in order of sequence, after viewDidLoad() is called, and our centralManager is initialized, the delegate method centralManagerDidUpdateState will be called. Let’s look at how to figure out the different states of Bluetooth low energy within this method.
Check Bluetooth Low Energy Status
The different Bluetooth LE states of the iOS device are of enumerated type CBCentralManagerState. They are:
CBManagerState.poweredOff
CBManagerState.poweredOn
CBManagerState.resetting
CBManagerState.unauthorized
CBManagerState.unknown
CBManagerState.unsupported
You can find the definitions of these states here.
The important ones to know are poweredOff indicating Bluetooth is off, poweredOn indicating it’s on so we can continue, and unsupported, indicating the lack of hardware support for Bluetooth LE on the device. Your app can have different alerts for the different statuses, but you need to have the state as poweredOn to continue. To check for that, within the centralManagerDidUpdateStatus method, check the central state as follows:
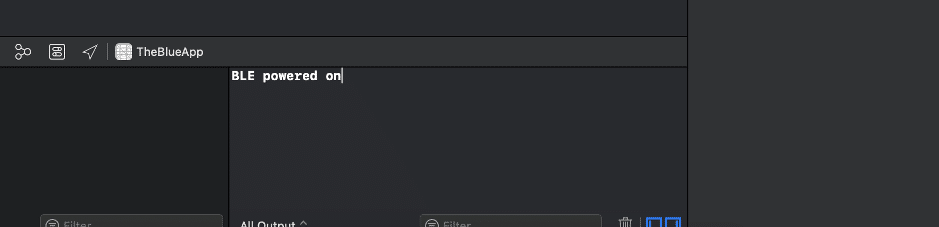
func centralManagerDidUpdateState(_ central: CBCentralManager) {
    if central.state == CBManagerState.poweredOn {
        print("BLE powered on")
        // Turned on
    } else {
        print("Something wrong with BLE")
        // Not on, but can have different issues
    }
}
Note that I have added print statements to show the status in the debug window. Compile this code and run on your device.
The app builds fine but crashes on launch with the following error:
TheBlueApp[8555:2463449] [access] This app has crashed because it attempted to access privacy-sensitive data without a usage description. The app's Info.plist must contain an NSBluetoothAlwaysUsageDescription key with a string value explaining to the user how the app uses this data.
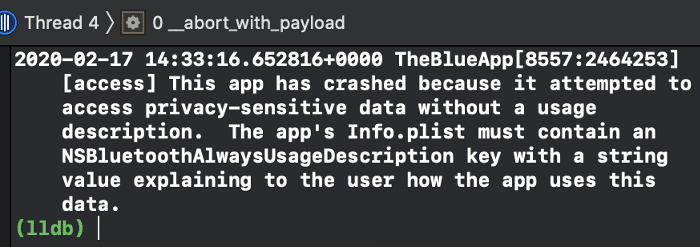
This is a self-explanatory message that Apple warned us about on the CoreBluetooth page here.
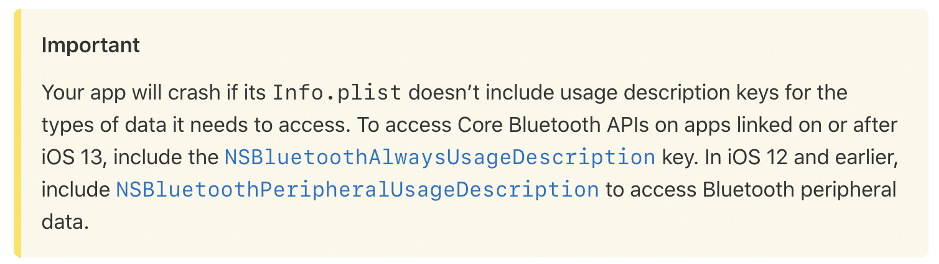
Setting Permissions
What the earlier error says is that we need to define a value for the NSBluetoothAlwaysUsageDescription key if using iOS13 or NSBluetoothPeripheralUsageDescription if using iOS12 or earlier. This is the message displayed to the user when asking for Bluetooth permission for the app. If we are designing for apps to be used on phones with iOS13 and previous versions as well, then it makes sense to define values for both of these keys. This needs to be done in the Info.plist file.
Go to the Info.plist file from the explorer on the left. Press the “+” button next to Information Property List.

A new row appears with a dropdown menu with a list of keys (as descriptive text).
Select Privacy - Bluetooth Always Usage Description, and enter a message in the Value field for this row. Something that tells your users what the app uses Bluetooth for. I have entered the following.
This app uses Bluetooth to receive data from my sensor.

Next, press the “+” button again to add another key.
This time select Privacy - Bluetooth Peripheral Usage Description and enter the same message for the value of this key.
Your plist file will look like this:

Now build and run the app again by clicking the little play button on the top toolbar. Your phone will show a notification asking for permission for TheBlueApp to use Bluetooth.
Select OK when prompted on the phone, asking for permission to use Bluetooth.
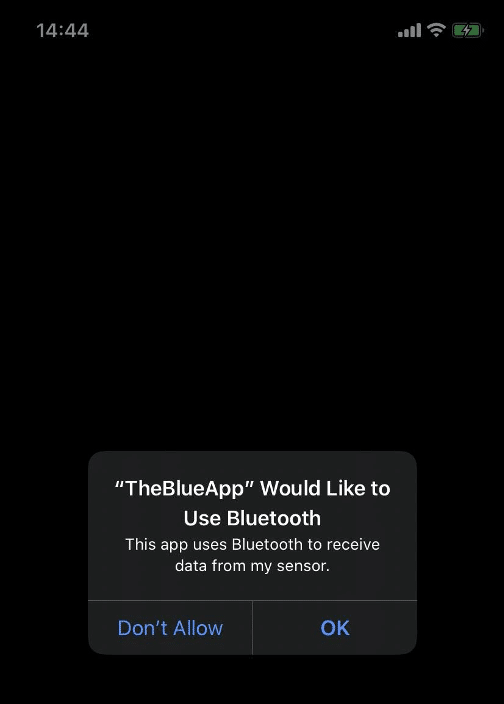
If all goes well, your debug area will show the text Bluetooth LE powered on (our print statement).
Feel free to experiment with different states to see how the phone responds to different settings.
We can now use our iOS device as the central manager, with all settings and permissions sorted. It is time to ask our central manager to scan for devices to find our sensor.
Scanning for a Bluetooth LE Peripheral
If the CBManager state is powered on; we will ask the central to scan for peripheral devices with the following:
central.scanForPeripherals(withServices: nil, options: nil)The withServices and options parameters allow customised scanning based on service UUIDs, but for now, we will just use nil to go for a broad-based scan.
The effect of this statement is that for each peripheral that the iPhone finds, there the CBCentralManagerDelegate method centralManager(_:didDiscover:advertisementData:rssi:) gets called.
From Apple’s documentation on Core Bluetooth, this method “Tells the delegate the central manager discovered a peripheral while scanning for devices.”
For each peripheral, it gives information about the advertisement data as a key-value pair dictionary and the RSSI.
In our project, we need to define the behaviour of this delegate method. Go to the end of the previous delegate method (centralManagerDidUpdate), hit enter to start on a new line, and start typing diddiscoverperipheral. Xcode will automatically list the methods that match the keywords. Make sure you select the didDiscoverPeripheral method which is part of the CBCentralManagerDelegate, as shown below.
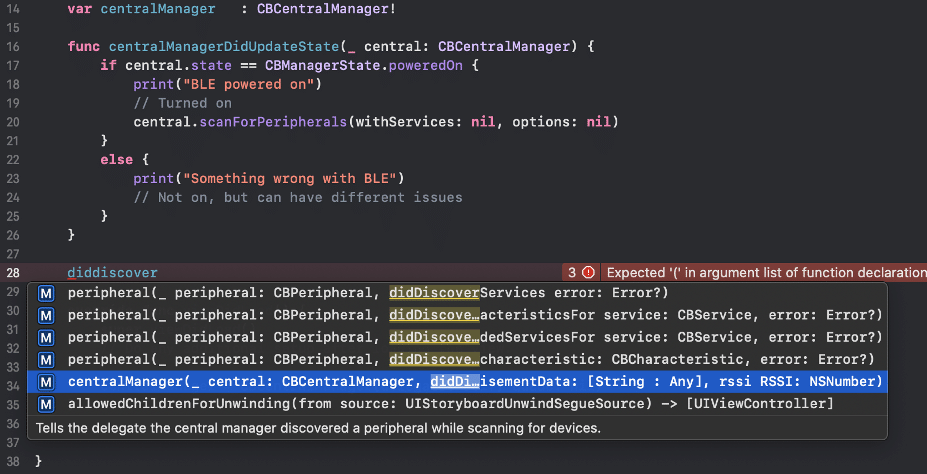
Double click the method, and the stub appears.

We can identify our peripheral by name, UUID, manufacturer ID, or basically anything that is part of the advertisement data. The simplest way is to search by the name, but that is certainly not a safe way. Ideally, we should check the name, UUID as well as manufacturer ID.
For now, we will just check the name of each of the devices that our central manager has found. Inside the didDiscover delegate method, type in the following:
if let pname = peripheral.name {
    print(pname)
}
The first line checks whether the peripheral has a name (many of them don’t), so to avoid our app from crashing, we are checking for nullability. If there is a name, we assign it to a constant and print the value.
Build and run the project, and you will see a list of names appearing in your debug area depending on how many devices are around.
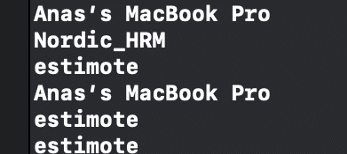
I have a Nordic nRF52832 Development Kit with the stock HRM example running on it, and I can see that my device is listed as Nordic_HRM. The next step is to stop scanning when our preferred peripheral is found and establish a connection with this peripheral.
Establishing a Connection
While scanning, as soon as we find our peripheral, we want to stop scanning and establish a connection with the peripheral. At the same time, we want to keep a reference to this peripheral so we can perform read/write actions.
Although the easiest way of identifying a peripheral is by its name, that is not the best way to do it. You would be advised to check other information such as manufacturer ID, advertisement data and service UUIDs. However, for simplicity, we will still use the peripheral name in the following example.
So, update the code where we printed the peripheral name as follows.
if let pname = peripheral.name {
    if pname == "Nordic_HRM" {
        self.centralManager.stopScan()
        self.myPeripheral = peripheral
        self.myPeripheral.delegate = self
        self.centralManager.connect(peripheral, options: nil)
    }
}
First, we are checking if pname is Nordic_HRM, which is the name being advertised by my Nordic dev kit. If that is the case, we ask the central manager to stop scanning since we have found our peripheral. Next, we assign this peripheral to the myPeripheral object and subsequently its delegate as the current view controller class. This second part is important because CBPeripheralDelegate needs to know who is the delegate here that will be conforming to its methods. Forgetting to do this is often the cause of hours of headaches since the CBPeripheralDelegate methods are not called and the developer is left wondering why that is the case. Finally, we ask the central manager to connect to this newly found peripheral of ours.
Once the connection is established, the centralManager(_:didConnect:) delegate method gets called. At this point, we ask the peripheral to provide us with more information about its services using the following line in the didConnect delegate method (as before, when you start typing didConnectPeripheral, Xcode will present you with the options to autocomplete).
The method will look like this:
func centralManager(_ central: CBCentralManager, didConnect peripheral: CBPeripheral) {
    self.myPeripheral.discoverServices(nil)
}
Note that you can pass the service UUIDs as an argument if you already know what you are looking for or you can check that manually later. (Also, note that if you are scanning for a peripheral while your app is in the background, you need to provide the service UUID. We talk more about this in the full course included in the Bluetooth Developer Academy).
At this point, your ViewController.swift will look like this:
import UIKit
import CoreBluetooth

class ViewController: UIViewController, CBCentralManagerDelegate, CBPeripheralDelegate {

    var centralManager: CBCentralManager!
    var myPeripheral: CBPeripheral!

    func centralManagerDidUpdateState(_ central: CBCentralManager) {
        if central.state == CBManagerState.poweredOn {
            print("BLE powered on")
            // Turned on
            central.scanForPeripherals(withServices: nil, options: nil)
        } else {
            print("Something wrong with BLE")
            // Not on, but can have different issues
        }
    }

    func centralManager(_ central: CBCentralManager, didDiscover peripheral: CBPeripheral, advertisementData: [String : Any], rssi RSSI: NSNumber) {
        if let pname = peripheral.name {
            if pname == "Nordic_HRM" {
                self.centralManager.stopScan()
                self.myPeripheral = peripheral
                self.myPeripheral.delegate = self
                self.centralManager.connect(peripheral, options: nil)
            }
        }
    }

    func centralManager(_ central: CBCentralManager, didConnect peripheral: CBPeripheral) {
        self.myPeripheral.discoverServices(nil)
    }

    override func viewDidLoad() {
        super.viewDidLoad()
        // Do any additional setup after loading the view.
        centralManager = CBCentralManager(delegate: self, queue: nil)
    }
}
Summary
In this tutorial, we had an introductory look at interfacing an iOS device with a Bluetooth LE peripheral. We covered:
- Setting up Xcode for Bluetooth LE development
- Bluetooth permissions
- Scanning for Bluetooth LE peripherals
- Connecting to a Bluetooth LE peripheral
Take your Bluetooth LE knowledge to the next level
There's still so much more to interfacing with a Bluetooth LE peripheral from an iOS app, including:
- Discovering services of a Bluetooth LE peripheral
- Discovering characteristics of a service
- Reading/Writing characteristic values
- Receiving notifications (subscribing/unsubscribing)
- Connection management:
- Disconnecting from a Bluetooth LE peripheral
- Handling a disconnection
- Background operation
We cover all this and much more in the Bluetooth Developer Academy.


