
This tutorial is an excerpt from a course available within the Bluetooth Developer Academy, developed in collaboration with Anas Imtiaz, Ph.D.
For the purpose of this tutorial (separated into two parts), our goal is to create an iOS app that can manage multiple BLE peripherals. Our example will be an app that can be used by runners to keep track of their speed, heart rate, and environmental temperature. These three inputs are provided by three separate sensors using notifications to update the central device.
Note: If you’re new to BLE development on iOS, then check out the following previous tutorials:
- Introduction to BLE Mobile Development [iOS] – Part 1
- Introduction to BLE Mobile Development [iOS] – Part 2
Prerequisites
- An Apple computer: Macbook, Mac Mini, iMac
- macOS
- XCode 11+
- iPhone with BLE (iOS 13+)
- 3 x BLE Peripherals
(we have used 1x nRF52 Development Kit with Nordic HRS example, 1x nRF52 Development Kit with Nordic RSC example, 1x Nordic Thingy 52) - Enrollment in the Apple Developer Program (Free, unless you want to deploy to the App Store in which case it is $99 per year). For more information on setting up your account, refer to the following link: https://developer.apple.com/support/account/
- Basic understanding of Swift
Note: we will be using SwiftUI to develop the user interface which requires iOS13 and Xcode 11. If you are on a previous version, you can still follow along since the Core Bluetooth APIs are exactly the same regardless of the method used to build the user interface.
For this tutorial, I am using:
- MacBook Pro 2017 with macOS Big Sur (11.4)
- XCode version 13.0
- iPhone 11 (iOS version 15)
- Swift 5.1
- nRF52 Development Kit with Nordic HRS peripheral example
- nRF52 Development Kit with Nordic RSC peripheral example
- Nordic Thingy:52
Project Setup
As always, the first thing to start off on an iOS app is to create a new project in Xcode. For the template, select iOS and then App from the Application section

On the next screen, enter project details and make sure to uncheck Use Core Data since we will not be using that in this project.
For interface, select SwiftUI.
Continue with the setup process until the project is created.
Build and run to make sure everything is ok.
App Prototyping
Before we proceed we need to figure out what the app is going to look like, how it is going to display the information from the sensors, and how it will actually interact with the sensors. This may involve input from a team of UI designers in a real-world project but for our purposes, we can assume we have some basic requirements as follows.
- We need a main screen in the app that shows its name and purpose
- The next screen should allow connections with various sensors and
- Once the user is ready, following connections with the sensors, the next screen should display the resulting data obtained from the different sensors.
Based on this, the app may look similar to the sketches shown below.
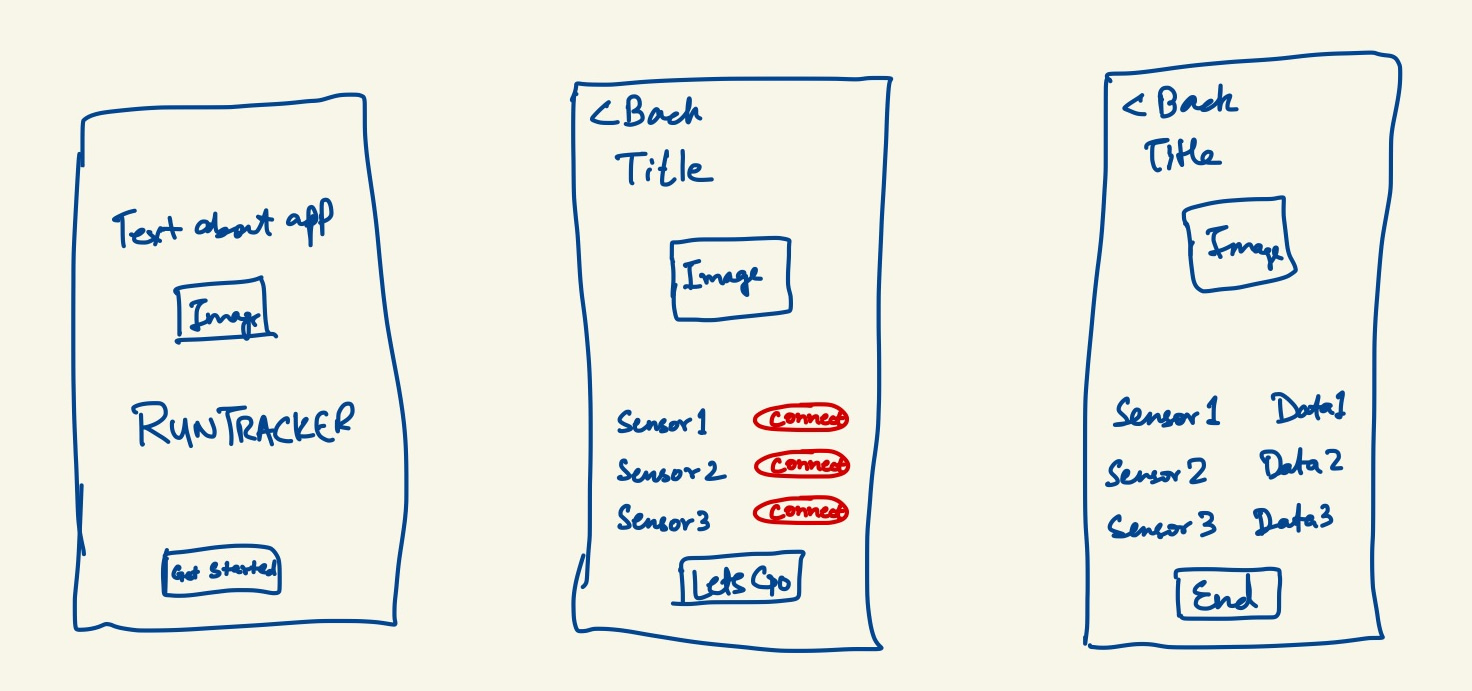
If you are developing in the real world I would expect you to get much more polished user journeys than this one!
The end result will look like the screenshots shown below.
First Screen
Now that we know what our app should look like, let’s go about adding UI elements corresponding to the requirements of each screen.
Let’s take a close look at the first screen. Essentially we have 4 UI elements that we can get from SwiftUI. From top to bottom we have Text, Image, Text, Button.
Since these are laid out vertically we can use a VStack to arrange everything.
Start a VStack inside the body of your ContentView
| struct ContentView: View { var body: some View { VStack { } } } |
The first element is Text which we can add as follows.
| Text(“Track your run with\nreal-time metrics”) |
Next, we have an Image. For this, I will use an icon from SFSymbols which is a library of vector icons from Apple. If you don’t already have it download and install SFSymbols here:
https://developer.apple.com/sf-symbols/
Now open up the SF Symbols app and search for “walk” in the top right bar.
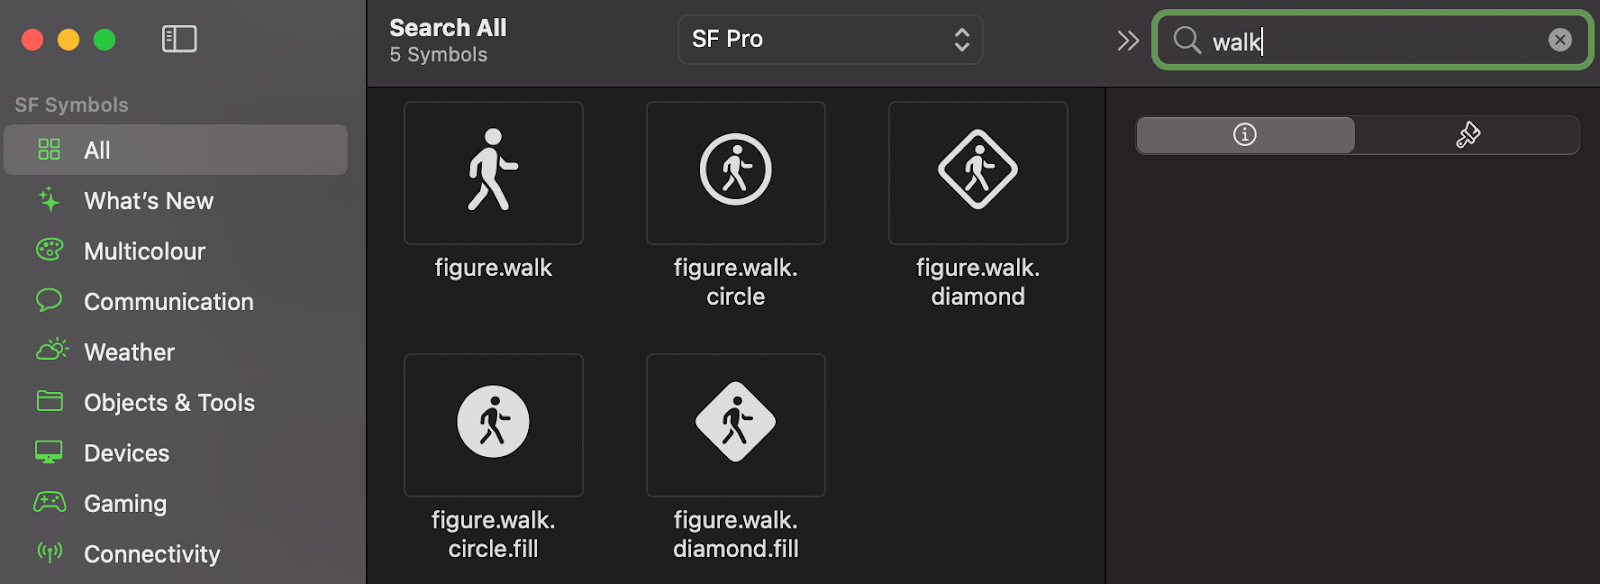
You can use any icon but I like the first one on the second line. Right-click on it top copy the name “figure.walk.circle.fill”
Now to add the image, simply use this name as follows:
| Image(systemName: “figure.walk.circle.fill”) |
Next, we have text again
| Text(“RUNTracker”) |
And finally, a button which can be added as follows.
| Button(“Get Started”) { } |
Build and run and you should see the following:

We have everything we need in terms of UI elements but they don’t look very nice so let’s stylize them in a way that they can be used elsewhere as well.
At this point, the code in ContentView should look like this:
| struct ContentView: View { var body: some View { VStack { Text(“Track your run with\nreal-time metrics”) Image(systemName: “figure.walk.circle.fill”) Text(“RUNTracker”) Button(“Get Started”) { } } } } |
Background Color
The first thing I want to do is to change the background color to a custom color. Go to the project navigator and find the Assets Catalogue (Assets.xcassets). Hit the + sign at the bottom to add a new Color Set and call it ThemeColor (or anything else that you prefer).
It shows two color squares that are to be used in Light and Dark modes. Let’s define the same color for both.
Click on the color square, and show the inspector on the right if it is not already visible.
In the Color section in the inspector, select sRGB for Content, 8-bit (0-255) for Input Method, and then define RGB values as 98, 207, 106.
Do this for both.

Now that we have our color defined we can use this name anywhere we want.
For example, Color(“ThemeColor”) will always give us our custom color without needing RGB values everywhere.
Now for the background color of the first screen, we could use the background modifier on our VStack that holds the UI elements. But the VStack itself only runs from the top of the first element to the bottom of the last so it will not fill the screen.
We can define a view to hold the VStack or we can just use ZStack and change its background color.
To do this, Cmd+click on VStack in your code and select Embed in ZStack.

Now simply add the following as the first line of ZStack before the start of your VStack.
Color(“ThemeColor”)
Now if you see in the preview you will see there is white color on top which is the safe area.

To ignore the safe area, use the modifier .edgesIgnoringSafeArea(.all) and your code should look like this.
| var body: some View { ZStack { Color(“ThemeColor”) .edgesIgnoringSafeArea(.all) VStack { …… |
Now for the first Text view, let’s change its appearance so that it is centred, uses a larger and bold font and its color is white. This is achieved by adding multiple modifiers as follows.
| Text(“Track your run with\nreal-time metrics”) .fontWeight(.bold) .font(.title2) .foregroundColor(.white) .multilineTextAlignment(.center) |
The first modifier achieves the effect of bold text. For font, we are using .title2. This is a good practice to use pre-defined styles with dynamic typing. This way if the system font size has changed then all the fonts are scaled appropriately. You can read more about dynamic typing here:
https://developer.apple.com/design/human-interface-guidelines/ios/visual-design/typography/
To add some space between this Text view and the next Image view, insert a Spacer().
| Text(“Track your run with\nreal-time metrics”) .fontWeight(.bold) .font(.title2) .foregroundColor(.white) .multilineTextAlignment(.center) Spacer() Image(systemName: “figure.walk.circle.fill”) |
For the image, which is an icon, we can actually use the font size to increase its size. We also want to change its foreground color to white.
| Image(systemName: “figure.walk.circle.fill”) .foregroundColor(.white) .font(.system(size: 120)) |
Note that in this case, we are using the absolute font size to enlarge the icon size (in contrast to what I said above). This is because we want it to be much larger than any of the predefined styles.
Insert another Spacer()
Now for the next Text view, I want my app’s name to appear as follows.

How can we achieve this?
What we want is two text views with different modifiers stacked next to each other. Essentially, two Text views in HStack with no spacing!
Embed two Text views in HStack (inside your VStack) as follows.
| HStack(spacing: 0) { Text(“RUN”) .font(.system(size: 52)) .fontWeight(.bold) .foregroundColor(.yellow) Text(“Tracker”) .font(.system(size: 50)) } |
Again, I am using absolute font sizes to achieve a specific look. In reality you would have an image here as a logo that can scale on different screens.
Next, I want some more space before I get to the button so insert two spacers.
Finally, I want my main button to look like this on all screens

So let’s make a custom view so that we can reuse this every time we need a button like this.
What we want as the view of the button is text that is black in color, a rounded rectangle in background with some padding around the text.
To achieve this, we can do the following.
| Button(action: { // some action }) { Text(“Get Started”) .font(.title2) .padding() .foregroundColor(.black) .background( RoundedRectangle(cornerRadius: 25) .stroke(Color.white, lineWidth: 2) .background(Color.white.cornerRadius(25)) ) } |
The modifiers are self-explanatory except for the last one where we have used the background modifier with RoundedRectangle and then applied styling to it.
Since we will be using this on other views, let’s create a new file for the custom views.
Create a new empty Swift file. Let’s call it CustomViews.swift. After the file is created add the line to import SwiftUI
We will then create a new struct called MainButton that is of type View and its body applying all the modifiers on the text that we just used above.
| struct MainButton: View { var text: String var body: some View { Text(text) .font(.title2) .padding() .foregroundColor(.black) .background( RoundedRectangle(cornerRadius: 25) .stroke(Color.white, lineWidth: 2) .background(Color.white.cornerRadius(25)) ) } } |
Now we can update our Button function in the main ContentView to use this struct as follows.
| Button(action: { // some action }) { MainButton(text: “Get Started”) } |
We will come back to this button later as we want it to do a few other things but for now, it does look the way we want it to.
Add another Spacer() below and the final ContentView should look like this:

Second Screen
For the second screen, again we want the background to be of the ThemeColor. Then, from top to bottom we have a back button and the title. The back button comes in automatically when we use a NavigationLink (we will get to this later) and the title is added using the navigationBarTitle modifier. Following this, there is an image, three lines of similar-looking text and button, and an action button at the end.
Let’s ignore the first two items as we will fix them once we establish the navigation link.
Create a new SwiftUI file, calling it SensorsConnectionView.swift
As before, use the same image of the walking person in a circle inside a VStack which itself is embedded in a ZStack.
| ZStack { VStack { Spacer() Image(systemName: “figure.walk.circle.fill”) .foregroundColor(.white) .font(.system(size: 120)) } } |
Add a Spacer() and some informational Text as follows and set its foreground color to white.
| Text(“Connect to all the sensors before starting your run”) |
Next, we have three rows of items that are next to each other so we will be using rows of HStack.
We want the end result to be as shown below.

So each HStack here is a combination of an image/icon, text, and button.
Let’s define the Connection button first. We will use a different method for this one just to demonstrate the alternative possibility. We will define a new ButtonStyle in our CustomViews.swift and then use it to style the button.
| struct ConnectionButton: ButtonStyle { func makeBody(configuration: Configuration) -> some View { configuration.label .padding(8) .background(Color.red) .foregroundColor(.white) .clipShape(Capsule()) } } |
The makeBody() method is used to create the view of the Button.
Now if we want to apply this style to a Button, we can simply apply the modifier to the button as:
| .buttonStyle(ConnectionButton()) |
Now let’s create a new struct in which we put these three elements together in an HStack.
| struct SensorConnectView: View { var body: some View { HStack { } } } |
Because we want the image and text to be different on each line we will define them as a variable.
| var imageName: String var dataName: String |
Also, we may want the button text to be different so that can be another variable.
| var buttonText: String |
Finally, we also want to pass the button action defining it in a closure. So we can define the action as follows since it doesn’t return anything.
| var buttonAction: () -> Void |
Now putting an Image, Text and Button together with some modifiers we have:
| HStack { Image(systemName: imageName) .foregroundColor(.white) .font(.title2) .frame(width: 32) Text(dataName) .textCase(.uppercase) .foregroundColor(.white) .font(.title3) .frame(width: 196, alignment: .leading) Button(buttonText) { buttonAction() } .buttonStyle(ConnectionButton()) } |
In the above code, for the image, we are using the SF Symbol icon name and defining the width to be fixed for both image and text just to keep things nicely aligned. For the button, we have used the buttonStyle that we defined earlier.
At this point, putting everything together SensorConnectView should look like this:
| struct SensorConnectView: View { var imageName: String var dataName: String var buttonText: String var buttonAction: () -> Void var body: some View { HStack { Image(systemName: imageName) .foregroundColor(.white) .font(.title2) .frame(width: 32) Text(dataName) .textCase(.uppercase) .foregroundColor(.white) .font(.title3) .frame(width: 196, alignment: .leading) Button(buttonText) { buttonAction() } .buttonStyle(ConnectionButton()) } } } |
Go back to the SensorsConnectionView,swift and define three new instances of SensorConnectView.
| SensorConnectView( imageName: “figure.walk”, dataName: “Running Speed”, buttonText: “Connect” { // button action } SensorConnectView( imageName: “heart.fill”, dataName: “Heart Rate”, buttonText: “Connect” { // button action } SensorConnectView( imageName: “thermometer.sun.fill”, dataName: “Temperature”, buttonText: “Connect” { // button action } |
Add a Spacer()
And another button of type MainButton with text Let’s Go.
| Button(action: { // some action }) { MainButton(text: “Let’s Go”) } |
And then another Spacer()
Now we have most things we need for this second screen but how do we get here from the main screen?
Go back to the first screen in ContentView.swift and replace the Button at the bottom with a NavigationLink, using our custom MainButton as its view.
| NavigationLink(destination: SensorsConnectionView()) { MainButton(text: “Get Started”) } |
While the NavigationLink creates a button to perform the transition it has to be part of the NavigationView. So, make sure everything inside the body of the ContentView is embedded in a NavigationView.
| NavigationView { ZStack { … } } |
If you build and run you can see that this allows you to navigate from the first screen to the second. And then there is a back button at the top of the second view which we can use to return to the first view.
Two more things are needed. We still don’t have a title at the top and I don’t like the blue color of the back button so I want to change it to white.
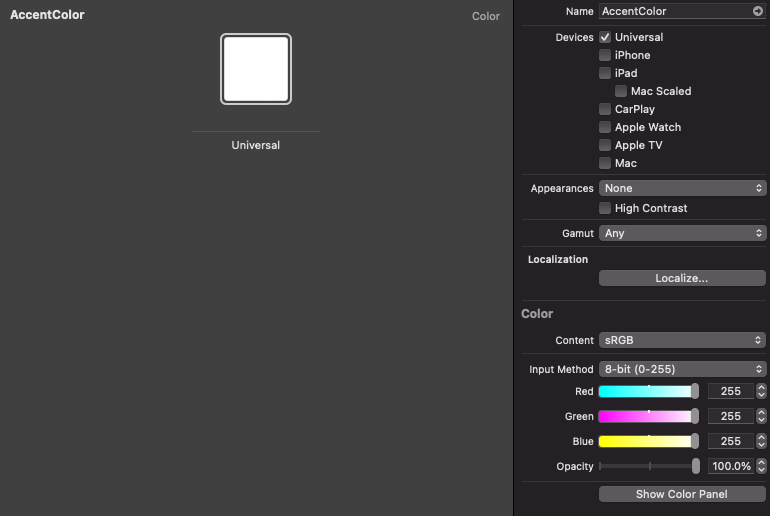
For the second issue, the color can be defined in Assets.xcassets. Go to AccentColor in Assets.xcassets, and change its color to white. Select the Universal color and then set the sRGB values to 255,255,255 in the inspector. This will ensure white accent color throughout the app. If the inspector is not visible, click on the top right button in Xcode to toggle the visibility of the inspector.
For the title, in SensorsConnectionView.swift, add a modifier right at the end where the ZStack curly brace is closed.
| .navigationBarTitle(“Configuration”, displayMode: .large) |
This will add the word Configuration at the top as part of the navigation bar title.
Our second screen is now complete!
Third Screen
Now we can move on to the last screen which will be significantly easier to set up based on the work we have done in the last two. Looking at the sketch, it is pretty similar to the second one except that its title will be different and the three rows here have placeholders for data to be displayed rather than the red button from the previous screen.
Create a new SwiftUI file called SensorsDataView.swift
Start with a ZStack with the background color defined (this is repetitive so we can actually create a custom view to replace this). Set the title using the navigationBarTitle modifier.
| .navigationTitle(“Active Session”) |
Now embed everything in a VStack.
The image is the same as before.
| ZStack { VStack { Spacer() Image(systemName: “figure.walk.circle.fill”) .foregroundColor(.white) .font(.system(size: 120)) } } .navigationTitle(“Active Session”) |
For the rows, as before, we want a little icon and description of what is being displayed followed by the value and the unit. So instead of buttons we have more text. We can define the custom view as follows in CustomViews.swift file.
| struct SensorDataView: View { var imageName: String var dataName: String var dataValue: UInt16 var dataUnit: String var body: some View { HStack{ Image(systemName: imageName) .foregroundColor(.white) .font(.title2) .frame(width: 32) Text(dataName) .textCase(.uppercase) .font(.title3) .frame(width: 196, alignment: .leading) Text(String(dataValue) + ” ” + dataUnit) .font(.title3) .foregroundColor(.white) .frame(width: 80) .padding(8) } } } |
Notice that the only difference here is the last element in the HStack where we are using Text view to display the string of data value and its unit. The dataValue is UInt16 because as you will see later this is what we get from the BLE sensors.
Define three new rows in the SensorsDataView:
| SensorDataView(imageName: “figure.walk”, dataName: “Running Speed”, dataValue: UInt16(0), dataUnit: “m/s”) SensorDataView(imageName: “heart.fill”, dataName: “Heart Rate”, dataValue: UInt16(0), dataUnit: “bpm”) SensorDataView(imageName: “thermometer.sun.fill”, dataName: “Temperature”, dataValue: UInt16(0), dataUnit: “C”) |
For now, we have just passing constants and will update this in the later sections.
Finally, add a button at the end with Spacer() before and after the button.
| Button(action: { // button action }) { MainButton(text: “End Session”) } |
Now you also need to go back to the SensorsConnectView and replace the button at the end with a NavigationLink which points to this SensorsDataView.
| NavigationLink(destination: SensorsDataView()) { MainButton(text: “Let’s Go”) } |
Now you should have the UI of the app complete with the navigation working from the first through to the last screen.
Implementing the “BLE Controller” module
For this example, we are using two nRF52832 Development Kits.
The first one has the Nordic HRS BLE peripheral example code and has the heart rate service with a UUID of 0x180D and heart rate measurement characteristic with UUID 0x2A37.
The second board has the Nordic RSC BLE peripheral example. This consists of the running speed service (UUID 0x1814) and characteristic (0x2a53).
Finally, a Nordic Thingy 52 is used to capture temperature. This is in the weather station service (UUID: EF680200-9B35-4933-9B10-52FFA9740042) with temperature characteristic (UUID: EF680201-9B35-4933-9B10-52FFA9740042).
It is a good idea at this point to verify these are working by checking against common BLE scanners and exploring the different services and characteristics.
Back to the iOS app, our views are looking good now but they don’t do much since they can’t connect to the sensors yet.
We have to give the usage permissions for BLE which is normally done in the Info.plist file. You may have noticed that there is no Info.plist in the latest versions of Xcode.
Navigate to the main project, select the Target and go to Info where you will find Custom iOS Properties.
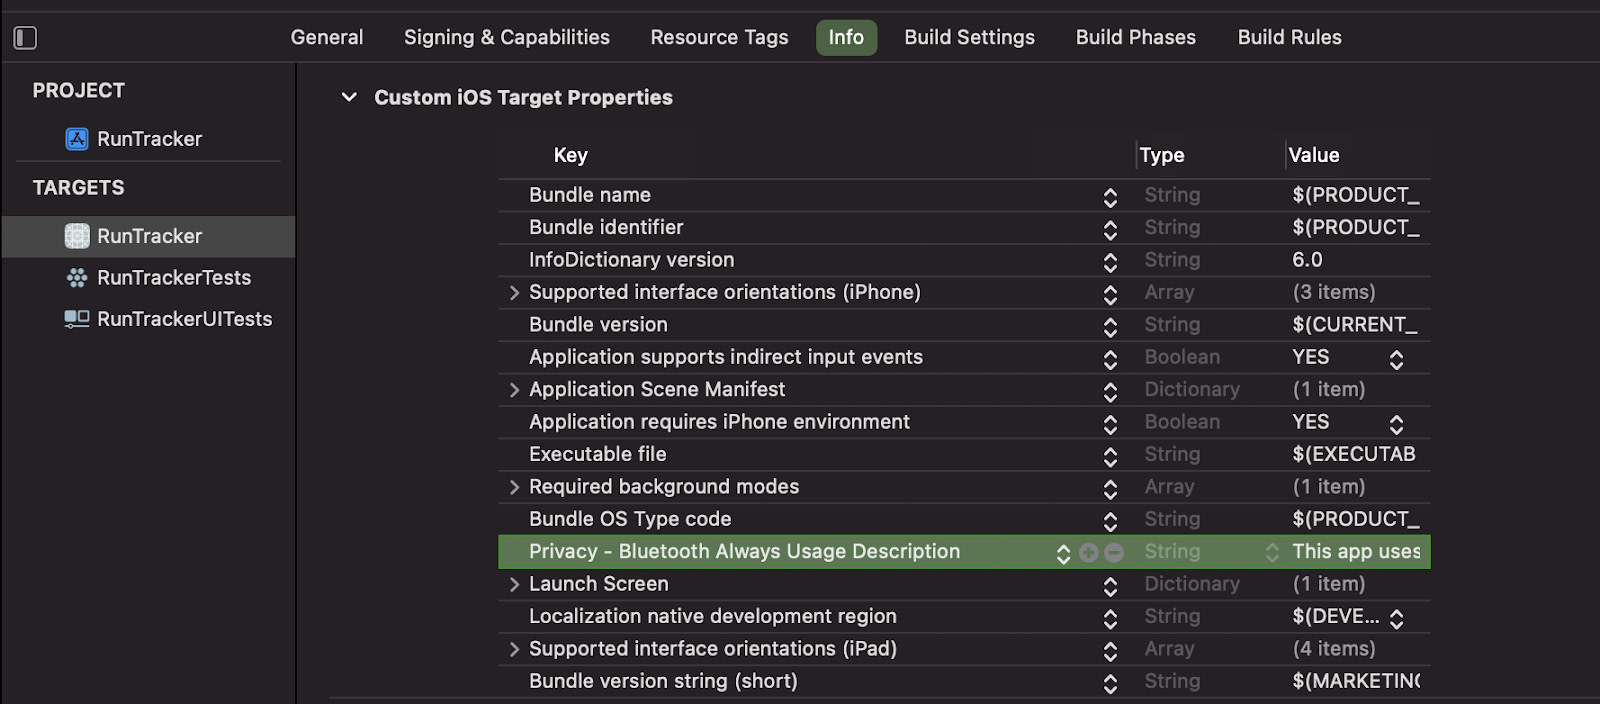
Add a new property for Privacy – Bluetooth Always Usage Description and a Value that gives the message to be displayed when asking for user permission.
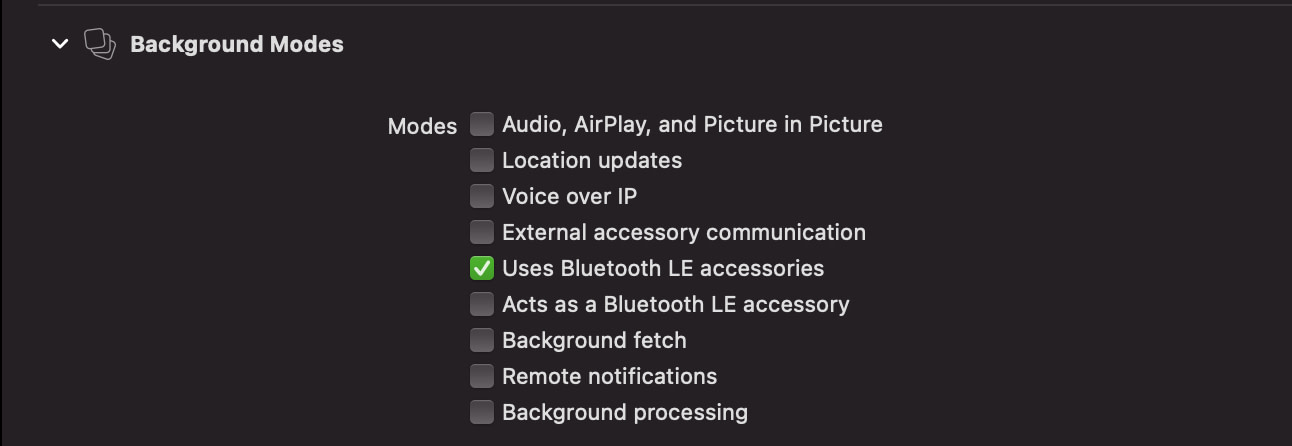
Additionally, we want to have BLE communication in the background so while we are here go to Signing & Capabilities. Select + from the top left and then Background Modes. Now check Uses Bluetooth LE accessories.
That’s all the setup in Xcode done.
We did something similar in the [BLE Background] course within the Academy where we created a separate class for handling the BLE events. This is even more important in this app since we want a single class that can manage connections and update the UI across different screens of the app.
So to start, create a new Swift file and import the CoreBluetooth framework. We will name the file as BLEController.swift.
Define the class so that it conforms to the required CoreBluetooth delegates.
| class BLEController: NSObject, ObservableObject, CBCentralManagerDelegate, CBPeripheralDelegate { … } |
Note that we are ObservableObject here because we will observe the changes within this class from other classes.
Xcode will show an error asking for the centralManagerDidUpdateState method so go ahead and use the Fix option to add it automatically.
Next, I like to check the state of BLE hardware to see if it is powered on and update a property.
Define this property as follows.
| @Published var isSwitchedOn = false |
The @Published property wrapper is used to update the views since this is part of an ObservableObject.
This can be updated as follows.
| func centralManagerDidUpdateState(_ central: CBCentralManager) { if central.state == .poweredOn { isSwitchedOn = true } else { isSwitchedOn = false } } |
We also want to have a CBCentralManager to search for peripherals and manage connections. So go ahead and add a variable in the class.
| var myCentral: CBCentralManager! |
Now this gets initialised in the init() function as follows.
| override init() { super.init() myCentral = CBCentralManager(delegate: self, queue: nil) } |
We also want to define the UUIDs that are to be discovered.
| let runningSpeedServiceUUID = CBUUID(string: “1814”) let runningSpeedCharacteristicUUID = CBUUID(string: “2A53”) let heartRateServiceUUID = CBUUID(string: “180D”) let heartRateCharacteristicUUID = CBUUID(string: “2A37”) let thingyServiceUUID = CBUUID(string: “EF680100-9B35-4933-9B10-52FFA9740042”) let thingyWeatherStationServiceUUID = CBUUID(string: “EF680200-9B35-4933-9B10-52FFA9740042”) let thingyTemperationCharacteristicUUID = CBUUID(string: “EF680201-9B35-4933-9B10-52FFA9740042”) |
Our basic BLEController class is now ready although it still doesn’t do much at this point. It should look like this:
| class BLEController: NSObject, ObservableObject, CBCentralManagerDelegate, CBPeripheralDelegate { var myCentral: CBCentralManager! @Published var isSwitchedOn = false let runningSpeedServiceUUID = CBUUID(string: “1814”) let runningSpeedCharacteristicUUID = CBUUID(string: “2A53”) let heartRateServiceUUID = CBUUID(string: “180D”) let heartRateCharacteristicUUID = CBUUID(string: “2A37”) let thingyServiceUUID = CBUUID(string: “EF680100-9B35-4933-9B10-52FFA9740042”) let thingyWeatherStationServiceUUID = CBUUID(string: “EF680200-9B35-4933-9B10-52FFA9740042”) let thingyTemperationCharacteristicUUID = CBUUID(string: “EF680201-9B35-4933-9B10-52FFA9740042”) override init() { super.init() myCentral = CBCentralManager(delegate: self, queue: nil) } func centralManagerDidUpdateState(_ central: CBCentralManager) { if central.state == .poweredOn { isSwitchedOn = true } else { isSwitchedOn = false } } } |
Updating Views with BLE Events
We want to be able to display the values obtained from the sensors on the third screen of our app. These are the running speed, heart rate, and temperature values.
We can do this by having three @Published properties declared in our BLEController class.
| @Published var runningSpeed: UInt16 = 0 @Published var heartRate: UInt16 = 0 @Published var temperature: Float = 0 |
The specific data types are based on the data received from the sensors.
We will update these values when receiving data from the sensors and these, in turn, will result in the UI being updated at places where they are being used.
The other thing we want to do is to connect with specific sensors from the second screen. This is the button action that we need to define.
We need to have a method that can call the scanForPeripherals method of our CBCentralManager instructing it to look for a sensor with specific services.
We can either have three different methods corresponding to each type of sensor or we can just have one method that can carry out the appropriate action. The latter case is a much more neat solution but how do we figure out which sensor to connect with?
One way to do this is to define a specific sensor type. I will do this in a new Swift file called RTSensors.swift where I can keep everything to do with custom sensor models together.
Since we have three sensors we can have three types.
| enum RTSensorType { case speed case heart case environment } |
Now in our BLEController, first add a variable for the sensorType. And define a function called connectToSensor() that takes in the sensor type as an argument.
| var sensorType: RTSensorType! |
| func connectToSensor(type: RTSensorType) { } |
We can call the same function from the Connect buttons on the second screen of the app changing only the type of sensor.
This function will then look at the passed type of sensor and call the scanForPeripherals method with the right set of service UUIDs.
| func connectToSensor(type: RTSensorType) { sensorType = type var serviceUUIDs: [CBUUID] = [] switch sensorType { case .speed: serviceUUIDs = [runningSpeedServiceUUID] case .heart: serviceUUIDs = [heartRateServiceUUID] case .environment: serviceUUIDs = [thingyServiceUUID] case .none: serviceUUIDs = [] } myCentral.scanForPeripherals(withServices: serviceUUIDs, options: nil) } |
Multiple Peripherals Data Model
Before going ahead to perform other BLE communication operations, let’s pause to think about how we are going to keep track of the different peripherals we are going to connect with.
One simple way is to have an array of CBPeripheral so that every time we connect to a new sensor we just append the new CBPeripheral to this array. Imagine we connect to three sensors, we will have an array with three CBPeripheral objects.
But which object corresponds to which sensor? The UUID property of the CBPeripheral object does not correspond to the service UUID and changes on every new connection so it is not possible to tell which element of the array is the heart rate sensor, for example, unless the order was fixed. If we want to disconnect the temperature sensor or read its battery level, how do we know which element to perform this communication with?
To work around this problem we can create another custom data type that has a CBPeripheral and the RTSensorType as its members. We can also have a property for the advertised name of the peripheral as well as a flag to check if it is connected or not. It looks like this (in the RTSensors.swift file).
| struct RTSensor { let peripheral: CBPeripheral let name: String let type: RTSensorType var isConnected: Bool } |
Now, we can have an array of RTSensor instead of an array of CBPeripheral. Add the following to your BLEController.
| @Published var sensors: [RTSensor] = [] |
We have declared it as a published property because we want to use its connection status to update our UI.
If, say, we want to read a value from the temperature sensor, we can look through the array and find the element with the temperature type and then use the CBPeripheral object from that element of the array.
Note that if we have sensors that are of the same type then we will probably end up requiring some other form of uniquely discriminating aspect. But for this tutorial, we can assume that there will only be one type of each sensor hence we can find that and then use it for communication.
Initializing the BLE Controller Class
Now that we have our custom types sorted and have the foundations of our BLE Controller, let’s have a look at how it can be initialized.
In the previous section, I mentioned that we want to be able to connect to the sensors from the second screen and show the values received on the third one. For any data that is to be shared between multiple views, we can use something called an @EnvironmentObject. What this does is allow us to create some data in the parent object and make it available for any of the views in the navigation link.
So what do we want to be available in all the subsequent views? That’s right, we want our BLEController.
Since the parent view is the main ContentView, that is where we create an instance of BLEController and describe it as a @StateObject.
| struct ContentView: View { @StateObject var bleController = BLEController() var body: some View { … } } |
Next, we use the modifier .environmentObject to pass on our BLEController instance to all the other views.
| NavigationView { ZStack { … } .environmentObject(bleController) } |
To access this BLEController instance in the second and third screens, we declare a property as an @EnvironmentObject in both of those views.
| @EnvironmentObject var bleController: BLEController |
Now we can use this bleController from any of the UI views that we have created!
Discovering Peripherals
To start discovering peripherals, we need to call the connectToSensor() method that we created earlier.
Go to the SensorsConnectionView and the call to this method for the button action.
| SensorConnectView( imageName: “figure.walk”, dataName: “Running Speed”, buttonText: “Connect” { bleController.connectToSensor(type: .speed) } |
Here we are passing the sensor type as speed. For the next two, we will pass the heart and environment types respectively.
Now the scanForPeripherals will be called with the correct service UUID since our connectToSensor method calls it with the correct service UUIDs to filter based on the sensor type.
Next, as usual, the didDiscover method of the central manager gets called if we find the sensor with the right service UUID. Add the stub for the didDiscoverMethod.
| func centralManager(_ central: CBCentralManager, didDiscover peripheral: CBPeripheral, advertisementData: [String : Any], rssi RSSI: NSNumber) { … } |
Once this is called, we want to save a reference to the peripheral which has been discovered in our sensors array of type RTSensor.
So in our didDiscover method, the first thing we do is append to sensors.
| sensors.append(RTSensor(peripheral: peripheral, name: peripheral.name ?? “NoName”, type: sensorType, isConnected: false)) |
What we are doing above is passing the discovered peripheral and its name (or NoName in case there isn’t any), setting the sensor type and its connected flag to false (since we aren’t connected yet).
Next, we want to set the delegate of the peripheral object to self and since we have just appended the RTSensor object we can use the last element of the array.
| sensors.last!.peripheral.delegate = self |
Then we stop scanning and attempt to connect to the peripheral we have just discovered.
| central.stopScan() central.connect(sensors.last!.peripheral, options: nil) |
Note that regardless of any peripherals being connected before this will work since we are creating a new CBPeripheral as part of RTSensor every time we discover a new sensor. Of course, to avoid duplication we also want to clean up and remove a certain element if it has been disconnected.
Summary & Closing
There’s still a lot that we haven’t covered yet for a fully functional app. We cover the rest of the implementation in a dedicated course within the Bluetooth Developer Academy, including:
- Connecting to Peripherals
- Discovering Services and Characteristics
- Subscribing to Notifications
- Reading data from sensors
- Canceling Peripheral Connections


