

Introduction
Picture this: you're designing a tiny Bluetooth temperature sensor that needs to run for years on a coin cell battery. You've got 256KB of RAM to work with, and every microamp of current draw matters. Do you really need a full Real-Time Operating System with thread scheduling, memory management, and all the bells and whistles? Or would you be better served by something leaner, meaner, and more predictable?
This is the exact scenario that led Nordic Semiconductor to create the nRF Connect SDK Bare Metal—a streamlined alternative to their standard RTOS-based SDK. It's a recognition that sometimes, less really is more. In this comprehensive guide, we'll explore what makes bare metal development different, when it makes sense to choose it over a full RTOS, and how to make the most of this powerful approach to embedded development.
Whether you're a battle-scarred veteran of the nRF5 SDK looking for a familiar programming model in the modern world, or a developer trying to squeeze every last drop of performance from your BLE application, this guide will help you understand if bare metal is the right choice for your next project.
What is Bare Metal Programming?
The term "bare metal" might conjure images of exposed circuit boards and manual bit manipulation, but the reality is both simpler and more nuanced. At its core, bare metal programming means writing code that runs directly on the hardware without an operating system acting as an intermediary. Your code is in direct conversation with the processor and peripherals, with nothing standing between your instructions and their execution.
Think of it like the difference between driving an automatic and a manual transmission car. With an RTOS (the automatic), you tell the system what you want to do, and it handles the complexity of making it happen. With bare metal (the manual), you have direct control over every gear shift, every clutch engagement. This direct control can be more efficient and predictable, but it also means you're responsible for not stalling the engine.
The Traditional Embedded Development Spectrum
To understand where nRF Connect SDK Bare Metal fits in the embedded development landscape, imagine a spectrum of abstraction levels. At one end, you have full operating systems like Linux or Android, running on powerful processors with gigabytes of RAM. These systems provide rich functionality but come with significant overhead.
Moving along the spectrum, you encounter Real-Time Operating Systems like FreeRTOS, Zephyr, or ThreadX. These are designed specifically for embedded systems, offering task scheduling and resource management while maintaining reasonable resource usage. They're the sweet spot for many complex embedded applications.
Further along, we find bare metal programming with libraries—this is where nRF Connect SDK Bare Metal lives. You're working directly with the hardware, but you still have access to well-tested libraries for common tasks. It's like cooking from scratch but still using pre-made spice blends.
At the far end of the spectrum is pure bare metal programming: direct register manipulation with no abstractions whatsoever. This approach is rarely necessary in modern development unless you're doing something truly exotic or working with bleeding-edge silicon.
Why Bare Metal for Bluetooth LE?
Here's where things get interesting. Bluetooth LE was designed from the ground up for low-power, simple devices. The protocol itself is event-driven: advertisements go out, connections come in, data gets exchanged, and then devices go back to sleep. This natural rhythm aligns perfectly with bare metal's event-driven programming model.
Consider a typical BLE peripheral device like a heart rate monitor. Its life consists of long periods of sleep punctuated by brief moments of activity: read sensor, update characteristic value, notify connected device, go back to sleep. This pattern doesn't need complex thread scheduling or priority management. In fact, adding an RTOS to such a simple flow pattern is like using a sledgehammer to crack a nut—it works, but it's overkill.
The advantages of bare metal for BLE applications go beyond just philosophical alignment. When you remove the RTOS layer, you eliminate kernel overhead, thread stacks, and scheduling delays. Memory that would have been consumed by OS structures becomes available for your application. Power consumption drops because there's no idle thread spinning in the background. Interrupt response times become more predictable because there's no scheduler deciding whether your interrupt handler should run now or after the current thread's time slice expires.
The nRF Connect SDK Architecture
To truly appreciate what makes the Bare Metal variant special, we need to understand how the standard nRF Connect SDK is structured. It's a bit like understanding the architecture of a modern apartment building before appreciating the elegance of a tiny house.
Standard nRF Connect SDK
The standard nRF Connect SDK is built on top of Zephyr RTOS, which is itself a fascinating piece of engineering. Zephyr is to embedded systems what a Swiss Army knife is to tools—incredibly versatile and packed with features. When you build an application with the standard SDK, you're getting a full technology stack that looks something like this:
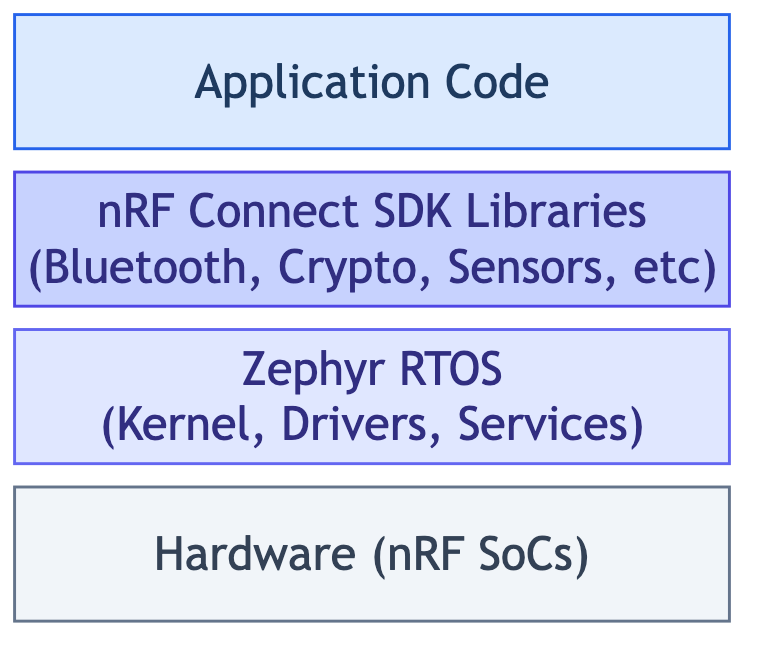
This layered approach brings tremendous power to your fingertips. The Zephyr kernel provides preemptive multithreading, allowing you to structure your application as multiple independent tasks that appear to run simultaneously. Device drivers offer a unified API for hardware peripherals, meaning your GPIO code can work across different Nordic chips with minimal changes. The network stacks support not just Bluetooth, but also Thread, Zigbee, and other protocols. You even get file system support if you need to store configuration data or logs.
All of this functionality is fantastic when you need it. But here's the thing—what if you don't? What if your application is a simple temperature sensor that wakes up every minute, takes a reading, and goes back to sleep? In that case, you're carrying around a lot of baggage you'll never use, and that baggage costs you in terms of RAM, flash, and power consumption.
nRF Connect SDK Bare Metal
This is where the Bare Metal variant comes in. Nordic's engineers asked themselves: what if we could keep all the good parts of the modern nRF Connect SDK—the build system, the hardware abstraction layer, the battle-tested Bluetooth stack—while stripping away the complexity of the RTOS? The result is an architecture that looks more like this:
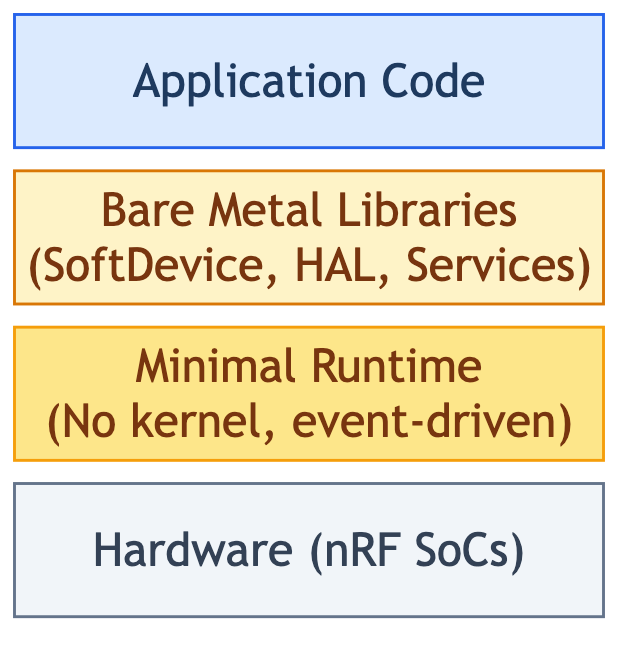
The magic happens with a simple configuration change: CONFIG_KERNEL=n. This single line transforms your Zephyr application into a bare-metal powerhouse, stripping away the RTOS kernel while keeping all the peripheral drivers and hardware abstraction layers you need.
The SoftDevice deserves special mention here. It's Nordic's proprietary Bluetooth stack that has been refined over many years and millions of deployed devices. By using the SoftDevice in bare metal mode, you get all the benefits of a proven, certified Bluetooth implementation without the overhead of an RTOS. The SoftDevice handles all the complex timing requirements of the Bluetooth protocol, leaving your application code to focus on business logic.
Deep Dive: Technical Differences
Now let's roll up our sleeves and examine what really changes when you flip that CONFIG_KERNEL switch. The differences go far deeper than just removing a few kilobytes of kernel code.
Memory Management
Memory is often the scarcest resource in embedded systems, and how you manage it can make or break your project. In the standard SDK, memory management follows a familiar pattern if you've worked with any RTOS. The kernel maintains its own data structures for managing threads, semaphores, mutexes, and other synchronization primitives. Each thread gets its own stack, sized according to its needs (or your best guess at its needs). The main thread might use 2KB, your Bluetooth handling thread another 4KB, and various system threads consume their own allocations.
All told, before your application even starts doing useful work, you've committed somewhere around 40KB of RAM just to infrastructure. On a high-end nRF chip with megabytes of RAM, this might be a rounding error. But on a cost-optimized part with 256KB total, you've just spent 15% of your budget on overhead.
The bare metal approach takes a radically different view. There's only one stack because there's only one thread of execution. The kernel data structures? Gone. Thread stacks? Not needed. Memory protection units? Optional, but usually disabled for simplicity. The result is dramatic: that same "hello world" BLE peripheral that needed 40-50KB in the standard SDK runs happily in 20-25KB with bare metal.
But this efficiency comes with responsibility. In the RTOS world, if you overflow a thread's stack, the kernel might catch it (especially with MPU enabled). In bare metal, a stack overflow means you're writing into whatever happens to be next in memory, leading to mysterious crashes that only happen on Tuesdays when the moon is full. You need to be more careful about stack usage, more deliberate about memory allocation, and more paranoid about buffer overflows.
Execution Model
The execution model is where the philosophical differences between RTOS and bare metal become most apparent. In the standard SDK, you think in terms of tasks and threads. Your application might have a main thread handling user interface, a sensor thread periodically reading data, and a Bluetooth thread managing connections. Each thread has its own priority, its own stack, and its own illusion of running independently.
// Multiple threads with different priorities
void main_thread(void) {
    while (1) {
        process_user_input();
        k_sleep(K_MSEC(100));
    }
}

void sensor_thread(void) {
    while (1) {
        read_sensor_data();
        k_sem_give(&data_ready);
        k_sleep(K_SECONDS(1));
    }
}

void ble_thread(void) {
    while (1) {
        k_sem_take(&data_ready, K_FOREVER);
        send_ble_notification();
    }
}
This multi-threaded approach is intuitive if you're coming from desktop or server programming. Each thread handles one concern, communication happens through well-defined mechanisms like semaphores, and the kernel ensures everyone gets their fair share of CPU time. It's elegant, it scales well to complex applications, and it's relatively easy to reason about—until it isn't.
The bare metal approach throws all of this out the window in favor of a simpler model: one thread, one loop, handle events as they come. Your entire application becomes a state machine that responds to stimuli:
// Single execution context with event handling
int main(void) {
    initialize_system();

    while (1) {
        // Process any pending log messages
        LOG_PROCESS();

        // Handle events
        if (sensor_data_ready) {
            process_sensor_data();
            queue_ble_notification();
            sensor_data_ready = false;
        }

        if (ble_event_pending) {
            handle_ble_event();
            ble_event_pending = false;
        }

        // Sleep until next event
        __WFE();
    }
}
At first glance, this might seem primitive—and in a way, it is. But this simplicity brings powerful benefits. There's no context switching overhead because there's only one context. There are no priority inversions because there are no priorities. There's no risk of deadlock because there are no locks. The flow of execution is completely predictable: events happen, you handle them, you go to sleep.
The __WFE() instruction at the bottom of the loop is particularly important. This ARM instruction (Wait For Event) puts the processor into a low-power state until an interrupt occurs. Unlike a busy-wait loop that burns power checking flags, WFE allows the processor to essentially shut down until something interesting happens. This is the secret sauce that enables bare metal applications to achieve such impressive power consumption figures.
Interrupt Handling
Interrupt handling is where bare metal really shines—or where it can really bite you, depending on your perspective. In the standard SDK, interrupts travel through several layers of abstraction. When a GPIO pin changes state or a timer expires, the hardware generates an interrupt that's caught by Zephyr's interrupt handling framework. This framework does important bookkeeping: saving context, potentially waking threads, and deciding if a reschedule is needed. All of this takes time—typically 2-5 microseconds from interrupt assertion to your handler running.
For many applications, a few microseconds of latency doesn't matter. But what if you're implementing a custom protocol that needs to respond within a microsecond? What if you're bit-banging a communication interface? What if you're building a motor controller where those extra microseconds mean the difference between smooth operation and jerky movement?
Bare metal gives you direct access to the interrupt vectors. When you enable CONFIG_ZERO_LATENCY_IRQS, your interrupt handlers run immediately, with no framework overhead. We're talking 12-20 CPU cycles from interrupt assertion to the first instruction of your handler—that's under 200 nanoseconds on a 64MHz processor. It's the difference between a sports car and a rocket ship.
But with great power comes great responsibility. In the RTOS world, you can do quite a bit in an interrupt handler because the kernel will clean up after you. In bare metal, your interrupt handler needs to be lean and mean. Get in, do the absolute minimum necessary, set a flag for the main loop to handle the rest, and get out. Spending too long in an interrupt handler can cause you to miss other interrupts or interfere with the SoftDevice's critical timing.
Bluetooth Implementation
The approach to Bluetooth programming reveals another fundamental difference in philosophy between the two SDKs. The standard SDK uses Zephyr's Bluetooth API, which provides a high-level, portable interface to Bluetooth functionality. It's designed to work across different Bluetooth controllers and even different hardware platforms:
// Zephyr Bluetooth API
static void connected(struct bt_conn *conn, uint8_t err) {
    if (err) {
        LOG_ERR("Connection failed (err 0x%02x)", err);
    } else {
        LOG_INF("Connected");
    }
}

static struct bt_conn_cb conn_callbacks = {
    .connected = connected,
    .disconnected = disconnected,
};

int main(void) {
    bt_enable(NULL);
    bt_conn_cb_register(&conn_callbacks);
    bt_le_adv_start(BT_LE_ADV_CONN_NAME, ad, ARRAY_SIZE(ad), NULL, 0);
    return 0;
}
This code is clean, readable, and portable. The callback-based architecture is familiar to anyone who's done event-driven programming. The API abstracts away the details of how Bluetooth actually works, letting you focus on your application logic.
The bare metal approach uses Nordic's SoftDevice API directly, which is more verbose but also more explicit about what's happening:
// SoftDevice event-driven API
static void on_ble_evt(ble_evt_t const *p_ble_evt) {
    switch (p_ble_evt->header.evt_id) {
        case BLE_GAP_EVT_CONNECTED:
            m_conn_handle = p_ble_evt->evt.gap_evt.conn_handle;
            LOG_INF("Connected");
            break;

        case BLE_GAP_EVT_DISCONNECTED:
            m_conn_handle = BLE_CONN_HANDLE_INVALID;
            LOG_INF("Disconnected");
            start_advertising();
            break;

        default:
            break;
    }
}

int main(void) {
    softdevice_init();
    ble_stack_init();
    gap_params_init();
    services_init();
    advertising_init();
    start_advertising();

    while (true) {
        LOG_PROCESS();
        softdevice_evt_get_and_dispatch();
        power_manage();
    }
}
At first glance, this might seem like a step backward. The event handling is more manual, the initialization is more explicit, and you're dealing with lower-level concepts like connection handles. But this explicitness is actually a feature, not a bug. You know exactly when events are processed (when you call softdevice_evt_get_and_dispatch), you have direct control over power management, and there's no hidden magic happening behind the scenes.
For developers coming from the nRF5 SDK, this pattern will feel like coming home. It's the same event-driven model they've been using for years, just with updated APIs for the newer chips.
Real-World Use Cases and Examples
Theory is all well and good, but let's talk about real devices that you might find in your pocket, on your wrist, or mounted on industrial equipment. Understanding these practical examples will help you recognize which approach fits your next project.
Ideal Bare Metal Use Cases
Let me paint you a picture of where bare metal truly excels. Imagine you're designing a temperature sensor for a cold chain logistics company. This sensor needs to sit in a shipping container for months, waking up every few minutes to check if the vaccines or food products are still at the right temperature. When it detects a problem, it needs to immediately broadcast an alert via BLE to any nearby smartphones or gateways.
This is bare metal's sweet spot. The device spends 99.9% of its time sleeping, wakes up just long enough to read a sensor and make a decision, then goes back to sleep. There's no need for multiple threads because nothing happens concurrently. The entire application logic fits in a simple state machine: sleep, wake, measure, decide, potentially advertise, sleep again. With bare metal, this device might run for two years on a coin cell. With a full RTOS, you'd be lucky to get 18 months.
Or consider the humble BLE beacon—those little devices that retailers use to send you coupons when you walk past the shoe department. A beacon does exactly one thing: broadcast a UUID at regular intervals. That's it. No connections, no data exchange, no complex logic. Implementing this with a full RTOS is like hiring a symphony orchestra to play "Happy Birthday"—technically correct but absurdly overwrought. Bare metal lets you implement a beacon in a few hundred lines of code that will run for years on a tiny battery.
Fitness trackers represent another perfect use case. The basic ones that count steps and monitor heart rate follow a predictable pattern: sample accelerometer at 50Hz, run step detection algorithm, update count, occasionally sync with phone. The heart rate measurement happens on demand when the user checks their wrist. Everything is event-driven: accelerometer interrupt triggers step counting, button press triggers heart rate measurement, BLE connection event triggers data sync. The bare metal model maps perfectly to this flow.
Industrial sensors often choose bare metal for a different reason: simplicity equals reliability. When you're monitoring vibration on a critical pump in a chemical plant, you don't want your sensor crashing because of a priority inversion or stack overflow in some auxiliary thread. You want dead-simple code that does one thing well and never fails. Bare metal's straightforward execution model makes it easier to analyze, test, and validate.
When to Choose Standard nRF Connect SDK
Now let's flip the script and talk about when you absolutely need the full power of the standard SDK. Consider an IoT gateway that bridges between BLE devices and the cloud. This device might be managing connections to dozens of BLE sensors while simultaneously maintaining a cellular or Wi-Fi connection to the internet. It needs to buffer data when the network is down, manage a local web server for configuration, and handle firmware updates for both itself and the connected sensors.
This is where an RTOS shines. You've got genuinely concurrent activities that need different priorities and resources. The thread handling cellular communications can't block the thread processing BLE events. The web server needs to respond to requests while data logging continues in the background. Trying to implement this in a single event loop would be like juggling chainsaws—theoretically possible but practically inadvisable.
Modern smartwatches push the envelope even further. They're running multiple sensors continuously: accelerometer for activity tracking, heart rate monitor for health metrics, GPS for run tracking, and maybe even an SpO2 sensor. They're displaying rich graphics on an OLED screen, handling touch input, managing music playback, and syncing with a phone. Oh, and users expect the battery to last at least a day or two.
This level of complexity demands an RTOS. You need separate threads for sensor fusion, UI rendering, and communication. You need priority scheduling to ensure the UI stays responsive even when the GPS is working hard to get a fix. You need the sophisticated power management that comes with an RTOS to selectively shut down subsystems when they're not needed.
Medical devices often require an RTOS not just for technical reasons but for regulatory ones. When you're building a continuous glucose monitor, you need to guarantee that critical alerts are delivered within a specific timeframe. You need extensive logging for FDA compliance. You need redundancy and error recovery mechanisms. The RTOS provides the infrastructure to build these safety-critical features with confidence.
BLE Mesh networks represent another clear win for the full SDK. In a mesh network, your device isn't just a simple peripheral—it's a router, forwarding messages for other nodes. It needs to maintain routing tables, handle message queuing, and manage multiple simultaneous connections. The complexity ramps up quickly, and trying to handle it all in a single event loop would be a nightmare.
Migration Strategies
If you're reading this guide, chances are you're in one of two camps: either you're maintaining a product built with the legacy nRF5 SDK and wondering about the migration path, or you're starting a fresh project and trying to decide which approach to take. Let's address both scenarios.
Migrating from nRF5 SDK to Bare Metal
For those of you who've been in the Nordic ecosystem for a while, the nRF5 SDK feels like an old friend. You know its quirks, you've memorized its APIs, and you've probably got a collection of battle-tested code that's been shipping in products for years. The good news is that the Bare Metal variant of nRF Connect SDK was designed with you in mind.
The programming model will feel instantly familiar. You've still got your main loop with event processing. The SoftDevice is still there, handling all the complex Bluetooth timing. You're still working directly with the hardware through Nordic's HAL. In many ways, it's like the nRF5 SDK grew up, went to college, and came back with some new ideas but the same fundamental personality.
But there are differences, and pretending otherwise would be disingenuous. The biggest shock will be the build system. Gone are the days of Makefiles and sdk_config.h. In their place, you'll find CMake and West (Zephyr's meta-tool for managing repositories) along with Kconfig for configuration and Devicetree for hardware description. If those terms make you nervous, take a deep breath—they're not as scary as they sound.
Here's the migration path that's worked well for teams I've helped:
First, get comfortable with the new build system. Don't try to port your entire application on day one. Instead, create a simple "hello world" BLE peripheral using the bare metal SDK. Get it building, get it running on your development board, and get familiar with the workflow. The commands look like this:
west init -m https://github.com/nrfconnect/sdk-nrf-bm west update
Once you're comfortable with the basics, start porting your peripheral drivers. The good news is that the underlying hardware hasn't changed—a GPIO is still a GPIO. The APIs have evolved, but the concepts map directly. Your nrf_drv_gpiote_in_config becomes nrf_gpio_cfg_input, but it's doing the same thing under the hood.
The SoftDevice migration is surprisingly smooth. Nordic has maintained API compatibility where it makes sense, so your BLE event handlers will need only minor tweaks. The biggest changes are in the initialization sequence and some of the configuration structures, but your core application logic can remain largely intact.
The modern build system actually becomes an asset once you embrace it. Kconfig gives you a cleaner way to manage feature flags than the old sdk_config.h. Devicetree provides a standardized way to describe your hardware that's more maintainable than scattered #defines. And CMake, for all its complexity, is more powerful and flexible than Make once you climb the learning curve.
Starting Fresh with Bare Metal
If you're starting a new project, you have the luxury of doing things right from the beginning. Here's the approach I recommend, learned from both successes and painful failures:
Start by thinking about your application as a state machine. What states can your device be in? What events cause transitions between states? This mental model maps perfectly to bare metal's event-driven architecture. Draw it out on a whiteboard, argue about it with your team, and get it right before you write a single line of code.
Memory planning might seem premature when you're just starting, but it's crucial for bare metal development. Make a spreadsheet. Budget RAM for your application data, your stack, the SoftDevice, and leave a healthy margin for the things you haven't thought of yet. It's much easier to optimize memory usage from the start than to frantically search for bytes when you're running out.
Power optimization isn't something you bolt on at the end—it needs to be part of your architecture from day one. Every decision should be viewed through the lens of power consumption. Do you really need to sample that sensor every second, or would every five seconds work? Can you batch your BLE notifications to reduce radio on-time? Can you use the peripheral's hardware features like PPI (Programmable Peripheral Interconnect) to handle routine tasks without waking the CPU?
Your testing strategy for bare metal needs to be different too. Without an RTOS to catch your mistakes, you need to be more rigorous. Unit test your business logic separately from your hardware interactions. Implement defensive programming practices—check your inputs, validate your assumptions, and always have a plan for when things go wrong. Because in embedded development, things always go wrong, usually at 3 AM in a customer's deployment.
Performance Considerations
Numbers don't lie, so let's look at the hard data. But more importantly, let's understand what these numbers mean for your product.
Latency Analysis
Interrupt latency is one of those specifications that doesn't matter until it really, really matters. In the standard SDK, when a hardware event triggers an interrupt, your code doesn't run immediately. First, the processor has to save its current context. Then Zephyr's interrupt handling framework kicks in, doing its bookkeeping. It might need to wake a thread, which triggers the scheduler, which needs to decide if a context switch is necessary. By the time your interrupt handler actually runs, you're looking at 100-300 CPU cycles—about 2-5 microseconds on a typical 64MHz processor.
For most applications, 5 microseconds is nothing. Humans can't perceive anything that fast. Even most sensors and communication protocols are perfectly happy with that response time. But what if you're not "most applications"?
Imagine you're implementing a custom protocol that bit-bangs data over GPIO. At 1 Mbps, each bit is only 1 microsecond wide. A 5-microsecond interrupt latency means you've missed five bits before your handler even starts. Game over.
Or consider a motor control application where you're implementing field-oriented control. The difference between 200 nanoseconds and 5 microseconds of interrupt latency might be the difference between smooth, efficient operation and a motor that sounds like it's grinding coffee beans.
Bare metal's zero-latency interrupts change the game. We're talking 12-20 CPU cycles from interrupt assertion to your handler running. At 64MHz, that's about 200 nanoseconds. Your interrupt handler can respond to events almost as fast as dedicated hardware. This opens up possibilities that simply aren't feasible with an RTOS.
Power Consumption Profiles
Power consumption in embedded systems is like compound interest—small differences add up over time. Let's look at a realistic example: a temperature sensor that wakes up every minute to take a reading.
With bare metal, the device draws about 1.5μA in deep sleep mode using the WFE (Wait For Event) instruction. When it wakes up, it draws 5mA for about 100 milliseconds to read the sensor, process the data, and potentially send a BLE advertisement. The math works out to:
- Sleep current: 1.5μA for 59.9 seconds = 89.85μA·s
- Active current: 5mA for 0.1 seconds = 500μA·s
- Average current: (89.85 + 500) / 60 = 9.83μA
With the standard SDK, idle current is higher—about 3μA—because the kernel is maintaining timer queues and other data structures even when all threads are sleeping. Same active current and duration:
- Sleep current: 3μA for 59.9 seconds = 179.7μA·s
- Active current: 5mA for 0.1 seconds = 500μA·s
- Average current: (179.7 + 500) / 60 = 11.33μA
That's only a 1.5μA difference, which might not seem like much. But let's see what it means for battery life. With a typical CR2032 coin cell (230mAh capacity):
- Bare Metal: 230mAh / 9.83μA = 23,400 hours = 2.67 years
- Standard SDK: 230mAh / 11.33μA = 20,300 hours = 2.32 years
That's four months of additional battery life—the difference between a product that lasts "over two years" versus one that dies just before the two-year mark. In consumer products, that distinction matters.
Code Size Comparison
Flash memory might be cheap, but it's not free. Every kilobyte of flash adds to your bill of materials, and in high-volume products, those pennies add up to real money. Plus, smaller code often means faster execution and lower power consumption during flash reads.
Here's what I've seen in real-world applications:
A minimal BLE peripheral (think a simple sensor that advertises data) implemented in bare metal typically compiles to about 120KB of flash and uses 20KB of RAM. The same functionality with the standard SDK comes in around 150KB flash and 40KB RAM. That's 25% more flash and 100% more RAM for essentially the same functionality.
The gap narrows as applications get more complex. A sophisticated BLE central device (like a gateway that connects to multiple peripherals) might be 180KB/35KB in bare metal versus 220KB/60KB with the full SDK. The overhead becomes a smaller percentage of the total.
But here's the thing: most BLE devices aren't sophisticated gateways. They're simple sensors, beacons, and peripherals where every byte counts. If you can fit your application in a chip with 256KB flash instead of 512KB, or 64KB RAM instead of 128KB, you've just saved significant money on every unit you manufacture.
Advanced Topics
Now let's venture into the deep end of the pool—the advanced techniques that separate good bare metal developers from great ones.
Bare Metal with SoftDevice Optimization
The SoftDevice is Nordic's secret weapon, and learning to work with it rather than against it is key to building efficient BLE applications. Think of the SoftDevice as a very specialized coprocessor that handles all the time-critical aspects of Bluetooth. Your job is to stay out of its way while still getting your work done.
Connection parameters are your first lever for optimization. Most developers just copy-paste connection parameters from examples without understanding their impact. But these parameters fundamentally determine your power consumption and latency trade-offs:
// Optimize for power with longer connection intervals static ble_gap_conn_params_t const conn_params = { .min_conn_interval = MSEC_TO_UNITS(100, UNIT_1_25_MS), .max_conn_interval = MSEC_TO_UNITS(200, UNIT_1_25_MS), .slave_latency = 4, .conn_sup_timeout = MSEC_TO_UNITS(4000, UNIT_10_MS) };
What do these numbers mean? The connection interval determines how often the devices talk to each other. At 100-200ms intervals with slave latency of 4, your device only needs to wake up every 400-800ms if there's no data to exchange. That's the difference between waking up 100 times per minute and waking up 7 times per minute. Your battery will thank you.
The Radio Notification API is a lesser-known feature that can be a game-changer for certain applications. It lets you know when the radio is about to be used:
// Get notified before radio events for time-critical operations
sd_radio_notification_cfg_set(
    NRF_RADIO_NOTIFICATION_TYPE_INT_ON_ACTIVE,
    NRF_RADIO_NOTIFICATION_DISTANCE_800US
);
Why would you want this? Imagine you're sampling an analog sensor that's sensitive to radio interference. By getting notified 800 microseconds before radio activity, you can pause your sampling, avoiding noisy readings. Or maybe you have a time-critical operation that can't be interrupted—schedule it between radio events.
Even more advanced is the timeslot API, which lets you run proprietary protocols alongside BLE. Yes, even in bare metal, you can have your device speaking BLE to smartphones while simultaneously running a custom 2.4GHz protocol to talk to your proprietary sensors. The SoftDevice handles the complex scheduling, ensuring both protocols get their fair share of radio time without stepping on each other.
Debugging Bare Metal Applications
Debugging bare metal applications is an art form. Without an RTOS to provide nice stack traces and thread information, you need to be more creative. But the constraints of bare metal often lead to better debugging practices.
First, let's talk about logging. In the RTOS world, you might be tempted to sprinkle printf statements everywhere. In bare metal, that's a recipe for disaster. Printf is blocking, uses tons of stack space, and can completely change your application's timing. Instead, use Nordic's deferred logging system:
// Lightweight logging that doesn't block LOG_INF("Sensor value: %d", reading); // Processes in main loop, not interrupt context
This logging system buffers messages in a ring buffer and processes them in your main loop when there's time. It's the difference between your interrupt handler taking 10 microseconds versus 10 milliseconds.
Hardware breakpoints become more critical in bare metal because software breakpoints can disturb timing-sensitive code. But use them sparingly:
// Use hardware breakpoints sparingly __BKPT(0); // Breakpoint with immediate value
Most ARM cores have only 4-6 hardware breakpoints. Use them wisely on the truly mysterious bugs, not for routine debugging.
My favorite bare metal debugging technique is what I call "GPIO debugging." It's primitive but incredibly effective:
// Toggle pins to measure timing nrf_gpio_pin_set(DEBUG_PIN); critical_function(); nrf_gpio_pin_clear(DEBUG_PIN); // Measure with oscilloscope
Hook up an oscilloscope or logic analyzer, and you can see exactly how long functions take, when interrupts fire, and where your code is spending its time. It's like having X-ray vision into your application's behavior. Plus, unlike printf debugging, it has minimal impact on your code's timing.
Common Pitfalls and How to Avoid Them
Let me share some war stories—the kinds of bugs that will have you questioning your career choices at 2 AM. These are the pitfalls I've seen talented developers fall into, and more importantly, how to avoid them.
1. Stack Overflow
In the RTOS world, each thread has its own stack, and if you're lucky, the kernel might even detect overflows for you. In bare metal, you have one stack for everything, and when it overflows, you're writing into random memory. The symptoms are bizarre: variables that change mysteriously, functions that work fine until you add one more local variable, crashes that only happen when certain combinations of functions are called.
I once spent three days debugging a device that would crash, but only when it received a BLE connection while processing sensor data during a timer interrupt. The root cause? The combined stack usage of nested interrupts was exceeding our allocated stack space by exactly 8 bytes. Those 8 bytes happened to contain a critical pointer, and corruption led to a crash minutes later in completely unrelated code.
The solution is disciplined stack management. First, calculate your worst-case stack usage analytically. Add up your deepest function call chain, factor in local variables, and don't forget interrupt nesting. Then add 25% margin because your analysis will miss something.
During development, use stack painting—fill your stack with a known pattern at startup, then periodically check how much has been overwritten. It's like a high-water mark for your stack usage. And always, always leave margin for the unexpected.
2. Event Queue Overflow
Without an OS managing your queues, it's easy to design yourself into a corner. I've seen systems where the event queue was sized for "normal" operation, but nobody thought about what happens during a BLE connection event storm or when a chattering button generates hundreds of events per second.
The symptom is usually silent event loss. Your device just stops responding to certain inputs, or BLE notifications mysteriously disappear. By the time you notice, the queue has already overflowed and recovered, leaving no trace of what happened.
The fix is defensive design. Size your queues for the worst case, not the average case. Implement overflow detection that logs a warning (or sets an error flag) when the queue gets close to full. Consider implementing back-pressure—if the queue is full, can you disable the interrupt source temporarily? And always use power-of-two sizes for circular buffers; the modulo operation becomes a simple bit mask, saving precious cycles.
3. Timing Conflicts
The SoftDevice is possessive about timing. It needs to handle radio events at precise moments, and if your code is busy doing something else, bad things happen. The symptoms range from increased power consumption (missed connection events lead to supervision timeouts) to complete connection failures.
I learned this the hard way with a product that worked perfectly on the bench but failed intermittently in the field. Turns out, our temperature compensation algorithm would occasionally take just long enough to cause the SoftDevice to miss a connection event. The fix was simple once we understood the problem: break the algorithm into smaller chunks and check for pending SoftDevice events between chunks.
The key is respecting the SoftDevice's timing requirements. Use the radio notification API to know when to get out of the way. Keep your interrupt handlers short. If you must do long calculations, break them into chunks and yield to the event loop periodically. And never, ever use busy-wait delays in bare metal—use timer callbacks instead.
4. Power Management Mistakes
This is the silent killer of battery life. Your code works perfectly, but the battery dies in days instead of years. You measure current consumption and find it's 10x higher than expected. What went wrong?
Usually, it's forgetting to sleep properly. That innocent-looking empty while loop? It's burning power continuously. That GPIO you configured as an output but left floating? It's drawing current. That peripheral you initialized but aren't using? Its clock is still running.
The solution is systematic power management. Your main loop should always end with __WFE() or equivalent sleep instruction. Before sleeping, ensure all unused peripherals are clock-gated. Configure unused GPIOs as inputs with pull-up/down to avoid floating pins. And invest in a good power profiler—you can't optimize what you can't measure.
Future of Bare Metal in nRF Connect SDK
The embedded development landscape is constantly evolving, and Nordic Semiconductor's roadmap reflects a nuanced understanding that one size doesn't fit all. What excites me about the future of bare metal development isn't just the technology—it's the recognition that simplicity and efficiency still matter in our increasingly complex world.
Looking ahead, I see several trends emerging. First, we're likely to see more protocol stacks adapted for bare metal use. Today, it's primarily Bluetooth LE via the SoftDevice, but imagine bare metal implementations of Thread, Zigbee, or even simplified TCP/IP stacks for specific use cases. The challenge will be maintaining the simplicity that makes bare metal attractive while adding these capabilities.
Migration tools are another area ripe for innovation. Converting a legacy nRF5 SDK project to nRF Connect SDK Bare Metal is currently a manual process, but I wouldn't be surprised to see automated tools that can analyze your old code and generate a skeleton project with the appropriate Kconfig and devicetree settings. It won't be perfect, but it could dramatically reduce the migration burden.
Perhaps most intriguing is the possibility of hybrid approaches. Imagine being able to selectively enable RTOS features—maybe you want just the scheduler for one specific use case, or just the memory protection unit for critical sections. This "à la carte" approach could give developers the best of both worlds: bare metal efficiency with RTOS features where they add value.
Better profiling tools are desperately needed. Today, understanding where your bare metal application spends its time and power requires external equipment and manual analysis. Integrated profiling that can track power consumption, interrupt latency, and stack usage in real-time would be a game-changer for optimization work.
Conclusion
After thousands of words exploring the intricacies of bare metal versus RTOS development, let me leave you with this thought: the best solution is the one that solves your problem elegantly, efficiently, and maintainably.
The nRF Connect SDK Bare Metal isn't just a nostalgic nod to simpler times—it's a recognition that for many real-world applications, simplicity is a feature, not a limitation. When you strip away the layers of abstraction, you're left with code that's predictable, efficient, and understandable. For the right applications, that's incredibly powerful.
But let's be honest: bare metal isn't always the answer. If you're building a complex system with multiple concurrent activities, sophisticated user interfaces, or rich networking requirements, the standard nRF Connect SDK with Zephyr RTOS is probably the better choice. The overhead you pay in RAM and power consumption buys you powerful abstractions that can dramatically accelerate development and improve reliability.
The key is making an informed decision based on your specific requirements. If you're building a simple BLE peripheral that needs to run for years on a battery, bare metal's efficiency is compelling. If you're creating a gateway device that juggles multiple protocols and complex business logic, the RTOS's task management and abstraction layers will save you months of development time.
What excites me most about Nordic's approach is that they're not forcing you to choose sides. Both options are actively developed, well-documented, and supported. You can start with bare metal for a simple proof of concept and migrate to the full SDK if your requirements grow. Or you can prototype quickly with the full SDK and then optimize down to bare metal for production.
In my years of embedded development, I've learned that dogma is the enemy of good engineering. Use the right tool for the job, understand the trade-offs, and always keep the end user in mind. Whether that tool is bare metal or RTOS, what matters is shipping products that work reliably, efficiently, and delight your users.
Additional Resources
Your journey with nRF Connect SDK Bare Metal doesn't end here. The Nordic ecosystem is rich with resources to help you succeed:
The official nRF Connect SDK Documentation should be your first stop. It's comprehensive, well-maintained, and includes both conceptual guides and API references. Don't skip the getting started guides—even experienced developers will find nuggets of wisdom there.
For deep technical details about the SoftDevice and chip specifications, the Nordic InfoCenter is invaluable. This is where you'll find timing diagrams, register descriptions, and the nitty-gritty details you need for advanced optimizations.
The Nordic DevZone community forum is where the magic happens. Nordic's engineers actively participate, and the community is generally helpful and knowledgeable. Before posting a question, search the archives—chances are someone has faced your exact issue before.
Don't overlook the example projects in the SDK's samples/ directory. These aren't just toy examples—they're production-quality code that demonstrates best practices. Start with these examples and modify them for your needs rather than starting from scratch.
For those migrating from nRF5 SDK, the migration guides in the official documentation are essential reading. They'll save you days of head-scratching by highlighting the key differences and providing translation tables for common operations.
Finally, remember that embedded development is a journey, not a destination. The tools, techniques, and best practices continue to evolve. Stay curious, keep learning, and don't be afraid to question conventional wisdom. Sometimes the best solution is the one that breaks the rules—as long as you understand why the rules existed in the first place.
Happy coding, and may your devices run for years on a single battery!


